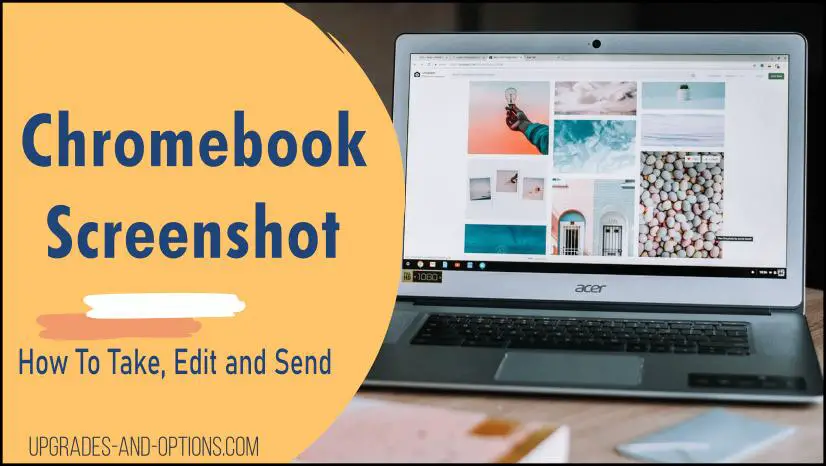
I explain how to screenshot on Chromebook to take, edit, and send them in this article.
If you are new to Chromebooks and Chrome OS, you may still be learning all the functionality and key shortcuts. The good news is that Chrome OS makes just about all tasks easy for users to perform. I thought I’d explain the various ways for you to take a screenshot, how you can edit it, and finally how to send it out.
Keep reading for the full details on how you can take, send and edit screenshots on your own Chromebook. Plus, tips on resolving problems and why you may be having issues taking a screenshot will also be covered.
In addition, I’ll cover some common issues you may have with trying to take a screenshot and how to resolve them.
How To Screenshot On Chromebook
How to screenshot on Chromebook:
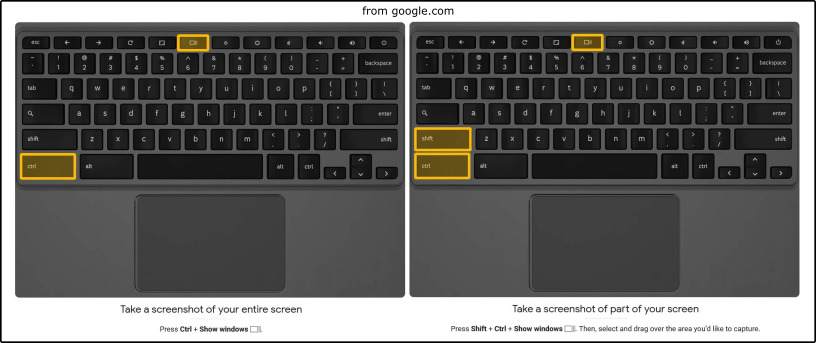
For a full-screen screenshot, press Ctrl+Show Windows keys.
For a partial screenshot, press Ctrl+Shift+Show Windows keys.
If you want a full-screen screenshot on Chromebook, you simply Press the Ctrl+Show Windows keys at the same time. Everything that is showing on your display will be captured, as you would expect.
But if you prefer a partial-screen screenshot on Chromebook, then you Press the Ctrl+Shift+Show Windows keys all at the same time. Next, you will drag a box around what you want to capture using the cursor.
If you are using an external keyboard, you will substitute the Show Windows key for the external keyboard’s F5 key.
With both these methods, a small box will display at the bottom right of your screen showing the captured image. You can click on this image to open its folder.
Note: the screenshot will be captured as a .png image file.
There are apps(extensions) available from the Chrome Store specifically for taking and editing screenshots. If you would like to check them out, one popular app is called: ScreenShot Capture & Editor Tool.
Tip: Many tablets allow you to use the power button plus the volume down button for a screenshot.
Related: Check out my article on the Lenovo Chromebook C330 2-in-1 Convertible Laptop
and if you are interested in a new laptop, read Laptop Buying Guide – How To Choose
Where Do I Find My Screenshots On A Chromebook?
By default, your screenshot will be saved in your downloads folder. This can be found by clicking or selecting the launcher button on the lower right of the screen. It’s the one that looks like a big white dot.
Then click on the up arrow and select the files folder. From there, double-click to open the downloads folder.
Your screenshot will be labeled: Screenshot(date)(time).png
Screenshots are found under files > downloads
How To Change Default Download Location On Chromebooks
If you would like to change the download folder for files on your Chromebook, you just need to edit the settings.
- Open Chrome
- At the top right, select More
Settings.
- Scroll to the bottom, select Advanced.
- Under ‘Downloads’, change the location to your preference.
Note: You can choose to save the file directly to your Google Drive folder if you wish, just make this the default download location.
How To Edit Screenshots On Chromebook
Now you know how to take a screenshot and where they are saved. Next, I’ll show you how to edit your screenshot.
Chromebook makes it easy to crop and edit:
- Locate your saved screenshot. Again, it is labeled as screenshot(date)(time).png.
- Double-click the screenshot to open it in the editor known as the image viewer.
- Click on the Pen icon to enter edit mode. A toolbar will appear where you select which edits to make, such as cropping, rotating and resizing, and brightness.
- After making edits, click the Pen icon again to save those edits.
Note: You cannot save a copy of your edits with the image viewer tool. It will overwrite the original. Consider making a copy of the screenshot first before making edits.
There are apps or extensions available from the Chrome Store specifically for taking and editing screenshots. If you would like to check them out, one popular extension is called: Explain and Send Screenshots
How To Send A Screenshot On Chromebook
If you’ve read the information above on how to take a screenshot you will know that a small box will appear indicating that a screenshot has been taken.
The box will have an option to Copy To Clipboard. If you click it, this will enable you to paste the screenshot into a document.
To attach the screenshot into an app, for example, Gmail, do the following:
- Open Gmail or another app.
- Compose your email
- Locate and select the PAPER CLIP ICON to attach the screenshot.
- Select the file(or screenshot) you would like to attach.
Related: Read my article on how to use the USB-C ports to charge your Chromebook from a phone charger.
Why Can’t I Take Screenshots On Chromebook?
Some people are having issues and can’t take a screenshot on their Chromebook.
If you receive a notification that says “Screenshot” and then displays “an error occurred” and finally “failed to save screenshot”, the following may help resolve your issue.
Your Chromebook may be managed by a school or other organization.
–>Click the time on the lower right of the screen. If you see a managed device icon, your administrator may have restricted the screenshot ability. Contact them to find out.
You may need to restart your Chromebook.
–> A simple reboot of the laptop often fixes and resolves many problems. Try rebooting to see if you can now perform a screenshot.
Tip: Clear the cache of the Chromebook and then try a screenshot. Hold down the Ctrl, Shift, and Backspace keys simultaneously).
–> Lastly, double check you are not trying to save the screenshot to a USB drive that is no longer connected to the laptop. Just check your download folder and ensure it is correct.
In Summary
I’ve tried to cover the topic of Chromebook screenshots (take, edit and send). Chromebooks are great tools that are easy to use, but sometimes you may need to know how to perform certain tasks. Taking a screenshot is pretty straightforward so you should now be able to take one, know where it is stored and how to edit and send it out.

J.S. is the owner, content creator, and editor at Upgrades-and-Options.com. I’ve worked in the IT and Computer Support field for over 20 years. The server hardware in my computer labs has mostly been IBM, but I’ve supported Dell, HP, and various other hardware. In addition, as part of my lab administrator responsibilities, I’ve learned, supported, and repaired/upgraded network hardware such as Cisco routers and switches. READ FULL BIO >>
- How Quantum Computing Could Impact Everyday Laptops
 Quantum computing may sound like science fiction, but its potential to revolutionize technology is very real. Unlike classical computing, which processes information using bits as 0s and 1s, quantum computing leverages the strange and exciting principles of quantum mechanics — like superposition and entanglement — to perform calculations at speeds previously thought impossible. This unprecedented power isn’t just about tackling complex simulations or advancing artificial… Read more: How Quantum Computing Could Impact Everyday Laptops
 - What Is The Difference Between Lenovo’s Pens? (with Part Numbers)
 Do you ever find yourself writing with an old-school pen or even worse a pencil? As you pry your fingers off that last-century writing device, ask yourself if there isn’t a better way. Well ask no more, there is a whole world of digital pens out there just waiting for you to discover.I went through this same process and wanted to find out about the… Read more: What Is The Difference Between Lenovo’s Pens? (with Part Numbers)
 - How To Wipe A Hard Drive Clean: 4 easy steps
 Wipe it Clean: The Ultimate Guide to Erasing Your Hard Drive Safely and Effectively To wipe a hard drive clean, follow these 4 steps to securely and thoroughly delete all your data. Learn the different methods, tools, and tips to ensure a complete wiping of your hard drive. How To Wipe A Hard Drive Follow these 4 steps to wipe your hard drive. 1. Back… Read more: How To Wipe A Hard Drive Clean: 4 easy steps
 - Maximize Laptop Performance: Mastering Overclocking
 Exploring Laptop Overclocking: My Personal Journey In an era where digital technology is at the heart of nearly all our activities, the performance of our laptops significantly impacts our productivity, gaming experience, creativity, and even our learning processes. Maximizing laptop performance isn’t just about getting tasks done faster, but it’s also about efficiency and reliability. A well-optimized laptop offers a seamless user experience, reducing downtime,… Read more: Maximize Laptop Performance: Mastering Overclocking
 - Ultimate Guide to Gaming Laptop Heat Management
 Immediate Answer Gaming laptops naturally run hot due to their powerful components packed in a compact design. However, excessive heat can throttle performance, shorten the lifespan of your device, and even cause hardware failures. To manage heat effectively, ensure proper airflow, clean internal components regularly, and, if needed, adjust system settings like undervolting or apply fresh thermal paste. Quick Heat Management Tips: Follow-Up Questions: 1.… Read more: Ultimate Guide to Gaming Laptop Heat Management
