- When it comes time to upgrade or replace your laptop’s hard drive, it can be a little intimidating if you’ve never done it before.
- In this article, we’ll walk you through the process of removing your laptop hard drive.
- See even more Tech Information Guide articles.
updated: 8/28/2024
- How to Remove a Hard Drive From a Laptop
- 1. Turn off the Laptop and Unplug All Cables and External Devices.
- 2. Remove the Battery If Possible.
- 3. Turn Over the Laptop and Remove the Back Cover.
- 4. Locate the Hard Drive.
- 5. Unscrew the Drive and Disconnect its Connection Cable.
- 6. Remove the Hard Drive From the Laptop.
- 7. Replace the Back Cover and Screws.
- What are the Tools Needed to Remove a Laptop Hard Drive?
- What Does a Hard Drive Look Like?
- What are the Precautions to Take When Removing a Laptop Hard Drive?
- What are the Troubleshooting Tips for Removing a Laptop Hard Drive?
- What are the Common Mistakes Made When Removing a Laptop Hard Drive?
- How to Properly Dispose of a Laptop Hard Drive?
- How to Properly Store a Laptop Hard Drive?
- Remove Laptop Hard Drive FAQs
THIS POST MAY CONTAIN AFFILIATE LINKS. As an Amazon Associate, I earn from qualifying purchases. PLEASE READ MY DISCLOSURE FOR MORE INFO.
If you’re looking to upgrade your laptop’s hard drive, or if you’re simply troubleshooting a laptop with data storage issues, one of the first things you’ll need to do is remove the laptop’s hard drive. Fortunately, removing a laptop hard drive is a relatively simple process that can be completed in just a few minutes with the right tools.
How to Remove a Hard Drive From a Laptop
To remove a laptop hard drive, first, turn off the laptop. Then disconnect the power cord and any external devices. Next, unscrew the hard drive cover and remove the hard drive. Finally, reinstall the cover and plug in the power cord.
To remove a laptop hard drive:
1. Turn off the Laptop and Unplug All Cables and External Devices.
The first step is just to make sure everything is off and unplugged. You will be opening up the laptop case and do not want any power to be running through the laptop while you’re doing so.
2. Remove the Battery If Possible.
Some laptops have external batteries that can be easily removed, and some have internal batteries. If your laptop has an internal battery, you can often enter the BIOS and disable it which will then shut down the laptop.
3. Turn Over the Laptop and Remove the Back Cover.
Next is to turn over the laptop so you have access to the back cover. Examine how many screws are holding the back cover in place, you will need to remove them and remember where they go as some might be a different size.
Take your screwdriver and unscrew all the screws. Once they are all removed, gently pry off the back cover. A guitar pick or credit card comes in handy to help remove the cover.
If there are any clips holding it in place, be careful not to break them as you will need to put them back in place when you’re done.
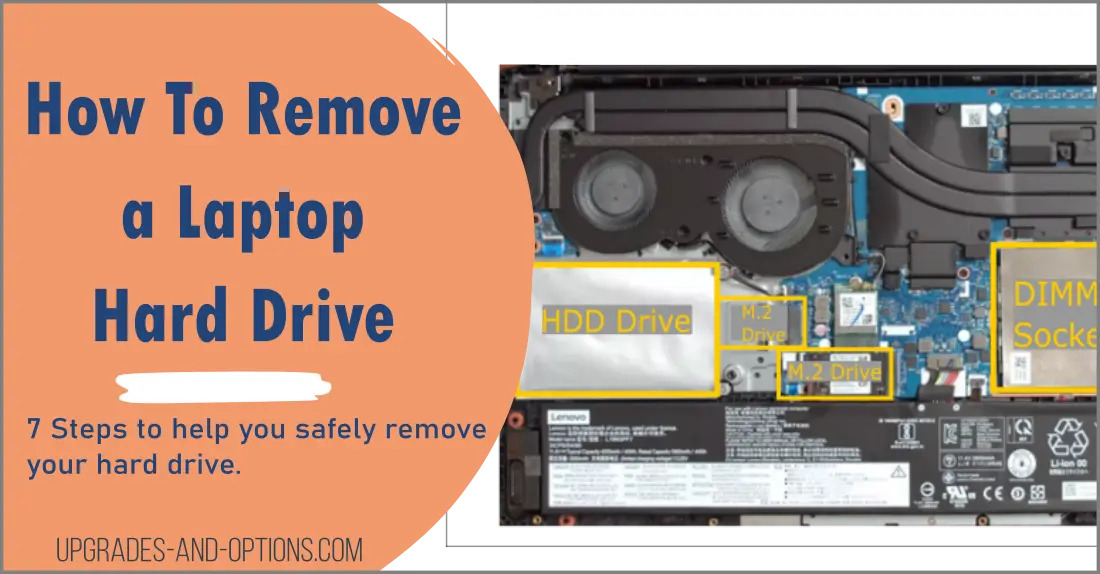
4. Locate the Hard Drive.
With the back cover removed, you will have access to the internal components of the laptop. Locate the hard drive, it will be a small metal box with circuit boards, usually located on the side of the laptop.
5. Unscrew the Drive and Disconnect its Connection Cable.
Unscrew the hard drive and gently detach the connection cable from the motherboard. The cable might be held in place with a plastic clip, just gently release it and unplug the cable.
6. Remove the Hard Drive From the Laptop.
You can now carefully remove the drive from the laptop making sure to protect the cable and not drop the drive. Note that the drive may be installed in a cage which is okay. You can unscrew the drive from the cage once you have it out of the laptop.
7. Replace the Back Cover and Screws.
Now you can put the back cover back on and screw it in place. Be careful not to over-tighten the screws as you can strip the threads. And make sure to replace the same screws to their original positions.
Note: Erase any data on the hard drive before disposing of it. If you get rid of your drive, anyone can access the data stored on it.
You can use the Clean Data option in Windows 11 to securely erase your drive. If you have an SSD drive, many manufacturers have their own secure erase tool to erase the data on the drive. Check with your manufacturer to see if they have one available.
What are the Tools Needed to Remove a Laptop Hard Drive?
Some hard drives are designed to be easily removed, while others need extra tools in order to be taken out of the computer.
Tools needed to remove a laptop hard drive include a Phillips head screwdriver and optionally a plastic tool like a guitar pick to help remove the back cover.
If you want to purchase a complete tool kit that includes a wrist strap and a plastic pry tool I recommend the: iFixit Pro Tech Toolkit available from Amazon. As an Amazon affiliate, I earn from purchases made through this link, but I do think this is a great kit.
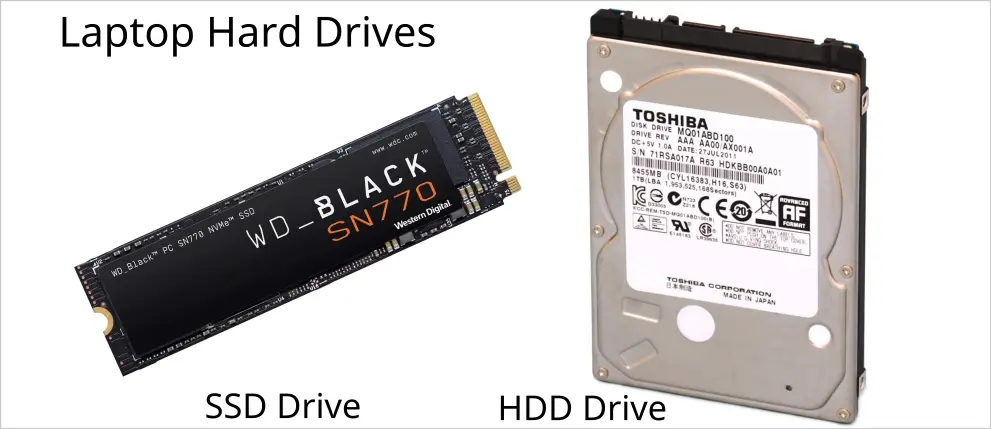
What Does a Hard Drive Look Like?
A hard drive is a type of storage that provides data in digital form. It’s often used on computers and laptops. You might notice that it looks like a silver or black box with metal and circuit boards.
What are the Precautions to Take When Removing a Laptop Hard Drive?
There are a few precautions you should take when removing a laptop’s hard drive.
- First, make sure to disconnect the power cable and any other cables that might be connected to the hard drive.
- Second, use caution when opening the laptop case.
- Finally, make sure to destroy any data on the hard drive before disposing of it.
Removing a laptop’s hard drive can be risky if not done correctly. Make sure to disconnect all cables and carefully remove the hard drive itself. Also, be careful when opening the laptop case – don’t force anything, and don’t damage any of the internal components.
What are the Troubleshooting Tips for Removing a Laptop Hard Drive?
Troubleshooting tips for removing a laptop hard drive include the following:
- Check if the drive is physically damaged.
- If you’re having trouble removing the back cover, check the laptop manual for instructions.
- Be careful not to damage any of the laptop’s internal components when removing the hard drive.
- Make sure to destroy any data on the hard drive before discarding it.
What are the Common Mistakes Made When Removing a Laptop Hard Drive?
When you remove a laptop hard drive, it’s important to be careful not to make any mistakes that could lead to lost data or formatting.
Here are 8 steps that will help you avoid these problems:
- Back up your data first. This is especially important if you’re removing the hard drive but want to keep your data.
- Use an appropriate tool. Most laptops will only require you to use a Philips head screwdriver, but a few manufacturers use Hex or Torx screws.
- Formatting a disk will delete all of its data. If you’re going to format a disk, make sure to create backup copies of your data first in case something goes wrong.
- Don’t try to remove the hard drive by force – this can damage it and cause headaches later on down the road when trying to restore your files back onto it. Instead, gently detach the cable and unscrew it from its place.
- Be careful to not lose any of the laptop’s screws. They’re often very small, so it’s easy to misplace them.
- Disconnect the power before removing the hard drive. This will prevent any accidents caused by electrical shock during the process.
- If you’re going to reinstall your operating system, make sure to backup your data first. Reinstalling Windows will erase all of your files on the hard drive – again, back them up beforehand if you’re worried about losing anything important.
- Finally, once you’ve removed and replaced the hard drive, be sure to restore your computer’s settings (including installed programs and user data) from a previous backup.
How to Properly Dispose of a Laptop Hard Drive?
Once you have removed the laptop hard drive, you will need to properly dispose of it. This is important because laptop hard drives often contain sensitive information that you do not want to fall into the wrong hands.
The best way to dispose of a laptop hard drive is to physically destroy it. This can be done by crushing it with a hammer or drilling through it. You can also use a degausser to erase the data on the hard drive beyond recovery. Once you have destroyed the hard drive, you can then recycle it or throw it away.
Recycling takes less energy and resources than throwing away a hard drive, and it helps reduce pollution in the environment.
It’s also important to note that recycling doesn’t create any hazardous waste products like incinerating does.
How to Properly Store a Laptop Hard Drive?
If you need to store a laptop hard drive for a long period of time, it’s important to do so properly to prevent data loss. The best way to store a laptop hard drive is in an anti-static bag. This will protect the drive from static electricity, which can damage the sensitive components inside.
You should also store the hard drive in a cool, dry place. Finally, don’t store the hard drive near magnetic fields, as this can also damage the data on the drive.
If you follow these tips, you’ll be sure to keep your laptop hard drive in good condition and avoid any data loss.
Remove Laptop Hard Drive FAQs
You do not necessarily need to remove the drive, but it is vital to make sure your data has been removed or erased before you get rid of the computer.
No, just removing the hard drive does not remove all the data, which is why you should use a disk wiping utility to wipe it clean before disposing of your computer.
No, the laptop will not work without the hard drive. The hard drive stores the operating system, drivers, and other important files.
You can, but you will need to make sure the drive is compatible with your new computer. You will also need to reinstall the operating system and any programs you want to use.

J.S. is the owner, content creator, and editor at Upgrades-and-Options.com. I’ve worked in the IT and Computer Support field for over 20 years. The server hardware in my computer labs has mostly been IBM, but I’ve supported Dell, HP, and various other hardware. In addition, as part of my lab administrator responsibilities, I’ve learned, supported, and repaired/upgraded network hardware such as Cisco routers and switches. READ FULL BIO >>
- Best Laptops for AI and Machine Learning
 Discover the top 5 laptops for AI and Machine Learning. We review high-performance machines perfect for deep learning, data science, and neural networks. Artificial Intelligence (AI) and Machine Learning (ML) are no longer futuristic concepts—they are the tools shaping our daily lives right now. From developing complex neural networks to training large language models (LLMs) locally, the hardware demands for these tasks have skyrocketed. In… Read more: Best Laptops for AI and Machine Learning
 - Upgrading SSD Storage in the ThinkPad X9-15 Gen 1 Aura Edition
 Upgrading SSD Storage and Analyzing Memory in the ThinkPad X9-15 Gen 1 Aura Edition Upgrade Your ThinkPad X9-15 SSD Like a Pro: A Technical Guide The ThinkPad X9-15 Gen 1 Aura Edition (Machine Types 21Q6 and 21Q7) is designed as a premium device. While memory is permanently fixed, users can easily expand storage capacity, as the M.2 Solid-State Drive (SSD) is designated as an Optional-service… Read more: Upgrading SSD Storage in the ThinkPad X9-15 Gen 1 Aura Edition
 - How Quantum Computing Could Impact Everyday Laptops
 Quantum computing may sound like science fiction, but its potential to revolutionize technology is very real. Unlike classical computing, which processes information using bits as 0s and 1s, quantum computing leverages the strange and exciting principles of quantum mechanics — like superposition and entanglement — to perform calculations at speeds previously thought impossible. This unprecedented power isn’t just about tackling complex simulations or advancing artificial… Read more: How Quantum Computing Could Impact Everyday Laptops
 - What Is The Difference Between Lenovo’s Pens? (with Part Numbers)
 Do you ever find yourself writing with an old-school pen or even worse a pencil? As you pry your fingers off that last-century writing device, ask yourself if there isn’t a better way. Well ask no more, there is a whole world of digital pens out there just waiting for you to discover.I went through this same process and wanted to find out about the… Read more: What Is The Difference Between Lenovo’s Pens? (with Part Numbers)
 - Legion 5 Laptop Upgrade Guide: Game Like a Pro
 This article serves as your ultimate guide to upgrading your Lenovo Legion 5 laptop with RAM and SSD, unlocking its potential to deliver unbeatable gaming performance. With over two decades of expertise in the tech industry and countless successful upgrade projects under my belt, I’ve distilled all my knowledge into this comprehensive guide. You’ll learn, step by step, how to upgrade the RAM and SSD;… Read more: Legion 5 Laptop Upgrade Guide: Game Like a Pro
