How to increase the screen brightness of your laptop or desktop PC.
Do you find yourself struggling to see what’s on your laptop screen in a bright room? Do you have a laptop that seems too dark?
A lot of people have trouble adjusting the brightness of their laptop screens. In this blog post, we will show you how to increase the brightness of your laptop with just a few clicks.
You may need to adjust your screen brightness depending on your environment and what you’re doing on your computer. For example, if you’re working in a dimly lit room, you may want to increase the screen brightness so that it’s easier to see. Conversely, if you’re working in a bright room, you may want to decrease the screen brightness to reduce screen glare.
Luckily, it’s easy to adjust screen brightness.
And be sure to choose the best laptop for your needs using my step-by-step laptop buying guide.
How to Increase the Brightness of Your Laptop
There are a few ways to adjust the screen brightness of your laptop or desktop PC. On Windows use Windows Mobility Center, Battery saver, Action Center, keyboard shortcut, or the Settings App. On macOS, use a keyboard shortcut or System Preferences. See below for all the details.
Most computers and laptop screens have a built-in feature that allows you to adjust the screen brightness. This can be helpful when you’re working in different lighting conditions or if you want to conserve battery power.
How to Change Brightness on Windows 10 or 11
There are a few different ways to adjust screen brightness in Windows.
Windows Mobility Center:
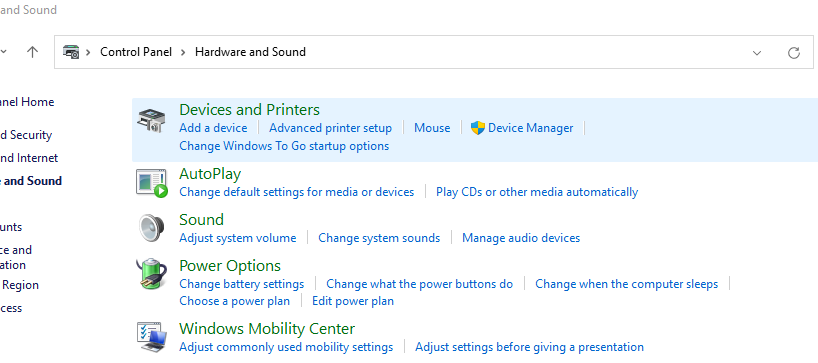
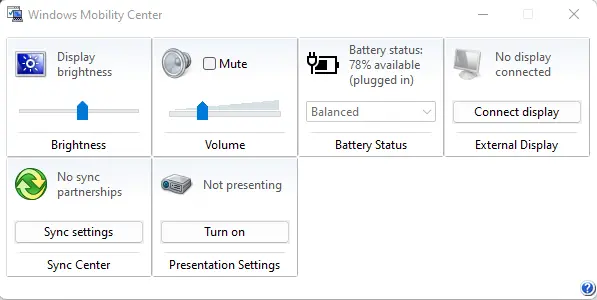
One way is to use the Windows Mobility Center. To do this, open the Control Panel and click on ‘Hardware and Sound.’ Under ‘Mobile PC,’ select ‘Windows Mobility Center.’
From here, you can use the brightness slider to adjust the screen brightness.
Battery saver:
Another way to adjust screen brightness is to use the battery saver feature. To do this, open the Control Panel and click on ‘System and Security.’ Under ‘Power Options,’ select ‘Battery Saver.’
From here, you can enable or disable battery saver mode, and set the screen brightness to low, medium, or high.
Also, access the power slider by clicking on the battery icon in the notifications area and then selecting the “Battery Saver” option. This will open up a slider that allows you to choose between four different power-saving modes: Battery saver, Best battery life, Better performance, and Recommended.
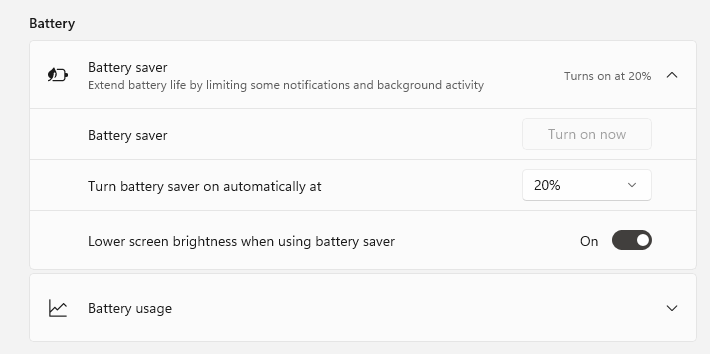
Each mode has its own screen brightness setting, so you can fine-tune your screen brightness to get the best balance of battery life and performance.
Windows Action Center:
You can also use the action center to adjust screen brightness. To do this, simply click on the Notification icon in the bottom right corner of your screen and then click on the Brightness tile. This will open up a slider that you can use to adjust your screen brightness.
From here, you can use the slider to adjust screen brightness.
Keyboard Shortcut Command:
If you prefer, you can also adjust screen brightness using keyboard shortcuts. To do this, press the Windows key + A on your keyboard to open the Action Center. Then, click on the “brightness” icon (which looks like a sun) and use the slider to adjust the screen brightness.
Settings App:
If you want more control over your screen brightness, you can open the Settings app.
Open the Settings app by clicking the Start button and then selecting the Settings gear icon. In the Settings window, click “System” and then select “Display” from the left-hand side menu.
On the right-hand side of the Display settings page, use the “Brightness” slider to set your desired screen brightness. You can also enable or disable the “auto-brightness” feature, which will automatically adjust your screen brightness based on your environment.
Screen Brightness Windows 7
On Windows 7, the process is slightly different. Go to “Control Panel,” then “Hardware and Sound,” and finally “Power Options.” Again, you’ll see a slider that you can use to adjust screen brightness.
How to Increase Screen Brightness on Mac
If you’re using a laptop, you may also be able to adjust screen brightness using keyboard shortcuts. For example, on a MacBook, you can press Shift + Option + F1 or F2 to adjust screen brightness.
Another way on a Mac, you can adjust the screen brightness from the System Preferences. Click on “Displays” and then move the slider to adjust the brightness.
Whether you’re using Windows or macOS, adjusting screen brightness is a quick and easy way to improve your viewing experience.
How to Adjust Brightness On A Tablet
Most tablets have an automatic brightness setting that will adjust the screen brightness based on your environment. To adjust the brightness manually on your tablet, simply go to the “Display” settings and find the “Brightness” or “Adaptive Brightness” option.
From here, you can enable or disable the feature, and set the screen brightness to your desired level.
On some tablets, such as the iPad, you can also adjust screen brightness by swiping up from the bottom of the screen to access the Control Center. From here, you can use the slider to adjust brightness.
On an Android tablet, you can access the brightness settings from the “Display” page in the Settings app. Alternatively, some Android tablets have a brightness widget that you can add to your home screen.
While you’re in the “Settings” app, you can also enable or disable the automatic brightness feature. This will allow you to manually control your screen brightness, regardless of your environment.
Adjusting the screen brightness is a simple way to improve your viewing experience on any device. By increasing the screen brightness, you can make sure that you’re able to see your content clearly, even in bright environments.
Conversely, decreasing the screen brightness can help preserve battery life on laptop computers and tablets.
About Brightness Levels
The definition of brightness for a display is the amount of light emitted from the screen. The brightness is usually measured in candela per square meter (cd/m^)1, also known as nits.
The brightness level of a laptop’s screen is usually between 200 and 300 nits. The brightness level of a desktop monitor is usually between 250 and 350 nits.
ALSO READ: 6 Advantages of using portable external monitors
What is a good brightness level for a monitor?
It depends on the lighting conditions in your environment and your personal preferences. In a well-lit room, you may want to set the brightness to 100%, whereas in a dark room, you may want to set it to 50% or lower.
It’s also worth noting that different monitors have different maximum brightness levels. For example, some laptop screens can reach 400 nits, while others may only be able to reach 300 nits.
If you’re not sure what brightness level is right for you, it’s best to start at 60% and then adjust from there.
Is low brightness better for the eyes?
There is no definitive answer to this question. Some people find that low brightness levels are easier on the eyes, while others prefer higher brightness levels.
Low brightness levels can reduce eye strain, but it’s ultimately up to you to decide what’s comfortable for you. If you find that your eyes are getting tired after looking at a bright screen for a long period of time, try reducing the brightness level.
If you’re having trouble finding a comfortable level, it’s best to consult with an eye doctor.
You can also try using an anti-glare screen protector, which can help reduce the amount of potentially harmful blue light that emits from your laptop or desktop monitor.
Increase Screen Brightness – Summary
If you’re looking for a way to increase the screen brightness of your laptop or desktop PC, there are a few different methods you can try. Adjusting the settings in Windows or macOS, using power options, or keyboard shortcuts can all help you achieve this goal. Experiment with different methods until you find one that works best for you.
1SOURCE: candela per square meter from HP

J.S. is the owner, content creator, and editor at Upgrades-and-Options.com. I’ve worked in the IT and Computer Support field for over 20 years. The server hardware in my computer labs has mostly been IBM, but I’ve supported Dell, HP, and various other hardware. In addition, as part of my lab administrator responsibilities, I’ve learned, supported, and repaired/upgraded network hardware such as Cisco routers and switches. READ FULL BIO >>
See these buying guides for the latest:
- Best Laptops for AI and Machine LearningDiscover the top 5 laptops for AI and Machine Learning. We review high-performance machines perfect for deep learning, data science, and neural networks. Artificial Intelligence (AI) and Machine Learning (ML) are no longer futuristic concepts—they… Read more: Best Laptops for AI and Machine Learning
- What Are the Most Wished For Gaming Chairs on Amazon and Why?The most wished for gaming chairs on Amazon are highly sought after because they combine comfort, ergonomic design, and aesthetic appeal. These chairs stand out due to their innovative features such as lumbar support, reclining… Read more: What Are the Most Wished For Gaming Chairs on Amazon and Why?
- Dominate Your Games with the Lenovo G34w-30 Gaming MonitorIntroduction: Immerse Yourself in the Game In the competitive world of gaming, every frame and millisecond can mean the difference between victory and defeat. The right monitor can significantly impact your gaming experience, offering a… Read more: Dominate Your Games with the Lenovo G34w-30 Gaming Monitor
- Best Portable Chargers on Amazon: Never Run Out of Battery AgainA Guide to Amazon’s Top-Rated Power Banks Imagine this: you’re on a long flight, eager to capture every moment of your trip, when suddenly your phone’s battery dips into the dreaded red zone. Or perhaps… Read more: Best Portable Chargers on Amazon: Never Run Out of Battery Again
- Should I Get a Lenovo Legion Go USB-C Dock?Level Up Your Legion Go Experience: A Comprehensive Guide to the Lenovo Legion Go USB-C Dock The Lenovo Legion Go has taken the gaming world by storm, offering a powerful and portable way to enjoy… Read more: Should I Get a Lenovo Legion Go USB-C Dock?

