Upgrade Your Legion 9 16IRX8 SSD Like a Pro: A Beginner’s Guide
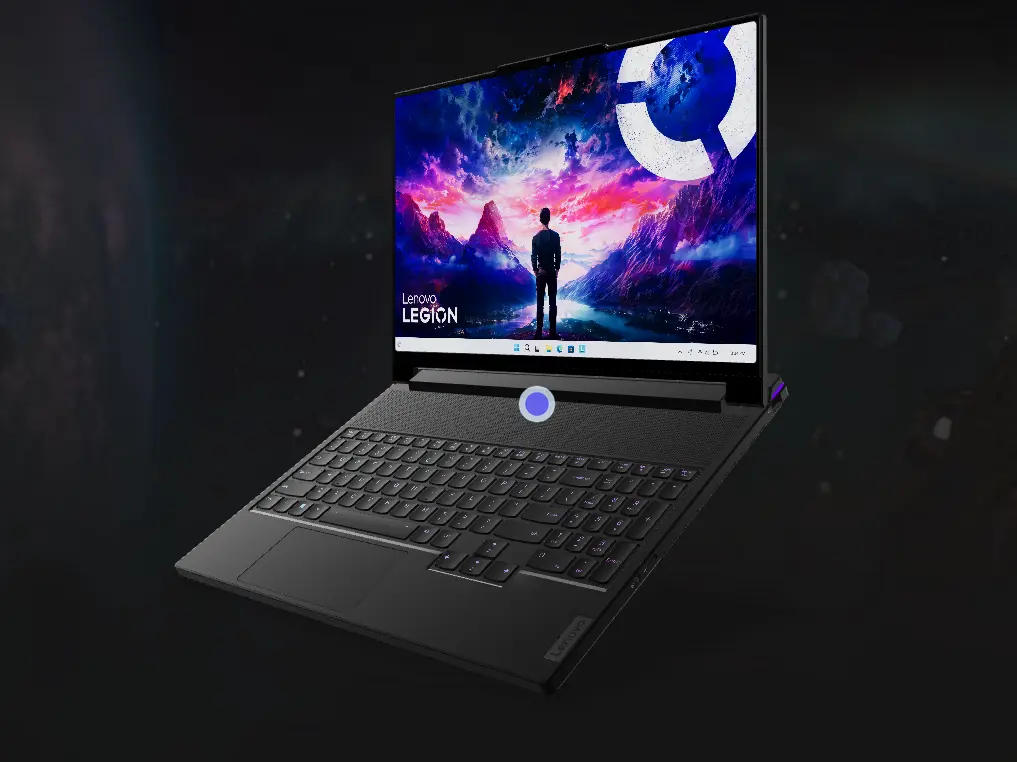
Lenovo Legion 9i (16″, 8)
The Legion 9 is a gaming powerhouse, boasting impressive specs and delivering smooth, immersive gameplay. But even the best machines can benefit from a little upgrade.
While the Legion 9 comes equipped with a capable SSD, some users might crave even more storage space or the performance boost of the latest technology. Thankfully, upgrading the SSD in your Legion 9 is a surprisingly accessible step-by-step process.
This guide, tailored for beginners, will walk you through the process step-by-step, ensuring a successful and stress-free upgrade.
- Before You Begin:
- Upgrading Your Legion 9 SSD:
- Additional Resources:
- Understanding Your Legion 9 Specs:
- Compatible SSD Recommendations:
- Accessing the Legion 9 UEFI/BIOS:
- Tips for Maintaining Your Upgraded Legion 9
- Frequently Asked Questions (FAQ) about SSD Upgrade Process:
- 1. Will upgrading the SSD void my warranty?
- 2. How do I transfer the data from my old SSD to the new one?
- 3. What tools do I need for the SSD upgrade?
- 4. Can I use any M.2 SSD for the upgrade?
- 5. How do I ensure my new SSD is properly recognized by my system?
- 6. Do I need to reinstall the operating system after upgrading the SSD?
- 7. What if the system does not boot after the SSD upgrade?
- 8. Is it necessary to install additional drivers after the SSD upgrade?
- 9. Can I use my upgraded Legion 9 for heavy gaming and video editing?
- 10. How long does an SSD upgrade usually take?
THIS POST MAY CONTAIN AFFILIATE LINKS. As an Amazon Associate, I earn from qualifying purchases. PLEASE READ MY DISCLOSURE FOR MORE INFO.
Before You Begin:
- Safety First: Ensure your laptop is powered off, unplugged, and cool. Wear a static wristband to prevent damage.
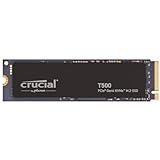
- Gather Your Tools: You’ll need a small Phillips-head screwdriver, compressed air (optional), and your new M.2 2280 PCIe Gen4 NVMe SSD (compatible with your Legion 9 model). Crucial T500 2TB SSD (CT2000T500SSD8) is a great option! – Amazon link
- Backup Your Data: Upgrading your SSD involves formatting the new drive, so back up all crucial data to an external drive or cloud storage.
- Review the Manual: While this guide is comprehensive, consult your Lenovo Legion 9 user manual for specific details and visuals.
Upgrading Your Legion 9 SSD:
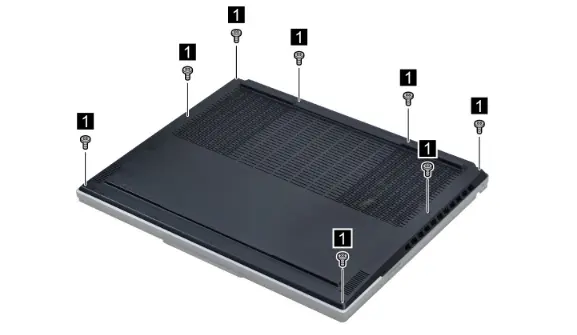
1. Remove the Lower Case:
- Place your laptop upside down on a flat surface.
- Locate the eight Phillips-head screws on the bottom panel and remove them carefully.
- Gently pry up the latches along the edges and remove the lower case, being mindful of any cables.
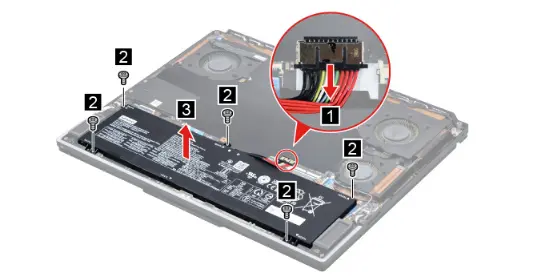
2. Disconnect & Remove the Battery:
- Locate the battery pack cable connected to the system board.
- Important: Use your fingernails to gently pull the connector, not the cable itself.
- Remove the five battery screws and gently lift out the battery pack.
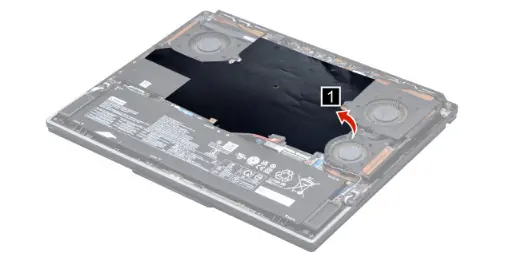
3. Remove the Mylar and SSD Shielding:
- Carefully peel off the system board mylar (retain it for reassembly).
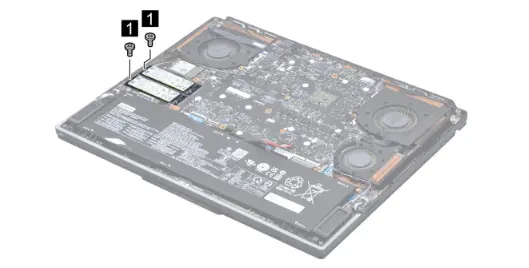
- Unscrew the four screws securing the SSD shielding and remove it.
4. Replace the Old SSD:
- Locate the existing SSD and gently pull it out from the M.2 slot.
- Insert your new SSD into the slot, ensuring proper alignment, and secure it with the two screws.
5. Reassemble & Boot Up:
- Carefully replace the SSD shielding, mylar, battery, and lower case, securing all screws.
- Power on your laptop and press F2 repeatedly to enter the UEFI/BIOS setup.
- Verify that the new SSD is recognized and proceed with your preferred operating system installation or cloning process.
Legion 9 Bonus Tips:
- Double-check compatibility: Ensure your chosen SSD is compatible with your Legion 9 model before purchase.
- Consider cloning: If you want to transfer your existing data to the new SSD, explore cloning software provided by some SSD manufacturers or third-party solutions.
- Post-upgrade maintenance: Keep your upgraded Legion 9 running smoothly with regular updates, defragmentation, and virus scans.
Common Questions and Answers for Upgrading Your Legion 9 SSD:
Q: How can I tell if my new SSD is compatible with my Legion 9?
A: Compatibility is crucial to ensure your new SSD works seamlessly with your Legion 9. Always check the specifications in your laptop’s manual and compare them with the new SSD’s specifications. The Legion 9 supports M.2 2280 PCIe Gen4 NVMe SSDs, making the Crucial T500 2TB SSD a suitable choice. Additionally, visiting Lenovo’s official website or contacting Lenovo support can help you verify compatibility.
Q: Do I really need a static wristband before starting the upgrade?
A: Yes, wearing a static wristband is a safety precaution that protects your computer’s internal components from static discharge, which can damage sensitive electronics. If you don’t have a wristband, ensure you frequently touch a grounded metal object to dissipate any static charge from your body.
Q: What should I do if the screws are stripped or difficult to remove?
A: If you encounter stripped or stubborn screws, use a precision screwdriver designed for electronics. Apply firm, even pressure while turning the screwdriver. If a screw is completely stripped, a rubber band placed over the screw head can provide extra grip. In extreme cases, you may need a screw extractor tool.
Q: How can I avoid damaging the battery cable when disconnecting it?
A: Use your fingernails or a plastic pry tool to gently pull on the connector, not the cable itself. Applying force directly to the wires can damage them, disrupting the power supply to your laptop.
Q: What if my SSD shielding or battery doesn’t fit back correctly during reassembly?
A: During reassembly, ensure that all components are aligned correctly and that no cables are pinched or obstructing the fit. If the shielding or battery doesn’t sit properly, recheck the placement of the SSD and other internal components to make sure they are secure and correctly positioned.
Q: I replaced the SSD, but my laptop doesn’t recognize it in BIOS. What should I do?
A: If your new SSD isn’t recognized in the BIOS, ensure it is properly seated in the M.2 slot. Restart your laptop and enter the BIOS again by pressing F2. Navigate to the storage section to check if the SSD appears. If it doesn’t, the SSD might be faulty, or there could be a compatibility issue. Double-check the drive’s compatibility with your laptop model and consider consulting support if necessary.
Q: Can I use my old SSD as external storage?
A: Yes, you can repurpose your old SSD as an external drive. Purchase an external SSD enclosure compatible with M.2 drives. Insert the old SSD into the enclosure and connect it to your laptop via USB. This is an excellent way to expand your storage capacity.
Additional Resources:
- Lenovo Legion 9 16IRX8 User Manual . Lenovo.
- Crucial T500 2TB SSD Amazon Product Page
- HDD vs. SSD: A Complete Laptop Storage Guide
By following these steps and tips, you can confidently upgrade your Legion 9 16IRX8 SSD.
Understanding Your Legion 9 Specs:
Before diving in, let’s familiarize ourselves with your specific Legion 9 16IRX8 model’s storage specs. This information is crucial for choosing the right upgrade:
- Memory: Your system comes with either 32GB or 64GB DDR5 RAM, which is quite powerful for most users. Upgrading RAM might not offer significant benefits unless you have specific needs like running memory-intensive programs. Two DDR5 SO-DIMM slots, dual-channel capable.
- Storage: Your Legion 9 has two M.2 2280 PCIe Gen4 NVMe® slots, allowing you to expand your storage further. These slots support up to 2TB each.
- Chipset: Intel HM770 chipset.
Choosing the Right Legion 9 SSD:
When selecting your new SSD, ensure it’s:
- M.2 2280 PCIe Gen4 NVMe® interface: This guarantees compatibility with your Legion 9’s slots.
- Capacity: Consider your storage needs. 1TB or 2TB options are readily available, depending on your budget and usage.
- Speed: Look for SSDs with read/write speeds exceeding 6,000 MB/s for optimal performance. The Crucial T500 2TB (Amazon link) mentioned earlier aligns perfectly with these criteria.
Compatible SSD Recommendations:
While you have the freedom to choose any compatible M.2 2280 PCIe Gen4 NVMe SSD, here are some recommendations based on your notes:
As an Amazon Associate, I earn from qualifying purchases at no cost to you.
- Crucial T500 2TB PCIe Gen4 NVMe M.2 SSD (CT2000T500SSD8): This high-performance SSD boasts read/write speeds up to 7,400/7,000MB/s, offering a significant performance boost over your original drive.
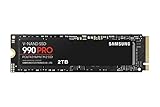
- Samsung 990 Pro 2TB PCIe Gen4 NVMe M.2 SSD): Another excellent option with impressive speeds and reliability.
Accessing the Legion 9 UEFI/BIOS:
After upgrading your SSD, you might need to enter the UEFI/BIOS to configure boot settings or verify hardware detection. Here’s how:
1. Power Up:
Turn on your Legion 9 or restart it if it’s already on.
2. Press F2 Repeatedly:
As soon as the Lenovo logo appears, rapidly tap the F2 key until the UEFI/BIOS setup utility loads. You might need to press and hold F2 for a few seconds.
3. Navigate and Configure:
Once in the UEFI/BIOS, use the arrow keys and Enter key to navigate and make any necessary changes. Refer to your user manual or online resources for specific instructions related to your Legion 9 model and desired adjustments.
4. Exit and Save:
When finished, navigate to the Exit section and choose the option to save changes, and exit the UEFI/BIOS. Your laptop will then restart normally.
Remember: Modifying settings in the UEFI/BIOS can impact your system’s stability. Only change settings you understand and are confident in. If unsure, consult your user manual or seek professional help.
Tips for Maintaining Your Upgraded Legion 9
Upgrading your SSD has boosted your Legion 9’s performance, but maintaining that performance requires some TLC. Here are some tips to keep your upgraded machine running like new:
Keep it Cool:
- Invest in a cooling pad: Especially during intense gaming or demanding tasks, a cooling pad helps dissipate heat, preventing throttling and ensuring optimal performance.
- Clean the dust bunnies: Regularly clean dust buildup from vents and fans using compressed air. Dust can trap heat and hinder airflow, impacting performance.
Optimize Your Software:
- Update drivers: Keep your drivers updated for optimal performance, compatibility, and security. Use tools like Lenovo Vantage or manufacturer websites to check for updates.
- Uninstall unused programs: Cluttered software can slow down your system. Remove programs you no longer use to free up space and resources.
- Maximize Laptop Performance: Mastering Overclocking
Maintain Good Habits:
- Practice safe shutdowns: Don’t force shutdowns; properly power down your laptop to prevent data corruption or system issues.
- Avoid overheating: Don’t use your laptop on soft surfaces like beds or pillows, as they can block airflow. Be mindful of ambient temperature during demanding tasks.
- Protect from physical damage: Handle your laptop with care to avoid bumps, drops, or spills. Invest in a protective case for added security.
Monitor Your System:
- Track temperatures: Use software like HWMonitor to monitor CPU and GPU temperatures. If they consistently reach high levels, consider additional cooling measures.
- Check for disk health: Use tools like CrystalDiskInfo to monitor your SSD’s health and performance. Early detection of potential issues allows for preventive action.
Regular Backups:
No matter how well you maintain your system, data loss can happen. Regularly back up your important data to an external drive or cloud storage to ensure it’s safe.
Frequently Asked Questions (FAQ) about SSD Upgrade Process:
1. Will upgrading the SSD void my warranty?
Generally, upgrading the SSD on your Legion 9 should not void your warranty, as Lenovo allows user-replaceable components. However, it’s highly recommended to read your warranty agreement or check with Lenovo support to confirm specific details related to your model.
2. How do I transfer the data from my old SSD to the new one?
Before replacing your SSD, you can clone your existing drive to the new SSD using cloning software like Acronis True Image or Macrium Reflect. You’ll need an external enclosure or a USB-to-SSD adapter to connect the new SSD to your laptop during this process.
3. What tools do I need for the SSD upgrade?
You’ll need a small Phillips-head screwdriver to open your Legion 9’s back panel. Additionally, an anti-static wristband is recommended to prevent static discharge that could damage internal components.
4. Can I use any M.2 SSD for the upgrade?
No, you must use an M.2 2280 PCIe Gen4 NVMe SSD for compatibility with your Legion 9. Ensure the SSD meets the required specifications for optimal performance.
5. How do I ensure my new SSD is properly recognized by my system?
After installing the new SSD, enter the UEFI/BIOS (by pressing F2 during startup) to ensure it is detected. You might need to set the new SSD as the primary boot drive in the BIOS settings.
6. Do I need to reinstall the operating system after upgrading the SSD?
If you clone your existing SSD to the new one, you won’t need to reinstall the OS. However, if you’re doing a clean installation, you’ll need to reinstall the operating system and all your applications.
7. What if the system does not boot after the SSD upgrade?
Check the SSD installation to ensure it’s securely connected. Enter the BIOS to verify if the new SSD is detected and set as the boot device. If issues persist, consult Lenovo support or refer to your user manual.
8. Is it necessary to install additional drivers after the SSD upgrade?
Typically, NVMe SSDs are supported natively by modern operating systems without needing additional drivers. However, ensure your system is up-to-date with the latest firmware and BIOS updates to maximize compatibility and performance.
9. Can I use my upgraded Legion 9 for heavy gaming and video editing?
With the upgraded SSD providing faster read/write speeds, your Legion 9 is well-suited for intensive tasks like heavy gaming and video editing. Make sure your software is optimized, and maintain your system regularly to handle demanding applications efficiently.
10. How long does an SSD upgrade usually take?
An SSD upgrade is relatively straightforward and can typically be completed within 30-60 minutes, depending on whether you’re cloning the old drive or performing a clean installation of the operating system.

J.S. is the owner, content creator, and editor at Upgrades-and-Options.com. I’ve worked in the IT and Computer Support field for over 20 years. The server hardware in my computer labs has mostly been IBM, but I’ve supported Dell, HP, and various other hardware. In addition, as part of my lab administrator responsibilities, I’ve learned, supported, and repaired/upgraded network hardware such as Cisco routers and switches. READ FULL BIO >>
