Looking to boost your Lenovo IdeaPad S340-14IIL’s performance? Upgrading its RAM is a great way to achieve that! This guide will walk you through the process, ensuring a smooth and successful upgrade.
The good news is the S340 is capable of upgrading the RAM.
This guide will be specifically for the Lenovo IdeaPad S340-14IIL. Other S340 models will be similar but might come with different amounts of memory. That is, the process will be the same but the specs might be slightly different.
- IdeaPad S340-14IIL Compatibility and Requirements:
- Purchase Compatible RAM For Your Lenovo IdeaPad S340:
- Preparation:
- Upgrading Your IdeaPad S340-14IIL RAM:
- Tips for success:
- How much does it cost to upgrade my IdeaPad’s memory?
- How much RAM do I have now?
- How Much Memory Do I Need In My Laptop?
- IdeaPad S340-14IIL RAM Upgrade: Takeaway
THIS POST MAY CONTAIN AFFILIATE LINKS. As an Amazon Associate, I earn from qualifying purchases. PLEASE READ MY DISCLOSURE FOR MORE INFO.
IdeaPad S340-14IIL Compatibility and Requirements:
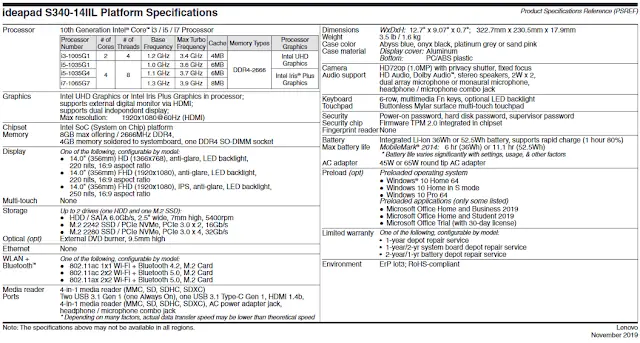
Let’s look at the specifications on the S340-14IIL. It is a 14″ laptop that comes with 8GB memory and a 256GB SSD drive. It also has the 10th generation Intel Core Processor.
Lenovo IdeaPad S340-14IIL SPECS:
- RAM Type: Your S340-14IIL uses DDR4-2666 SDRAM SO-DIMM memory.
- 4GB Soldered + 4GB DIMM DDR4-2666
- Maximum RAM Capacity: The laptop can handle up to 20GB of RAM (1 soldered + 1 slot).
- Checking Current RAM: Right-click the Start menu and select “System.” Under “Installed memory,” you’ll see your current RAM amount.
Before you purchase a new memory module, check your model and serial number. These are located on the sticker on the bottom of the laptop. Make sure you have an IdeaPad S340.
If you are not sure of the exact model you have, simply go to the Lenovo support website and select auto-detect.
Upgrade Options:
- 4GB soldered + 4GB DIMM: This is the standard configuration. Replace the 4GB DIMM with an 8GB or 16GB module for a total of 12GB or 20GB.
- 8GB soldered + 12GB DIMM: Some models come pre-upgraded. Check your current configuration before buying.
Purchase Compatible RAM For Your Lenovo IdeaPad S340:
You need to know the model of your IdeaPad because they don’t all use the same memory module.
I’ve found the easiest way to know which exact module to buy is to use the system compatibility checker from the Crucial website. As an Amazon Associate, I earn from qualifying purchases at no cost to you.
- Crucial RAM 16GB DDR4 3200MHz from Amazon that is compatible with the Ideapad S340-14IIL.
Using this tool, you either select the model of laptop you have or let the website scan your machine and display the part you need.
The Lenovo Ideapad S340 maximum RAM is 20GB.
The Lenovo S340 comes with 4GB memory soldered onto the motherboard and one memory socket. This socket might already have a 4GB memory DIMM installed, which provides a total of 8GB of memory. To upgrade, replace the 4GB DIMM with an 8Gb or 16GB DIMM.
The table below displays the specs for the S340-14IIL only. It may not be the same for your model.


Preparation:
- Gather tools: Small Phillips screwdriver, compressed air (optional).
- Back up your data.
- Power off and unplug your laptop.
- Remove the battery (if removable).
Upgrading Your IdeaPad S340-14IIL RAM:
1. Prepare your workspace:
- Find a clean, well-lit area.
- Turn off your laptop and unplug it.
- Remove the battery (if removable).
2. Open the back panel:
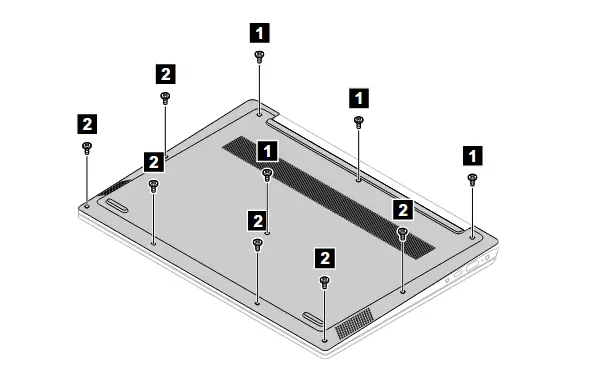
- Locate the screws on the bottom panel and remove them carefully.
- Gently pry open the back panel using a plastic tool (like a guitar pick) to avoid scratches.
- Unplug the battery from the main board.

3. Locate the RAM slot:
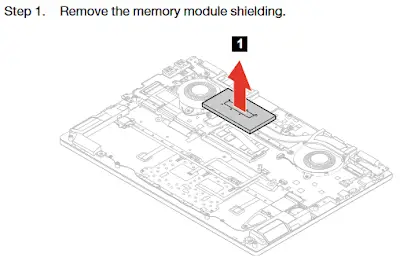
- In the middle of the mainboard you will see a metal cover.
- Remove this cover to access the memory module as shown in the illustration below.

4. Remove the existing RAM (if present):
- Gently push the module outwards to release the retention clips.
- Pull it out carefully, holding it by the edges.
5. Install the new RAM:
- Align the notch on the module with the slot and gently push it in until it clicks into place.
- Ensure it’s firmly seated.
- Replace the RAM cover.
6. Reassemble your laptop:
- Close the back panel and screw it back in place.
- Reconnect the battery (if applicable).
7. Power on your laptop:
- If the upgrade was successful, your laptop should boot normally and recognize the new RAM.
- Check the “System” menu again to confirm the increased memory amount.
If you would like to see Lenovo’s video of this memory upgrade follow this link: IdeaPad S340 memory upgrade
Tips for success:
- Double-check RAM compatibility before purchasing.
- Handle components carefully with clean, dry hands.
- Use compressed air to remove dust from the RAM slot before installation.
- If you encounter any issues, consult Lenovo support or a professional technician.
How much does it cost to upgrade my IdeaPad’s memory?
How Much Does an IdeaPad S340-14IIL RAM Upgrade Cost?
Upgrading your IdeaPad S340-14IIL’s RAM can be a budget-friendly performance boost, but the cost depends on a few factors:
RAM Capacity:
- 8GB Module: Expect to pay around $35-$50 USD.
- 16GB Module: Prices typically range from $55-$80 USD.
Brand and Retailer:
- Popular brands like Crucial, Kingston, and Samsung might have slightly higher prices compared to lesser-known brands.
- Online retailers often offer competitive prices and deals, so comparison shopping is recommended.
Current RAM Configuration:
- If your laptop already has a 4GB RAM module, you can upgrade to 12GB (4GB + 8GB) for a more affordable option compared to directly replacing with 16GB.
Do You Have Other Laptop Questions?IdeaPad S145-15IWL RAM Upgrade OR Laptop Not Turning On?
How much RAM do I have now?
Checking Your Current RAM in Windows 10 and 11.
Knowing your current RAM amount is crucial before considering an upgrade. Here’s how to check it in both Windows 10 and 11:
Method 1: Task Manager
- Press Ctrl + Shift + Esc to open Task Manager.
- Click on the “Performance” tab.
- Under the “Memory” section, you’ll see the total amount of RAM installed in your system. This is displayed in both MB (megabytes) and GB (gigabytes).
Method 2: System Settings
- Right-click the Start menu and select “System settings.”
- In the System settings window, scroll down and click on “About your device.”
- Under “Device specifications,” you’ll find the “Installed RAM” amount, shown in both MB and GB.
How Much Memory Do I Need In My Laptop?
How Much RAM Do You Need in Your IdeaPad S340-14IIL?
The ideal RAM amount for your Lenovo IdeaPad S340-14IIL depends on your specific usage patterns and needs. Here’s a breakdown to help you decide:
Basic Usage (Browsing, Email, Light Office Work):
- 8GB RAM: This is the minimum recommended amount for most casual users. It should handle basic tasks like web browsing, email, and document editing smoothly.
Moderate Usage (Multitasking, Light Gaming):
- 12GB RAM: If you frequently multitask between several applications, edit photos occasionally, or play light games, consider upgrading to 12GB. This will provide noticeable performance improvement during multitasking and help avoid slowdowns.
Heavy Usage (Gaming, Video Editing, Design Software):
- 16GB RAM: If you’re a gamer, video editor, graphic designer, or use demanding software, 16GB RAM is highly recommended. It will ensure smooth performance for these resource-intensive tasks and prevent system crashes.
Signs You Might Need More RAM:
- Slow Boot Times: If your laptop takes a long time to boot up, it could indicate insufficient RAM for handling initial system processes.
- Laggy Performance: If your laptop struggles to keep up with basic tasks like web browsing or opening documents, it’s definitely time to consider an upgrade.
- Frequent Application Crashes: If applications frequently crash or freeze, especially while multitasking, insufficient RAM could be the culprit.
- Overheating: RAM overload can cause your laptop to overheat, leading to performance throttling and potential hardware damage.
IdeaPad S340-14IIL RAM Upgrade: Takeaway
Knowing what to look for and what you’ll see when you open up the machine is always helpful before starting the process. Upgrading your S340-14IIL’s RAM can significantly improve its performance, especially for multitasking and demanding applications. By following these steps and tips, you can ensure a successful and rewarding upgrade experience.
- Upgrading SSD Storage in the ThinkPad X9-15 Gen 1 Aura Edition
- Legion 5 Laptop Upgrade Guide: Game Like a Pro
- IdeaPad Gaming 3 Upgrade (Full Specs)
- Lenovo LOQ 15IRX9 RAM and SSD Upgrade
- Level Up: 10 Hacks to Boost Laptop Speed

J.S. is the owner, content creator, and editor at Upgrades-and-Options.com. I’ve worked in the IT and Computer Support field for over 20 years. The server hardware in my computer labs has mostly been IBM, but I’ve supported Dell, HP, and various other hardware. In addition, as part of my lab administrator responsibilities, I’ve learned, supported, and repaired/upgraded network hardware such as Cisco routers and switches. READ FULL BIO >>


