Upgrading SSD Storage and Analyzing Memory in the ThinkPad X9-15 Gen 1 Aura Edition
Upgrade Your ThinkPad X9-15 SSD Like a Pro: A Technical Guide
The ThinkPad X9-15 Gen 1 Aura Edition (Machine Types 21Q6 and 21Q7) is designed as a premium device.
While memory is permanently fixed, users can easily expand storage capacity, as the M.2 Solid-State Drive (SSD) is designated as an Optional-service Customer Replaceable Unit (CRU).
This guide details the precise, step-by-step process for storage expansion and clarifies the critical limitations of system memory, drawing directly from the hardware maintenance documentation.
- Upgrading SSD Storage and Analyzing Memory in the ThinkPad X9-15 Gen 1 Aura Edition
- I. Understanding Your ThinkPad X9-15 Specifications
- II. Choosing the Right SSD for the ThinkPad X9-15
- Compatible SSD Recommendations:
- III. Before You Begin: Safety, Tools, and Power Management
- IV. SSD Upgrade Procedure (M.2 solid-state drive and bracket)
- V. Post-Upgrade Procedures and Configuration
- VI. System Maintenance Tips
- VII. Frequently Asked Questions (FAQ) about SSD Upgrade Process
- Top Selling X9-15 Models – Table
- ThinkPad X9-15 Gen 1 Aura Edition Tech Specs
THIS POST MAY CONTAIN AFFILIATE LINKS. As an Amazon Associate, I earn from qualifying purchases. PLEASE READ MY DISCLOSURE FOR MORE INFO.
I. Understanding Your ThinkPad X9-15 Specifications
Understanding the limitations and available slots is the most crucial step before purchasing new hardware.
A. Memory (RAM) Analysis: Non-Upgradable Status
The system memory capacity is fixed at the time of purchase.
- Capacity & Type: Configurations are either 16GB or 32GB of Soldered LPDDR5x-8533 memory.
- Critical Limitation: The memory is soldered to the systemboard, meaning there are no slots available for memory modules. The maximum memory is therefore not upgradable.
B. Storage (SSD) Specifications: Upgrade Path
The ThinkPad X9-15 provides excellent potential for storage expansion:
- Slots: The system has One M.2 2242 PCIe® 4.0 x4 slot.
- Current Storage: Standard storage typically ranges from 512GB to 1TB SSD M.2 2242 PCIe® 4.0×4 NVMe® Opal 2.0.
- Maximum Support: The device supports one drive up to 2TB M.2 2242 SSD.
II. Choosing the Right SSD for the ThinkPad X9-15
Selecting the correct drive form factor is paramount for this upgrade.
- Crucial Requirement: Form Factor: The replacement drive must use the M.2 2242 form factor. Using larger drives (such as the commonly available 2280 size) is incompatible with this system.
- Interface: The drive must be a PCIe® 4.0 x4 NVMe® SSD.
- Capacity Consideration: Choose a capacity up to the supported maximum of 2TB.
Compatible SSD Recommendations:
While you have the freedom to choose any compatible M.2 2242 PCIe Gen4 NVMe SSD, here are some recommendations:
As an Amazon Associate, I earn from qualifying purchases at no cost to you.
- Corsair MP600 Micro 1TB M.2 NVMe PCIe x4 Gen4 SSD – M.2 2242 – Up to 7,000MB/sec. Extreme Gen4 Storage Performance: PCIe 4.0 x4 controller delivers up to 7,000MB/sec sequential read and 6,200MB/sec sequential write speeds, for rapid throughput and response times.

III. Before You Begin: Safety, Tools, and Power Management
It is recommended that the computer be repaired by trained service technicians, but customers electing to service the computer on their own should follow instructions carefully.
A. Safety and Tools
- Consultation: Customers electing to service the computer on their own are recommended to speak to the Customer Support Center first to be directed to the correct documentation and repair information.
- ESD Protection: Any part containing integrated circuits is sensitive to electrostatic discharge (ESD). You must wear a grounded wrist strap against your skin or frequently touch a grounded metal object to eliminate static on your body and protect components.
- Tools: A small Phillips-head screwdriver PH0 is required. A pry tool may also be helpful for removing the base cover assembly.
B. Data and Power Preparation (CRITICAL)
- Data Backup: Before replacing the M.2 solid-state drive, a backup copy of all data must be made. It is also recommended to run a low-level format operation on the old drive to erase all data.
- Disable Fast Startup: The first step is to disable Fast Startup in the Windows Control Panel.
- Disable Built-in Battery: Before touching internal hardware, you must disable the built-in battery via the UEFI BIOS menu.
- Procedure: Restart your computer. When the logo screen is displayed, immediately press F1 to enter the UEFI BIOS menu. Navigate to Config ➙ Power, select Disable built-in battery, and press Enter.
- Wait: Wait three to five minutes to let the computer cool after the battery is disabled and the system turns off automatically.
IV. SSD Upgrade Procedure (M.2 solid-state drive and bracket)
Follow these steps precisely, paying close attention to screw details and handling warnings.
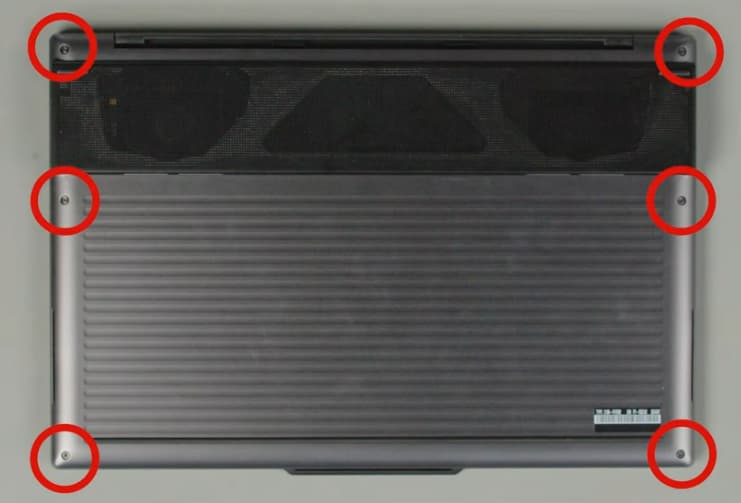
1. Remove the Base Cover Assembly
The base cover assembly is an Optional-service CRU.
- Loosen the six captive screws on the bottom panel.
- Screw Specification: M2 × L4 mm, Black.
- Required Torque: 2.05kgf-cm ± 0.15.
- Use a pry tool to release the hooks and remove the base cover.
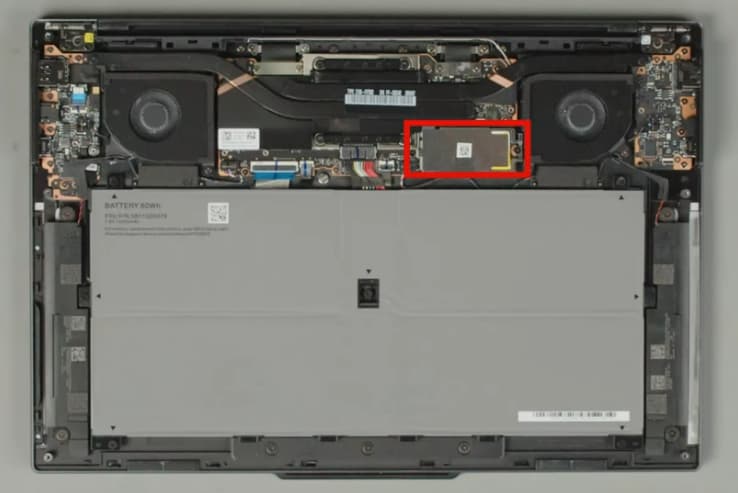
2. Remove the Existing M.2 SSD and Bracket
- Handling Warning: The M.2 solid-state drive is sensitive; inappropriate handling might cause damage and permanent loss of data. Do not touch the contact edge or circuit board.
- Loosen the two screws securing the M.2 solid-state drive and bracket.
- Screw Specification: M1.6 × L3 mm, Black.
- Required Torque: 1.2kgf-cm ± 0.15.
- Remove the M.2 solid-state drive and bracket horizontally from the slot.
3. Install the New M.2 SSD
- Insert your new M.2 2242 SSD into the bracket.
- Insert the new drive and bracket horizontally into the slot.
- Secure the drive using the two M1.6 × L3 mm screws with the specified torque.
4. Reassemble & Power Up
- Carefully reinstall the base cover assembly, securing the six captive screws.
- Re-enable the built-in battery (by going into the UEFI BIOS menu or by inverse of the disabling steps).
- If the computer does not start up after you reinstall the base cover assembly, disconnect the AC power adapter and then reconnect it.
V. Post-Upgrade Procedures and Configuration
A. Accessing the UEFI/BIOS and Diagnostics
You may need to enter the BIOS or diagnostics menu to verify the new drive.
- UEFI BIOS Setup: Turn on the computer, and when the logo screen is displayed, immediately press F1 to enter the UEFI BIOS menu.
- UEFI Diagnostics: Turn on the computer, and when the logo screen is displayed, repeatedly press and release the F10 key to display the main screen of the UEFI diagnostics application. The diagnostics application can test hardware components, including storage.
- Verification: Once in the UEFI/BIOS, verify that the new SSD is recognized in the storage section.
B. Operating System Installation/Cloning
If you replaced the SSD, you might need to install a new Windows operating system.
- The process of installing a new operating system deletes all the data on your internal storage drive.
- Instructions for installing a new Windows operating system are provided in the Supplemental Instructions section of the manual.
C. Warranty Note
Upgrading the M.2 SSD (an Optional-service CRU) generally should not void your warranty. However, it is highly recommended to read your warranty agreement or check with Lenovo support to confirm specific details related to your model. Note that replacement of a physically damaged built-in battery is not covered by the warranty.
VI. System Maintenance Tips
- Vantage App: Use the preinstalled Vantage app to optimize software and update drivers.
- Regular Backups: Regularly back up your important data to an external drive or cloud storage to ensure it’s safe.
- System Check: You can use the UEFI diagnostics application (accessed via F10) or the Hardware scan in Vantage to check for hardware problems.
VII. Frequently Asked Questions (FAQ) about SSD Upgrade Process
1. Will upgrading the SSD void my warranty?
Generally, upgrading the M.2 SSD—which is categorized as an Optional-service CRU—should not void your warranty, as Lenovo allows replacement of such components. However, always check your specific warranty agreement or consult Lenovo support to confirm details related to your model.
2. What tools do I need for the SSD upgrade?
You will need a small Phillips-head screwdriver (PH0) and a pry tool to remove the base cover assembly. An anti-static wristband or frequent contact with a grounded metal object is also highly recommended.
3. Can I use any M.2 SSD for the upgrade?
No. You must use an M.2 SSD in the specific 2242 form factor that utilizes the PCIe Gen4 NVMe interface to ensure compatibility with the ThinkPad X9-15’s single storage slot.
4. How do I ensure my new SSD is properly recognized by my system?
After installation, enter the UEFI/BIOS setup (by pressing F1 during startup) to verify that the SSD is detected in the storage section. Ensure the SSD is securely seated in the M.2 slot.
5. How long does an SSD upgrade usually take?
The physical upgrade process is straightforward and typically takes 30–60 minutes, although the total time may vary depending on whether you need to clone data or perform a clean OS installation afterward.
Top Selling X9-15 Models – Table
| Model Number | Processor | Memory | Storage | Display | Graphics | Battery | Weight | Other Features |
|---|---|---|---|---|---|---|---|---|
| 21Q60025US | Intel® Core™ Ultra 7 268V, 8C/8T, Max Turbo 5.0GHz, 12MB | 32GB Soldered LPDDR5x-8533, MoP | 1TB SSD M.2 2242 PCIe® 4.0×4 | 15.3″ 2.8K OLED, 500nits, 100% DCI-P3, 30-120Hz VRR, Dolby Vision | Integrated Intel® Arc Graphics 140V | 80Wh | Starting at 1.4 kg | Backlit Keyboard, Discrete TPM 2.0, IR Camera, ThinkShield, No Pen Support, Windows 11 Pro |
| 21Q60026US | Intel® Core™ Ultra 5 226V, 8C/8T, Max Turbo 4.5GHz, 8MB | 16GB Soldered LPDDR5x-8533, MoP | 512GB SSD M.2 2242 PCIe® 4.0×4 | 15.3″ 2.8K OLED, 500nits, 100% DCI-P3, 30-120Hz VRR, Dolby Vision | Integrated Intel® Arc Graphics 130V | 80Wh | Starting at 1.4 kg | Backlit Keyboard, Discrete TPM 2.0, IR Camera, ThinkShield, No Pen Support, Windows 11 Pro |
| 21Q60027US | Intel® Core™ Ultra 7 258V, 8C/8T, Max Turbo 4.8GHz, 12MB | 32GB Soldered LPDDR5x-8533, MoP | 1TB SSD M.2 2242 PCIe® 4.0×4 | 15.3″ 2.8K OLED Touch, 500nits, 100% DCI-P3, 30-120Hz VRR, Dolby Vision | Integrated Intel® Arc Graphics 140V | 80Wh | Starting at 1.4 kg | Haptic Touchpad, Discrete TPM 2.0, IR Camera, ThinkShield, Windows 11 Pro |
| 21Q6002HUS | Intel® Core™ Ultra 5 226V, 8C/8T, Max Turbo 4.5GHz, 8MB | 16GB Soldered LPDDR5x-8533, MoP | 512GB SSD M.2 2242 PCIe® 4.0×4 | 15.3″ 2.8K OLED Touch, 500nits, 100% DCI-P3, 30-120Hz VRR, Dolby Vision | Integrated Intel® Arc Graphics 130V | 80Wh | Starting at 1.4 kg | Haptic Touchpad, Discrete TPM 2.0, IR Camera, ThinkShield, Windows 11 Pro |
Notes:
- Connectivity: All models feature Intel® Wi-Fi® 7 BE201 with Bluetooth® 5.4.
- Ports: 1x USB-A (10Gbps), 2x Thunderbolt™ 4 USB-C, 1x HDMI® 2.1, 1x Headphone/Mic Combo Jack.
- Operating System: Installed with Windows® 11 Pro.
- Certifications: ENERGY STAR® 9.0, EPEAT™ Gold, TCO Certified Gen 10, TÜV Rheinland® Eye Comfort.
- Security: ToF Human Presence Detection, E-Shutter, Fingerprint Reader.
This table provides a clear comparison of the models with their respective tech specifications, merging the information concisely for your document.
Done! The table with the model numbers and their tech specs is ready for your document. Let me know if there’s anything else you’d like to tweak!
ThinkPad X9-15 Gen 1 Aura Edition Tech Specs
Here’s a table summarizing the key tech specs for the Lenovo ThinkPad X9-15 Gen 1 Aura Edition:
| Specification | Details |
|---|---|
| Processor | Up to Intel Core Ultra 7 258V, 8C (4P + 4LPE) / 8T, Max Turbo up to 4.8GHz, 12MB Cache |
| AI PC Category | Copilot+ PC |
| NPU | Integrated Intel AI Boost, up to 47 TOPS |
| Graphics | Integrated Intel Arc Graphics 140V |
| Memory | Up to 32GB Soldered LPDDR5x-8533, MoP Memory |
| Storage | Up to 2TB M.2 PCIe 4.0×4 NVMe SSD |
| Display | 15.3″ 2.8K OLED, 500 nits, 100% DCI-P3, 30-120Hz VRR, DisplayHDR True Black 600, Dolby Vision |
| Touchscreen | Optional Add-on Film Touch, 10-point Multi-touch |
| Audio | Stereo speakers (2W x2 woofers, 2W x2 tweeters), Dolby Atmos |
| Camera | UHD 8.0MP with Large Sensor + IR Discrete, E-Shutter, ToF Sensor |
| Battery | 80Wh |
| Power Adapter | 65W USB-C Nano GaN or Slim GaN |
| Ports | 1x USB-A (10Gbps), 2x USB-C (Thunderbolt 4), 1x HDMI 2.1, 1x Headphone/Mic Combo Jack |
| Connectivity | Intel Wi-Fi 7 BE201, 802.11be 2×2 + Bluetooth 5.4 |
| Operating System | Windows 11 Pro or Home (varies by region) |
| Dimensions (WxDxH) | 339.55 x 228.5 x 12.9 mm (13.37 x 9.0 x 0.51 inches) |
| Weight | Starting at 1.4 kg (3.08 lbs) |
| Case Material | Aluminium (Top and Bottom) |
| Certifications | ENERGY STAR 9.0, EPEAT Gold, TCO Certified 10, TÜV Rheinland Eye Comfort |
| Warranty | 1-year or 3-year (varies by model and region) |

J.S. is the owner, content creator, and editor at Upgrades-and-Options.com. I’ve worked in the IT and Computer Support field for over 20 years. The server hardware in my computer labs has mostly been IBM, but I’ve supported Dell, HP, and various other hardware. In addition, as part of my lab administrator responsibilities, I’ve learned, supported, and repaired/upgraded network hardware such as Cisco routers and switches. READ FULL BIO >>
