
Ready to give your ThinkPad E14 Gen 4 (AMD) a performance boost? Upgrading the RAM and SSD can unlock faster speeds, smoother multitasking, and a more responsive user experience.
This guide is designed for beginners, walking you through the process step-by-step with helpful tips and advice.
- Compatibility Check: Ensuring a Perfect Upgrade
- Pre-Upgrade Preparation: Safety First
- ThinkPad E14 Gen 4 RAM Upgrade Process
- ThinkPad E14 Gen 4 SSD Upgrade Process
- Post-Upgrade Testing: Ensuring Flawless Functionality
- Upgrade Warnings: Risks Mitigation
- Additional Resources:
- Understanding Your Thinkpad E14’s Specs:
- Compatible SSD Recommendations:
- Accessing the Thinkpad E14 UEFI/BIOS:
THIS POST MAY CONTAIN AFFILIATE LINKS. As an Amazon Associate, I earn from qualifying purchases. PLEASE READ MY DISCLOSURE FOR MORE INFO.
Compatibility Check: Ensuring a Perfect Upgrade
Before we begin, it’s crucial to confirm that your upgrades align perfectly with your ThinkPad E14 Gen 4’s specifications:
- Max Memory: Up to 40GB (8GB soldered + 32GB SO-DIMM) DDR4-3200
- Memory Slots: One soldered, one DDR4 SO-DIMM slot, dual-channel capable
- Storage Support: Up to two drives, 2x M.2 SSD with one 2242 and one 2280 PCIe 3.0 x4 slots
- M.2 2242 SSD up to 512GB
- M.2 2280 SSD up to 1TB
Ensuring compatibility is like laying a solid foundation. It guarantees stability and optimized performance in our tech endeavors.
Pre-Upgrade Preparation: Safety First
Disabling the Built-in Battery:
- Disable Fast Startup from the Control Panel under Power Options.
- Restart your ThinkPad, pressing F1 during the logo screen to enter the ThinkPad Setup.
- Navigate to `Config` > `Power`, selecting `Disable built-in battery`, and confirm.
This step is paramount for safety and preventing any potential damage to your ThinkPad or new components.
ThinkPad E14 Gen 4 RAM Upgrade Process
Tools Required:
- Precision Screwdriver Set
- Anti-static Wrist Strap
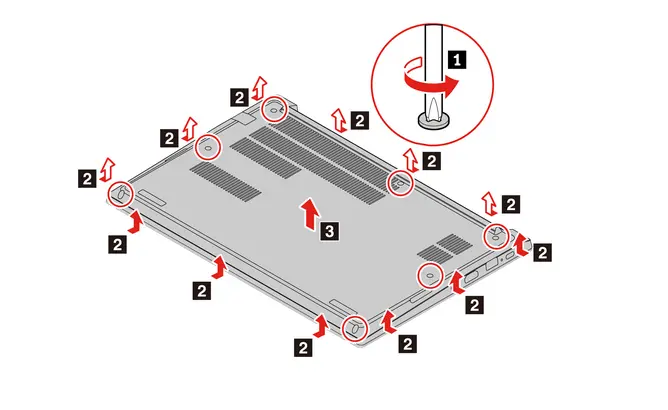
1. Remove the Lower Case:
- Place your laptop upside down on a flat surface.
- Locate the seven Phillips-head screws on the bottom panel and remove them carefully.
- Gently pry up the latches along the edges and remove the lower case, being mindful of any cables.
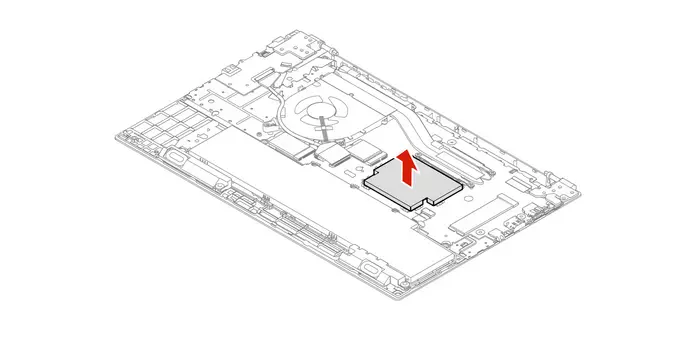
2. Locate RAM Slots:
- With the back cover removed, locate the SO-DIMM slot for RAM. You will have to remove the memory module bracket covering the RAM.
- Remove existing RAM: Open the latches on both sides of the memory module slot at the same time, and then remove the memory module.
- Hold the new RAM module by the edges, aligning it with the notch in the slot. Gently but firmly press down until it clicks into place.
3. Reassemble:
- Put the back cover back on and screw it tightly, but avoid overtightening.
- Restart your ThinkPad, and you’re good to go!
ThinkPad E14 Gen 4 SSD Upgrade Process
Tools Required:
- Precision Screwdriver Set
- Anti-static Wrist Strap
1. Remove the Lower Case:
- Place your laptop upside down on a flat surface.
- Locate the seven Phillips-head screws on the bottom panel and remove them carefully.
- Gently pry up the latches along the edges and remove the lower case, being mindful of any cables.
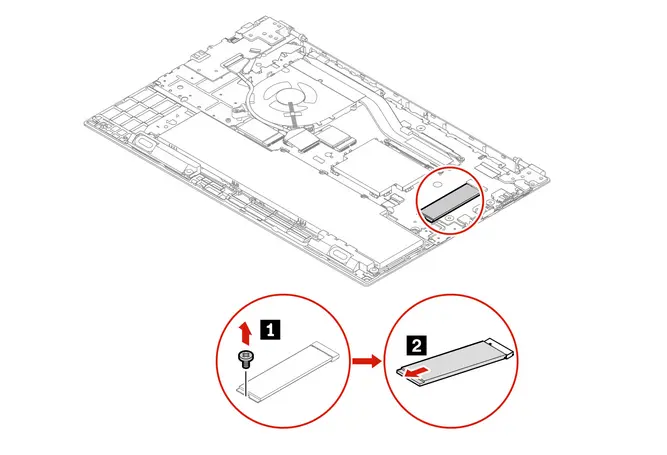
2. Locate M.2 SSD Slots:
- With the back cover removed, locate the two M.2 SSD slots. One is for 2242 and one for 2280 form factor. Identify the appropriate slot for your new SSD based on its size.
- Install the New SSD: Carefully hold the SSD by the edges and gently insert it into the chosen slot, ensuring it’s aligned correctly. Push down until it clicks securely into place.
3. Reassemble:
- Put the back cover back on and screw it tightly, but avoid overtightening.
- Restart your ThinkPad, and you’re good to go!
Essential Tips for a Successful SSD Upgrade
- Data Backup: Ensure all your important files are backed up before proceeding with the SSD installation. This safeguards against any potential data loss during the upgrade.
- Handling the SSD: Always hold the SSD by the edges to prevent damage from static electricity or oils from your fingers. Make sure to handle the SSD carefully to maintain its integrity.
- Avoiding Pressure: Do not exert force on the SSD. Excessive pressure can damage the delicate components and lead to hardware failure.
- Shock Absorption: When not installed, place the SSD on a padded or soft surface such as a piece of cloth or foam. This practice helps to minimize the risk of shock or vibration that could compromise the SSD’s functionality.
ThinkPad E14 Gen 4 Post-Upgrade Testing: Ensuring Flawless Functionality
After completing the upgrades, it’s crucial to:
- Boot up your ThinkPad to verify it recognizes the new SSD and RAM.
- Check system performance to ensure everything is functioning smoothly.
Upgrade Warnings: Risks Mitigation
- Upgrading without a certified technician may impact your warranty.
- Use an anti-static wrist strap to prevent damage from static electricity.
- Ensure proper installation to avoid system instability or damage.
- Always backup critical data before undertaking any hardware modifications.
Additional Resources:
- Thinkpad E14 Use Manual from Lenovo
- Crucial RAM 16GB DDR4 3200MHz. Amazon Product Page.
- Crucial RAM 32GB DDR4 3200MHz CL22. Amazon Product Page.
- Crucial T500 1TB Gen4 NVMe M.2. Amazon Produce Page.
- What is a Solid-State Drive (SSD). My article.
As an Amazon Associate, I earn from qualifying purchases at no cost to you.
Understanding Your Thinkpad E14 Gen 4’s Specs:
Let’s cover the ThinkPad E14 Gen 4 (AMD) specs. This information is crucial for choosing the right upgrade:
- Memory: Your Thinkpad E14 is equipped with 8 GB of soldered RAM, expandable with an additional 8 GB DIMM up to a maximum of 32 GB DIMM of DDR4-3200. This allows for a total maximum RAM capacity of 40 GB.
- Storage: The Thinkpad E14 offers the flexibility of up to two drives, featuring 2x M.2 SSD slots – one 2242 and one 2280 PCIe 3.0 x4 slots. The M.2 2242 SSD supports capacities of up to 512GB, while the M.2 2280 SSD allows for storage up to 1TB.
- Chipset: AMD SoC Platform.
Choosing the Right Thinkpad E14 Gen 4 SSD:
When selecting your new SSD, ensure it’s:
- Compatible with M.2 2280 (80mm) form factor
- PCIe NVMe Gen3 x4 interface. You can use a Gen4x4 also.
- Offers ample storage space for your needs
Choosing the Right Thinkpad E14 Gen 4 RAM:
When choosing your new RAM, consider:
- Compatibility with DDR4 SO-DIMM slots
- Memory speed of at least 3200 MHz for optimal performance
- Choosing the right capacity based on your multitasking needs and budget.
Compatible SSD Recommendations:
While you have the freedom to choose any compatible M.2 2280 PCIe Gen3 NVMe SSD, here are some recommendations based on your notes:
As an Amazon Associate, I earn from qualifying purchases at no cost to you.
- Crucial T500 1TB PCIe Gen4 NVMe M.2 SSD: This high-performance SSD boasts read/write speeds up to 7,300/7,000MB/s.
- Samsung 990 Pro 1TB PCIe Gen4 NVMe M.2 SSD): Another excellent option with impressive speeds and reliability.
Accessing the Thinkpad E14 UEFI/BIOS:
After upgrading your SSD or RAM, you might need to enter the UEFI/BIOS to configure boot settings or verify hardware detection. Here’s how:
- When the logo screen is displayed, repeatedly press and release the F1 key. The main screen of the UEFI diagnostic program is displayed.
- Navigate and Configure: Once in the UEFI/BIOS, use the arrow keys and Enter key to navigate and make any necessary changes.
Remember: Modifying settings in the UEFI/BIOS can impact your system’s stability. Only change settings you understand and are confident in. If unsure, consult your user manual or seek professional help.
- Upgrading SSD Storage in the ThinkPad X9-15 Gen 1 Aura Edition
- Legion 5 Laptop Upgrade Guide: Game Like a Pro
- IdeaPad Gaming 3 Upgrade (Full Specs)
- Lenovo LOQ 15IRX9 RAM and SSD Upgrade
- Level Up: 10 Hacks to Boost Laptop Speed

J.S. is the owner, content creator, and editor at Upgrades-and-Options.com. I’ve worked in the IT and Computer Support field for over 20 years. The server hardware in my computer labs has mostly been IBM, but I’ve supported Dell, HP, and various other hardware. In addition, as part of my lab administrator responsibilities, I’ve learned, supported, and repaired/upgraded network hardware such as Cisco routers and switches. READ FULL BIO >>
