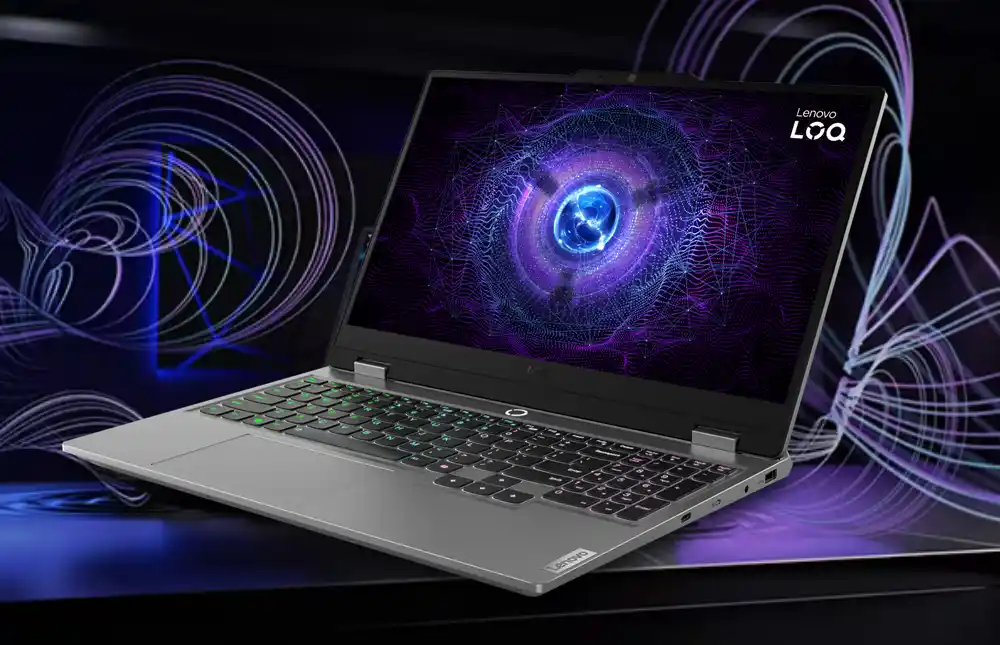
Lenovo LOQ 15IRX9: Unleash Your Gaming Potential with RAM and SSD Upgrades
Looking to squeeze every ounce of performance from your Lenovo LOQ 15IRX9 gaming laptop? You’ve come to the right place.
While this machine comes packed with impressive specs like a 13th Gen Intel Core i7 processor and an NVIDIA GeForce RTX 4060 graphics card, there’s always room for improvement. Upgrading your RAM and SSD can make a world of difference, leading to faster loading times, smoother gameplay, and enhanced multitasking capabilities.
In this guide, we’ll break down everything you need to know about upgrading your Lenovo LOQ 15IRX9’s RAM and SSD. We’ll cover:
- Why these upgrades matter for gamers
- Choosing the right RAM and SSD for your system (compatibility is key!)
- A detailed, step-by-step walkthrough of the upgrade process (with helpful visuals)
- Common troubleshooting tips and tricks
So, grab your toolkit and get ready to supercharge your Lenovo LOQ 15IRX9! Let’s transform your gaming experience.
DIY Upgrade – You Got This!
Upgrading the RAM and SSD in your Lenovo LOQ laptop is a task you can tackle yourself if you’re comfortable working with computer hardware and have a basic understanding of the components involved. If you’re feeling uncertain, seeking assistance from a qualified technician is always a good option.
- Lenovo LOQ 15IRX9: Unleash Your Gaming Potential with RAM and SSD Upgrades
- A. Lenovo LOQ Compatible RAM:
- B. Lenovo LOQ Compatible SSD:
- C. The Essential Toolkit:
- Step 1: Power Down and Prepare
- Step 2: Access the RAM Slot
- Step 3: Install the New RAM
- Step 4: Reassemble and Test
- Step 5: Enjoy the Performance Boost!
- Step 1: Power Down and Prepare (Same as RAM Upgrade)
- Step 2: Access the SSD Slot
- Step 3: Install the New SSD
- Step 4: Reassemble and Test
- Step 5: Data Migration (Additional Step)
- Step 6: Enjoy the Enhanced Speed!
- Lenovo LOQ 15IRX9 (83DV00FXUS) Specifications Table
- Additional Resources
THIS POST MAY CONTAIN AFFILIATE LINKS. As an Amazon Associate, I earn from qualifying purchases. PLEASE READ MY DISCLOSURE FOR MORE INFO.
Compatibility:
- RAM Type: The Lenovo LOQ 15IRX9 utilizes DDR5-4800 RAM. Dual-channel capable.
- maximum RAM: Capacity of 32GB.
- SSD Specs: M.2 SSDs with a PCIe NVMe interface.
- Interface: Two PCIe NVMe Gen4.0 x4 slots
- Capacity: M.2 2280 SSD up to 1TB. Officially. Many users install 2TB.
Gathering Your Tools and Components
Before you begin your upgrade journey, it’s essential to have the right tools and components at your disposal. Think of it as assembling your upgrade squad! Here’s a breakdown of what you’ll need:
A. Lenovo LOQ Compatible RAM:
- DDR5 SO-DIMM is Key: The Lenovo LOQ 15IRX9 83DV00FXUS laptop utilizes DDR5 SO-DIMM RAM modules. It’s crucial to purchase RAM sticks that adhere to this specification.
- Speed Matters: The supported speed for this model is 4800MHz. Make sure the RAM you select matches this speed for optimal performance.
- Capacity Considerations: The LOQ 15IRX9 83DV00FXUS comes with a single 16GB DDR5-4800 SO-DIMM module, but it supports a maximum of 32GB. If you want to max out your RAM, you can add another 16GB module.
B. Lenovo LOQ Compatible SSD:
- Embrace the M.2 Form Factor: This laptop features multiple M.2 slots: one M.2 2242 slot and two M.2 2280 slots. You have options! The 2242 and 2280 refer to the physical dimensions of the SSD. Decide which form factor suits your needs based on the available slots and the capacity you desire.
- NVMe for Speed: For the best performance, choose an SSD that supports the NVMe (Non-Volatile Memory Express) protocol. NVMe offers significantly faster data transfer rates compared to older SATA SSDs.
- Capacity – The Sky’s the Limit: Select an SSD capacity that aligns with your storage requirements. Whether you need 512GB, 1TB, or even more, there are plenty of options available.
C. The Essential Toolkit:
- Precision Screwdriver Set: Here’s one at Amazon. A precision screwdriver set with magnetic tips is your best friend during this upgrade process. Those tiny screws are much easier to handle with a magnetic screwdriver.
- Anti-Static Wrist Strap: Protect your laptop’s sensitive components from electrostatic discharge (ESD) with an anti-static wrist strap. ESD can cause damage to delicate electronics, so grounding yourself is a must.
- Clean and Static-Free Workspace: Prepare a clean, well-lit, and organized workspace free of static electricity. A non-conductive surface, like a wooden table, is ideal.
Important Considerations for Upgrading Your Lenovo LOQ Laptop
| Consideration | Description |
|---|---|
| Warranty Implications | Upgrading your Lenovo LOQ laptop by opening it and installing new components like RAM or an SSD may affect your warranty coverage. Lenovo’s warranty terms can vary depending on your region and the specific warranty you purchased. It is crucial to review your warranty documentation or contact Lenovo support for clarification before starting any upgrades. |
| Data Backup | Upgrading your SSD, particularly if you’re replacing the existing drive, carries a risk of data loss. Back up all your important data before you begin the upgrade process. You can use an external hard drive, cloud storage, or another reliable backup method. This ensures you can restore your data in case any unexpected problems occur. |
| Safety Precautions | Working with electronic components requires precautions to prevent damage from electrostatic discharge (ESD). |
| * Static-Free Environment: Set up your workspace in a static-free environment, preferably on a non-carpeted surface. | |
| * Ground Yourself: Use an anti-static wrist strap connected to a ground point, like a metal part of your computer case, to discharge static buildup from your body. | |
| * Handle Components Carefully: Avoid touching the gold contacts on RAM modules and SSDs. Hold the components by their edges to minimize the risk of ESD damage. |
Need to buy some RAM? Consider these from Amazon.com. THIS POST MAY CONTAIN AFFILIATE LINKS. As an Amazon Associate, I earn from qualifying purchases. PLEASE READ MY DISCLOSURE FOR MORE INFO.
Lenovo LOQ RAM Upgrade: A Step-by-Step Guide
Here’s a step-by-step guide to upgrading the RAM in your Lenovo LOQ 15IRX9.
- Crucial Note: This guide is specifically tailored to the Lenovo LOQ 15IRX9 model. Procedures may vary slightly for different models. Always consult your laptop’s documentation or Lenovo’s support website for model-specific instructions.
Step 1: Power Down and Prepare
- Shut Down Completely: Begin by completely shutting down your Lenovo LOQ laptop. Do not simply put it to sleep or hibernate. A full shutdown is essential to avoid any potential data loss or damage to components.
- Disconnect Power: Unplug the AC adapter from your laptop. This step eliminates the risk of electrical shock during the upgrade process.
- Ground Yourself: To prevent electrostatic discharge (ESD), which can harm electronic components, put on an anti-static wrist strap and ensure it is properly grounded.
Step 2: Access the RAM Slot
- Flip the Laptop: Turn your Lenovo LOQ laptop upside down and place it on a clean, non-conductive surface, like a wooden table.
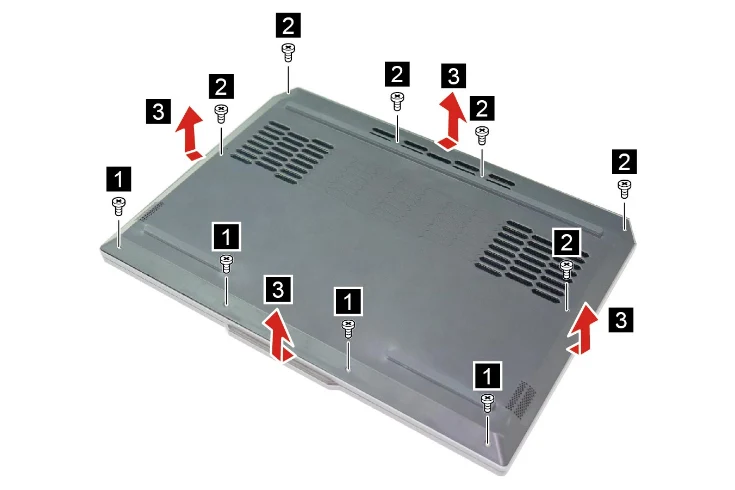
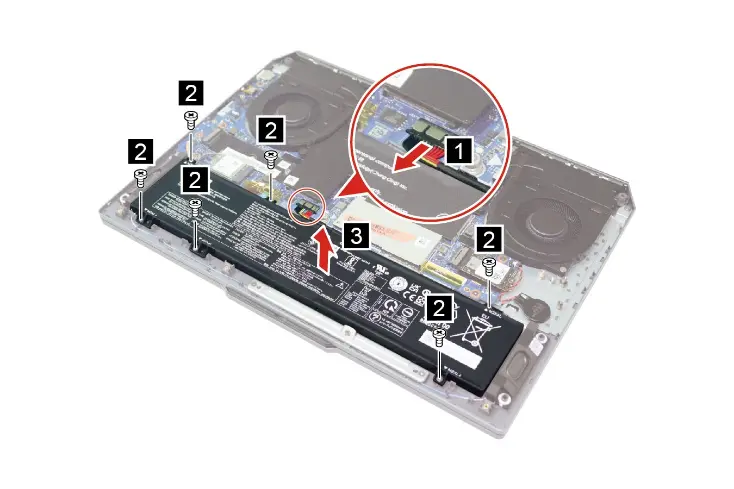
- Locate the Back Panel: Remove ten screws, pry up the latches, and then remove the lower case.
- Detach the Back Panel: Gently lift or pry the back panel to detach it from the laptop’s chassis. Be careful not to damage any clips or connectors that may be holding the panel in place.
- Remove the Battery Connector: Disconnect the battery pack cable from the system board.
Question: What if the case doesn’t come off easily?
Answer: Double-check that all screws are removed. Gently pry from different edges, but avoid using excessive force.
Step 3: Install the New RAM
- Identify the RAM Slot: Once you have access to the laptop’s internals, locate the RAM slot. It will typically resemble a long, narrow slot with clips on either side.
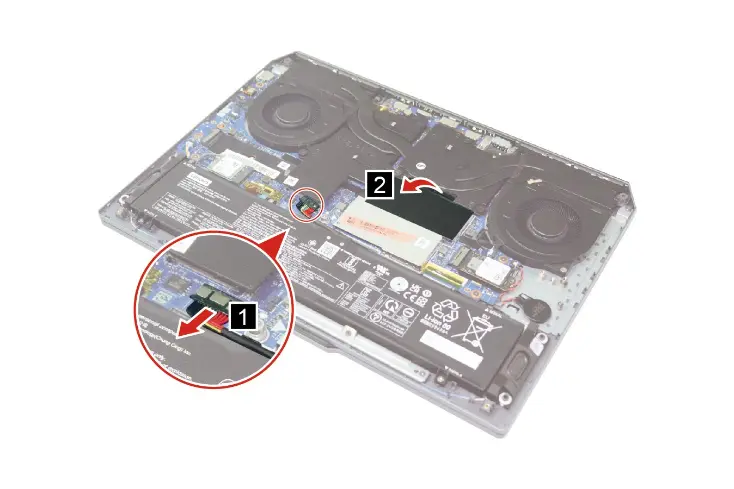
- Peel back the mylar.
- Remove the DIMM shielding.
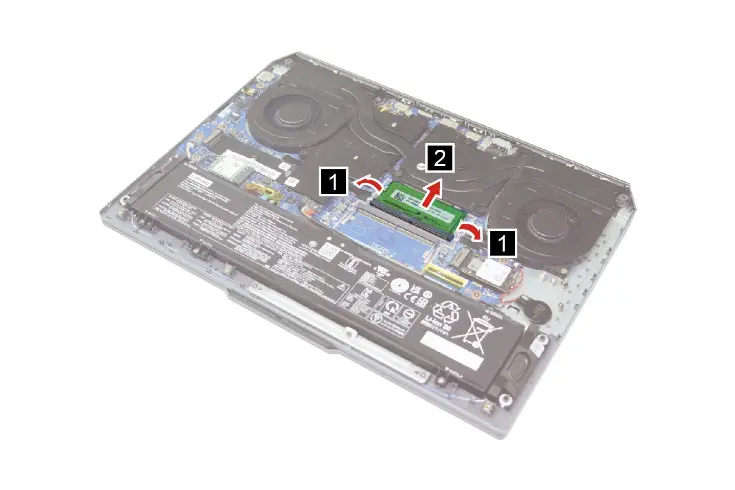
- Remove Existing RAM (if applicable): If your Lenovo LOQ came with a pre-installed RAM module and you’re upgrading to a higher capacity module, gently push down on the clips on either side of the RAM module to release it. The module should pop up at a slight angle, allowing you to remove it.
- Align and Insert the New RAM: Align the notch on the new RAM module with the key in the RAM slot. Hold the module at a slight angle and gently push it into the slot.
- Press Down to Secure: Once the module is properly aligned, press down firmly on both ends of the module until you hear the clips click into place. The RAM should now be securely seated in the slot.
Step 4: Reassemble and Test
- Reattach the Back Panel: Carefully align the back panel with the laptop’s chassis and gently press it down until all the clips are securely fastened.
- Replace the Screws: Reinsert all the screws that you removed earlier, taking care not to overtighten them.
- Power On and Check the BIOS: Plug in the AC adapter and power on your Lenovo LOQ laptop. As the laptop boots up, access the BIOS (Basic Input/Output System) to verify that the new RAM is recognized by the system. The key to access the BIOS will typically be displayed on the boot screen (e.g., F2, Del, Esc).
Step 5: Enjoy the Performance Boost!
With the RAM upgrade successfully completed, your Lenovo LOQ gaming laptop should be ready to deliver enhanced performance for all your demanding tasks. Get ready for faster load times, smoother multitasking, and a more responsive gaming experience!
Lenovo LOQ SSD Upgrade: A Step-by-Step Guide
Let’s move on to upgrading the SSD in your Lenovo LOQ 15IRX9. This can significantly improve boot times, application load times, and overall system responsiveness.
- Crucial Note: As with the RAM upgrade, this guide is specifically tailored to the Lenovo LOQ 15IRX9 model.
Step 1: Power Down and Prepare (Same as RAM Upgrade)
Follow the same power-down and preparation steps as outlined in the RAM upgrade section. This includes shutting down the laptop completely, disconnecting the power adapter, removing the battery connector, and grounding yourself with an anti-static wrist strap.
Step 2: Access the SSD Slot
The process of accessing the SSD slot will be similar to accessing the RAM slot. You’ll need to:
- Flip the Laptop: Turn your laptop upside down and place it on a clean, non-conductive surface.
- Locate the Back Panel: Remove ten screws, pry up the latches, and then remove the lower case.
- Detach the Back Panel: Gently lift or pry the back panel to detach it from the laptop’s chassis. Be careful not to damage any clips or connectors that may be holding the panel in place.
Step 3: Install the New SSD
- Identify the SSD Slot: Locate the M.2 SSD slot on your laptop’s motherboard. This slot is designed to accommodate M.2 SSDs, which are much smaller and more compact than traditional 2.5-inch SATA SSDs.
- Determine the Correct Size: The Lenovo LOQ 15IRX9 has one M.2 2242 slot and two M.2 2280 slots. The numbers (2242 and 2280) refer to the SSD’s physical dimensions in millimeters. Ensure that the new SSD you purchased matches one of these sizes.
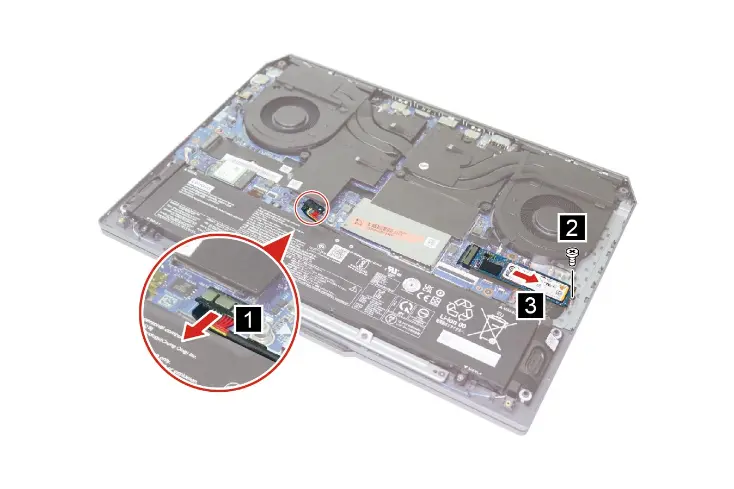
- Remove the Existing SSD (if applicable): If your Lenovo LOQ came with a pre-installed SSD, you’ll need to remove it to install the new one.
- Remove the Screw: There’s usually a single screw holding the SSD in place. Carefully remove this screw using the appropriate screwdriver.
- Slide the SSD Out: Once the screw is removed, gently slide the SSD out of the slot at a slight angle. Avoid using excessive force.
- Install the New SSD:
- Align the Notch: Align the notch on the new SSD with the key in the M.2 slot.
- Gently Insert: Carefully insert the SSD into the slot at a slight angle.
- Secure with the Screw: Once the SSD is fully inserted, use the screw you removed earlier to secure it in place. Do not overtighten.
Step 4: Reassemble and Test
Follow the same reassembly and testing steps as outlined in the RAM upgrade section. This includes reattaching the back panel, replacing the screws, reconnecting the battery connector, and powering on the laptop to check the BIOS and ensure that the new SSD is recognized.
Step 5: Data Migration (Additional Step)
If you are replacing an existing SSD that contains data, you’ll need to migrate that data to the new SSD. There are a couple of ways to do this:
- Fresh Install of Windows: You can perform a clean installation of Windows on the new SSD. This involves booting from a Windows installation USB and following the on-screen prompts to install Windows. Note: This method will erase all data on the new SSD, so be sure to back up any important data beforehand.
- Clone the Existing Drive: This method involves using cloning software to create an exact copy of your existing SSD onto the new SSD. This will transfer all of your data, operating system, applications, and settings to the new drive. Cloning software often comes bundled with SSDs or can be obtained from third-party vendors. Important: Make sure the cloning software is compatible with your specific SSDs and operating system.
Important Notes:
- Be extremely careful when performing data migration. Ensure that you select the correct source and destination drives to avoid accidentally overwriting or erasing data.
Step 6: Enjoy the Enhanced Speed!
After successfully installing and migrating data to the new SSD, your Lenovo LOQ gaming laptop should experience a significant boost in speed and responsiveness. You can expect faster boot times, quicker application launches, and smoother overall performance.
Need to buy an SSD? Consider these from Amazon.com. THIS POST MAY CONTAIN AFFILIATE LINKS. As an Amazon Associate, I earn from qualifying purchases. PLEASE READ MY DISCLOSURE FOR MORE INFO.
Lenovo LOQ Specs:
Lenovo LOQ 15IRX9 (83DV00FXUS) Specifications Table
| Feature | Specification |
|---|---|
| Processor | Intel® Core™ i7-13650HX |
| Cores/Threads | 14C (6P + 8E) / 20T |
| Clock Speed | P-core: 2.6 / 4.9GHz; E-core: 1.9 / 3.6GHz |
| Cache | 24MB |
| Graphics | NVIDIA® GeForce RTX™ 4060 8GB GDDR6 |
| Boost Clock | 2370MHz |
| TGP | 115W (with 230W adapter), 105W (with 170W adapter) |
| AI TOPS | 233 |
| Chipset | Intel® HM770 |
| Memory | 1x 16GB SO-DIMM DDR5-4800 |
| Memory Slots | Two DDR5 SO-DIMM slots (dual-channel capable) |
| Max Memory | Up to 32GB DDR5-4800 |
| Storage | 512GB SSD M.2 2242 PCIe® 4.0×4 NVMe® |
| Additional Storage | Two M.2 2280 PCIe® 4.0 x4 slots; One M.2 2242 slot up to 1TB |
| Display | 15.6″ FHD (1920×1080) IPS 300nits Anti-glare |
| Display Features | 100% sRGB, 144Hz, G-SYNC® |
| Audio | Realtek® ALC3287 codec, Stereo speakers (2W x2), Nahimic Audio |
| Camera | HD 720p with E-shutter |
| Battery | Integrated 60Wh |
| Power Adapter | 230W Slim Tip (3-pin) |
| Keyboard | White Backlit, English (US) |
| Touchpad | Buttonless Mylar® surface multi-touch, Precision TouchPad (PTP) |
| Dimensions | 359.86 x 258.7 x 21.9-23.9 mm (14.17 x 10.19 x 0.86-0.94 inches) |
| Weight | Starting at 2.38 kg (5.25 lbs) |
| Operating System | Windows® 11 Home, English |
| Ethernet | Integrated 100/1000M |
| WLAN + Bluetooth | Wi-Fi® 6, 802.11ax 2×2 + BT5.2 |
| AI Chip | LA1 |
| Security | Firmware TPM 2.0, E-shutter |
| Warranty | 1-year, Courier or Carry-in |
Notes:
- TGP (Total Graphics Power) varies depending on the power adapter used.
Finalizing the Upgrade and Optimizing Performance
After physically installing the new RAM and SSD, you need to ensure that your Lenovo LOQ 15IRX9 83DV00FXUS recognizes the new components and runs smoothly.
Reassembly and Initial Boot
- Power On and BIOS Check: Connect the AC adapter and power on the laptop. As the laptop starts, access the BIOS by pressing the F2 key during startup.
- First Boot Observation: Pay close attention to the initial boot process after the upgrade. Look for any error messages or unusual behavior that might indicate an issue with the newly installed components.
- Operating System Installation (If Applicable): If you replaced the primary drive (the one where your operating system was installed), you will need to install a fresh copy of your operating system (such as Windows 11) onto the new SSD.
Additional Tips
- Data Migration (If Applicable): If you upgraded to a larger SSD and want to transfer your existing data and operating system from the old drive, use cloning software. Cloning software creates an exact copy of your old drive onto the new SSD, preserving all your files, settings, and applications. This is a more convenient option than reinstalling the operating system and all your applications.
- Driver Updates: After completing the upgrades, it’s essential to check for and install the latest drivers for your new RAM and SSD. You can find these drivers on Lenovo’s support website, specifically for the LOQ 15IRX9 83DV00FXUS model.
- Troubleshooting: If your laptop doesn’t boot properly or the BIOS doesn’t recognize the new components:
- Double-check that all cables and components are properly connected and seated.
Additional Resources
- Visit Lenovo Support for manuals and additional guidance.
- Read my other – Laptop Upgrade Articles. SSD Not Showing Up In Bios Or Windows | Easy Fix
By following these post-upgrade steps and tips, you can ensure that your Lenovo LOQ is running smoothly and efficiently with its new hardware.
Frequently Asked Questions About Upgrading RAM and SSD in Lenovo LOQ 15IRX9 83DV00FXUS
Q1: What are the benefits of upgrading the RAM and SSD in my Lenovo LOQ 15IRX9 83DV00FXUS?
A: Upgrading both your RAM and SSD can significantly enhance your gaming laptop’s performance:
- RAM Upgrade Benefits:
- Improved Multitasking: More RAM enables your system to handle multiple applications simultaneously without slowdowns. This is particularly useful for gamers who like to stream, have multiple browser tabs open, or use voice chat while playing.
- Smoother Gameplay: RAM directly impacts how smoothly games run. With more RAM, your system can load game assets faster and reduce stuttering or lag, especially in graphically demanding games.
- Faster Application Performance: Demanding software, such as video editing programs or 3D modeling tools, benefits significantly from increased RAM.
- SSD Upgrade Benefits:
- Faster Boot Times: An SSD boots your operating system and programs much faster than a traditional hard drive. You’ll experience significantly reduced waiting times.
- Reduced Load Times: Applications, games, and files load much quicker from an SSD. This means you spend less time waiting and more time being productive or enjoying your games.
- Enhanced System Responsiveness: An SSD makes your entire system feel snappier and more responsive. Everything from opening files to switching between applications feels faster.
Q2: How do I know what type and maximum capacity of RAM and SSD my Lenovo LOQ 15IRX9 83DV00FXUS supports?
A: The technical specifications for your Lenovo LOQ 15IRX9 83DV00FXUS:
- RAM: It uses DDR5-4800 SO-DIMM RAM and has two slots, allowing for a maximum memory capacity of 32 GB.
- SSD: It supports two M.2 2280 PCIe® 4.0 x4 slots for SSDs, and an additional M.2 2242 slot with a capacity of up to 1TB.
It is crucial to purchase compatible RAM and SSD modules. You can find compatible components on Lenovo’s support website by searching for your specific laptop model (LOQ 15IRX9 83DV00FXUS).
Q3: What tools do I need to upgrade the RAM and SSD?
A: Gather the following tools before beginning the upgrade process:
- Compatible RAM and SSD Modules: Ensure you purchase modules that are compatible with your laptop model (Lenovo LOQ 15IRX9 83DV00FXUS).
- Screwdriver Set: You’ll need a screwdriver set with the correct sizes and types of screwdrivers. A Phillips head screwdriver (PH1/PH0) is needed for servicing these models. A magnetic screwdriver is also recommended as it helps to hold screws.
- Anti-Static Wrist Strap: Use an anti-static wrist strap to ground yourself and prevent static discharge, which can damage sensitive electronic components.
- Clean, Non-Conductive Work Surface: This protects your laptop from scratches and static discharge during the upgrade process.
Q4: I’m replacing my primary SSD with a larger one. What’s the best way to transfer my operating system and data to the new drive?
A: Use cloning software to create an exact copy of your old SSD onto the new SSD. This method:
- Preserves Everything: It copies your operating system, applications, settings, and files.
- Saves Time: It’s much faster than reinstalling the operating system and applications from scratch.
- Ensures a Smooth Transition: You can boot directly from the cloned SSD without reinstalling anything.
There are various cloning software options available, both free and paid. Research reputable software that is compatible with your system.
Q5: What should I do after the upgrade to ensure everything works correctly?
A: After physically installing the RAM and SSD, follow these essential steps:
- Initial Boot and BIOS Check: Power on the laptop and enter the UEFI/BIOS (usually by pressing F2 during startup). Verify that the BIOS correctly recognizes the new RAM and SSD and displays their capacities accurately.
- Operating System Installation (If Needed): If you replaced your primary SSD (where the operating system was installed), you’ll need to install a fresh copy of your operating system on the new drive.
- Driver Updates: Visit the Lenovo support website to download and install the latest drivers for your new RAM and SSD modules. These updates ensure optimal compatibility and performance. Use the part number, 83DV00FXUS, to locate the correct drivers.
- Data Migration (If Needed): If you upgraded to a larger SSD but kept your old operating system drive, use cloning software to transfer your data and operating system from the old drive to the new one.
- Troubleshooting: If the laptop doesn’t boot or you encounter any issues, double-check all connections and refer to the documentation (Hardware Maintenance Manual or Lenovo support website) for troubleshooting tips. Contact Lenovo support if the problems persist.
Q7: What if I encounter problems during or after the upgrade process?
A: Troubleshooting tips can be found in:
- Lenovo Support Website: Search for your specific laptop model (LOQ 15IRX9 83DV00FXUS) on Lenovo’s support website. You’ll likely find FAQs, troubleshooting articles, and community forums where others may have encountered similar problems.
- Lenovo Support Team: If the documentation doesn’t resolve your issue, contact Lenovo’s support team.
Q8: Are there any precautions I should take to avoid damaging my laptop during the upgrade?
A: Yes, always exercise caution when working with electronic components:
- Power Down Completely: Always shut down the laptop and unplug the power adapter before opening it or working on any internal components.
- Ground Yourself: Wear an anti-static wrist strap to prevent electrostatic discharge, which can damage delicate electronic components.
- Work on a Clean Surface: A clean, non-conductive surface helps prevent scratches and static discharge.
- Handle Components Carefully: Avoid touching the gold contacts on RAM modules or SSDs. Handle the components by their edges.
- Use the Right Tools: Use the appropriate screwdrivers and tools. Do not force screws or components.
By following these precautions and guidelines, you can minimize the risk of damage and ensure a successful RAM and SSD upgrade for your Lenovo LOQ 15IRX9 83DV00FXUS gaming laptop.

J.S. is the owner, content creator, and editor at Upgrades-and-Options.com. I’ve worked in the IT and Computer Support field for over 20 years. The server hardware in my computer labs has mostly been IBM, but I’ve supported Dell, HP, and various other hardware. In addition, as part of my lab administrator responsibilities, I’ve learned, supported, and repaired/upgraded network hardware such as Cisco routers and switches. READ FULL BIO >>

