A new SSD not showing up in either BIOS or Windows can be frustrating, I’ll cover widely seen issues and how to resolve them. This information is generally targeted toward laptops but will still apply to desktops as well.
To resolve an SSD not showing up we’ll need to look in the BIOS, the operating system, and the drive itself.
Steps To Fix New SSD Drive Not Showing Up
An issue with a new SSD might simply be because it needs to be initialized in Windows, or some BIOS settings adjusted, or lastly, the drive itself may be the issue. See the steps below for a fix to your problem.
How Do I Fix SSD Not Detected In BIOS?
A newly installed SSD drive may not be detected in the BIOS for a few reasons. Let’s work through them. Usually, you can enter the BIOS by pressing F1 or F2, or DEL right when you turn on the computer. Check with your manufacturer if you don’t know how to do this, or just try pressing various Function keys on boot-up.
1. Check SSD Installation
Double-check that the drive is installed correctly and fully inserted into the slot. This seems basic but happens a lot. On a laptop, make sure the drive is securely in the slot. On a desktop check that any cables are inserted all the way.
Note: on some systems, a SATA port gets disabled if the M.2 port is being used. Try connecting the drive to another SATA port if this is the case
2. Check Drive Configuration
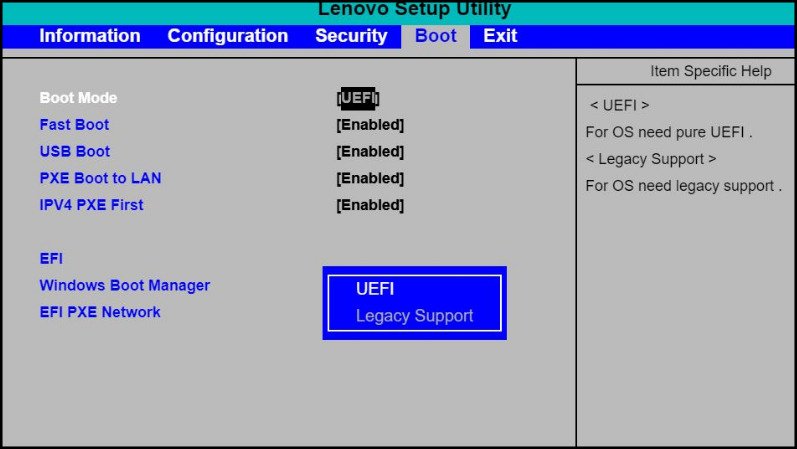
Improper configuration settings can cause an SSD not detected in the BIOS issue. Enter the computer’s BIOS and search for the drive configuration or settings. It will vary depending on your make and model but generally look for the Boot or Configuration tab.
Now look for a Boot Mode or Controller Mode, again this might be different on your computer. We are looking for how the computer addresses the drive, it will display something similar to SATA or UEFI, AHCI, or Legacy Mode.

Note what the current setting is and change it to another selection. For example, if it shows UEFI, change it to Legacy Mode and reboot. You want to change whatever is currently selected to see if this resolves the SSD not being detected issue.
Search the BIOS for drive configuration and support features. Adjust these to get the SSD recognized.
Note: It is always good practice to keep the BIOS up to date with the latest firmware. Check your computer’s support site for updates.
Finally, check the date and time setting in the BIOS and update them if needed. Improper date settings sometimes cause strange effects when getting the computer to boot properly.
Also Read: How to Shut Down a Lenovo Laptop
3. Faulty SSD Drive
If nothing else fixes the new SSD not being detected by the BIOS, it may just be a bad drive. Check with the manufacturer about warranty status and/or download a drive testing program to run. For example, Seagate has tools available for download to check their own drives.
I wrote another article on Lenovo’s extensive testing tools including stand-alone drive tests. Check it out if you are having any drive problems.
SSD Not Showing Up In Windows 10
If you installed a new SSD and it is not showing up in Windows 10 you will need to initialize the drive. This will let you set up and create a usable partition to the SSD. The steps are as follows:
- From Windows 10, right click on the start menu and select Disc Management.
- Find the new drive, it may show up as Disk 1. Right click this drive and select ‘Initialize Disk’. You may only see ‘New Simple Volume’ if it is already initialized, that’s okay, select it instead.
- Follow the prompts to select a Drive letter and to format the new drive partition.
Initialize a new SSD by using Disk Management.
RELATED: Are you looking for a way to improve your gaming experience? If so, then you should consider investing in a solid-state drive (SSD). Read Best SSD For Gaming
How Do You Set SSD As Boot Drive In BIOS Lenovo?
To set an SSD as the boot drive in BIOS on a Lenovo computer:
- Restart the PC and press the key to enter the BIOS, which may be F2 depending on the model.
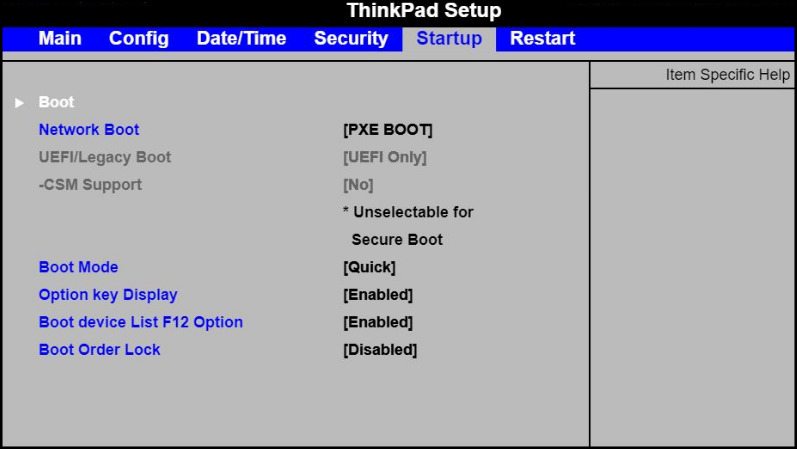
- Navigate to the “Startup” or “Boot” section of the BIOS.
- Look for the option to turn on or enable the SSD, which may be labeled as “Boot from SSD” or similar.
- Change the boot order by selecting the option to adjust the boot sequence or primary boot device.
- Move the SSD to the top of the boot order list to make it the first priority.
- Save the changes and exit the BIOS.
- Your computer will now boot from the SSD as the primary drive.
See the image below for the boot order or primary boot sequence option. Select this to adjust the boot order of your drives.

WD Blue SSD Not Recognized In BIOS?
Newer SSD drives are available in the M.2 form factor. M.2 can be either SATA or NVMe. NVMe is newer and your computer may not be compatible with it. Check the specifications of your computer to see if it only supports SATA.
To get your computer to recognize the new M.2 SSD, follow the steps above to enter the BIOS and select the proper drive boot settings.
The SSD may be M.2 NVMe. Check if your machine is compatible.
To know more about M.2 and NVMe read my article: Does A NVMe SSD Make A Difference?
How Do I Know If My SSD Is Failing?
If all the above steps do not get the SSD recognized the drive may be going bad. To know the signs of a failing SSD drive look for the following:
- An unusually slower or lagging computer.
- Windows blue screens or errors.
- File system corruption.
These may be precursors to a failing drive. If you are seeing issues, backup your data right away.
Also Read: MBR vs. GPT partitions: Which Is Better?
Summary
A new SSD not showing up in the BIOS or Windows 10 can be resolved with the steps in this article. Also, check that an M.2 SSD is the correct type(SATA or NVMe) for your computer. And also very common is the drive to not be installed correctly. Double-check it is fully inserted into the port or connected to the cables.


