If you are looking to format an SD card on a Mac, this guide will show you how.
updated: 1/19/2024
So if you want to free up space on your SD or microSD memory card, formatting it using your Mac is one way to do it.
In this guide, we’ll walk you through the steps to format your SD card on your Mac computer, so you can start using it again without any hassle.
Whether you’re a photographer looking to clear space on your camera’s memory card or just someone who needs to transfer files from your computer to your mobile device, formatting your SD card on a Mac is a straightforward process that anyone can do.
Note: When you format an SD or microSD memory card using a Mac, you’re essentially wiping it clean and starting from scratch. All data stored on the card will be erased.
Make sure you’ve backed up any photos, videos, and other files you want to keep before formatting the memory card. Keep in mind that once you format an SD or microSD memory card, the process cannot be undone.
- How to Format An SD Card On Mac
- Troubleshooting and Solutions: Formatting SD Card on Mac Issues
- Using External Applications To Format SD Cards on Mac
- Should You Format SD Card to FAT On Mac?
- Understanding File Systems
- How to Verify the SD Card Is Formatted
- How to Eject the SD Card
- Best Practices for Maintaining Formatted SD Cards
- What are the different ways to format an SD card on a Mac?
- What are the benefits of formatting an SD card on a Mac?
- What To Do If The SD Card Is Corrupt And Can’t Work
- FAQ
- Summary
How to Format An SD Card On Mac
We’ll look at a few ways to format an SD card on a Mac. The first method uses the Disk Utility application that comes pre-installed on all Macs. The second method is faster and uses the Terminal.
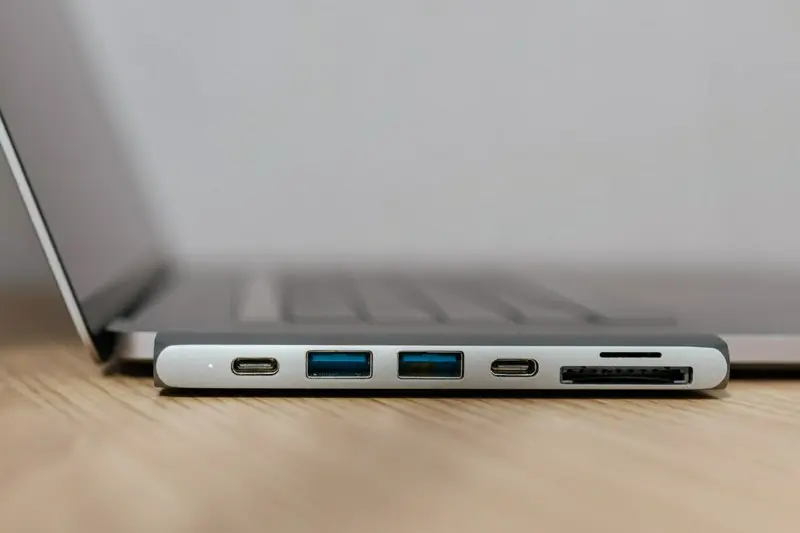
Inserting the SD Card
Before you begin, ensure that your SD card is safely inserted into your Mac. Here is a step-by-step guide on how to do this:
- Locate the SD card slot on your Mac. This is usually found on the right side of your MacBook Pro or at the back of your iMac. For MacBook Air users, the SD card slot is at the bottom of the side edge.
- Insert the SD card. Gently push the SD card into the slot. If you encounter resistance, do not force the card in. Instead, remove it, flip it over, and try again. The card is correctly inserted when it clicks into place.
- Access the SD card on your Mac. Once inserted, the SD card will appear as a new drive in Finder. You can access this drive just like any other on your computer.
Using Disk Utility
A widely used method to format an SD card on a Mac is through Disk Utility. Here’s a detailed, step-by-step guide:
- Open Disk Utility. This can be done by opening your System Preferences and then clicking on the Disk Utility option. You will see a list of drives on the left-hand side of the Disk Utility window.
- Select the SD card. From the list of drives, select your SD card. It will likely be named “NO NAME” or “UNTITLED”.
- Click on “Erase”. An option at the top of the Disk Utility window is labeled “Erase”. Click on this to initiate the formatting process.
- Name your SD card. A dialogue box will appear, asking you to name your SD card. Enter any name you prefer, but ensure it is unique.
- Choose the file format. From the same dialogue box, you will be asked to choose a format for your SD card. You can choose from Mac OS Extended (Journaled), ExFat, or MS-DOS (FAT).
- Finalize the formatting. To start the formatting process, click “Erase” again. A progress bar will appear at the bottom of the screen, showing the progress of the format.
Remember, formatting will erase all data on your SD card. Before proceeding, make sure all important data is backed up elsewhere.
Using the Command Line
Using the command line to format your SD card is a faster, albeit riskier, method. It is possible to make an error and format the wrong drive. Here’s how to do it:
- Open Terminal. You can access Terminal by navigating to Applications > Utilities.
- List all disks. Type `sudo diskutil list` and press Enter. This command will list all disks on your system. Identify the SD card you wish to format.
- Format the SD card. Type `sudo diskutil eraseDisk ExFAT name_of_disk` and press Enter. Replace `name_of_disk` with the identifier for your SD card.
During this process, you will be prompted to enter your password for sudo access. After entering your password, the formatting process will begin.
After Formatting Your SD Card on a Mac
Once you’ve successfully formatted your SD card, it’s ready to be used anew. Remember, the card is now completely empty, so it has the full amount of storage space available.
You can start transferring files to the SD card by dragging them onto the SD card icon in Finder.
Keep in mind that the SD card will only be usable on devices compatible with the file system you chose during formatting.
- For example, if you formatted with the Mac OS Extended (Journaled) file system, the card will work with other Macs but not with Windows or Linux systems.
- If you need to use the card with different operating systems, consider reformatting it to exFAT or MS-DOS (FAT) which are more universally compatible.
Lastly, always safely eject your SD card through the Finder before physically removing it from your Mac to prevent any data loss or damage to the card.

Troubleshooting and Solutions: Formatting SD Card on Mac Issues
In the process of formatting your SD card on a Mac, you might encounter a few challenges. Here are some common issues and their potential solutions:
Error Messages During Formatting Process
- “Erase process has failed.” – This error message typically appears when Disk Utility is unable to format the SD card, often due to an underlying issue with the SD card itself.
- “Disk is write-protected.” – This error shows up when the SD card is locked or write-protected. You’ll need to unlock the SD card before you can format it.
- “Could not validate source.” – If Disk Utility can’t verify the SD card source, this error message will appear.
Potential Solutions to Common Issues
- Restart Your Mac and Try Again – Sometimes, a simple system reboot can solve many issues. If you encounter an error message, try restarting your Mac and repeating the formatting process.
- Check if SD Card is Locked – If you’re encountering a write-protection issue, check the lock switch on your SD card. If it’s in the locked position, slide it to the unlocked position and try formatting again.
- Try Using Another SD Card Reader – If the problem persists, it could be that the card reader is faulty. Try using a different card reader.
- Use Terminal Instead – If Disk Utility fails, consider using Terminal to format your SD card as described in the previous section.
- Consult Apple Support – If all else fails, you can reach out to Apple Support for further assistance.
Remember, these are just troubleshooting tips. Always back up your data before attempting to format your SD card, as the process will erase all data stored on the card.

Using External Applications To Format SD Cards on Mac
There are several third-party applications available that can streamline the process of formatting an SD card on a Mac. These applications often offer more user-friendly interfaces and additional features that Disk Utility or Terminal lack.
Two such applications include SD Card Formatter and Disk Drill.
Here’s a guide on how to use these:
SD Card Formatter
- Download and Install. Visit the SD Card Formatter website and download the software. After downloading, install it on your Mac.
- Launch the Application. Open the SD Card Formatter application.
- Select the SD Card. From the drop-down menu, choose the SD card you want to format.
- Choose the Format Type. Select the format you want for your SD card. The options will typically include Quick Format and Full (Overwrite).
- Format the SD card. Click on the “Format” button to start the formatting process. Remember, this will erase all data on the SD card.
Disk Drill
- Download and Install. Go to the Disk Drill website to download the software and install it on your Mac.
- Launch the Application. Open Disk Drill on your desktop.
- Select the SD Card. From the list of drives, select the SD card you intend to format.
- Choose the Format Type. Disk Drill offers multiple file system formats. Choose the one that best suits your needs.
- Format the SD card. Click on the “Erase” button to initiate the formatting process. As always, remember that this will wipe all the data on the SD card.
Using third-party applications can simplify the formatting process and offer additional features such as recovery options. However, while these applications are user-friendly, remember to always back up your data before formatting your SD card.
Should You Format SD Card to FAT On Mac?
When deciding on which file system to use for formatting your SD card on a Mac, your choice should hinge on your specific needs and the device you intend to use the card with. Here are some factors to consider:
Using FAT for Maximum Compatibility
If your objective is to ensure the widest compatibility between several operating systems, such as Mac and Windows, then formatting your SD card as FAT is a feasible choice.
FAT is a file system that is recognized by virtually all systems, making it a versatile option for an SD card that will be used across an array of devices.
Using FAT for Standard Functionality
If your main aim is to restore your SD card to its standard functionality, then formatting it as FAT would not be detrimental.
While this won’t offer any extraordinary benefits, it will ensure that your SD card operates as it should.
Considering Device-Specific Requirements
However, it’s important to note that some devices, like cameras and certain game consoles, demand a specific file format for the SD card to work correctly.
Before deciding on the format, you should refer to the documentation of your device to identify the correct format to use.
Common Formats: FAT32 and exFAT
The most frequently used formats for SD cards are FAT32 and exFAT.
Each has its pros and cons. For instance, while FAT32 has excellent compatibility, it can’t handle individual files larger than 4GB. Meanwhile, exFAT supports larger files, but it isn’t as widely compatible as FAT32.
In conclusion, the decision to format your SD card, and which system to use, should be made based on your specific needs and the device you intend to use the card with. Incorrect formatting can lead to issues, so ensure you’ve chosen the correct format before initiating the process.
Understanding File Systems
When formatting an SD card, it’s crucial to understand the different file systems available and their respective advantages and disadvantages. Here’s a closer look at the most commonly used file systems: FAT32, exFAT, and NTFS.
FAT32
The File Allocation Table 32 (FAT32) is a classic file system that originated in the Windows 95 era. It enjoys widespread compatibility across multiple platforms including Windows, Mac, and Linux. It can also be used with many game consoles and virtually all cameras. However, FAT32 has a significant limitation; it cannot handle a single file larger than 4GB. If you’re planning on storing large files, such as high-resolution videos, FAT32 might not be the best choice.
exFAT
The Extended File Allocation Table (exFAT) is a modern replacement for FAT32, overcoming its predecessor’s limitation on file size. exFAT can handle files much larger than 4GB, making it an excellent choice for high-definition videos or large datasets. It’s compatible with both Windows and Mac systems, but its compatibility with other devices (like game consoles or cameras) and operating systems (like Linux) can be spotty without additional software.
Mac OS Extended (HFS+)
Mac OS Extended, also known as HFS+ (Hierarchical File System Plus), is a file system developed by Apple for use on Mac computers. It has several advantages, such as support for hard links, journaling for crash resistance, and case sensitivity. Additionally, HFS+ does not come with any file size limitations, unlike FAT32.
However, its major drawback is related to compatibility; while it works flawlessly on Mac systems, it is not natively supported by Windows and Linux.
If you plan to use your SD card only with Mac devices, Mac OS Extended could be a suitable formatting option. However, if you want your SD card to function across different operating systems, consider using a more universally accepted file system like FAT32, exFAT, or NTFS.
NTFS
New Technology File System (NTFS) is a proprietary file system used by Windows. It supports large files and includes features like file permissions and system-level encryption. While it’s perfect for Windows, NTFS is read-only on Mac systems without third-party software. It’s also not commonly supported by non-computer devices.
It’s essential to understand these file systems’ pros and cons when deciding how to format your SD card. Compatibility, file size limitations, and the device you’re using all come into play when making the best decision for your specific scenario.

How to Verify the SD Card Is Formatted
To ensure your SD card has been properly formatted, follow the steps below to verify it. These steps can be executed on your Mac or on a PC with an SD card reader:
On a Mac:
- Launch Disk Utility: You can find Disk Utility by searching for it in Spotlight or by navigating to Applications > Utilities > Disk Utility.
- Select the SD Card: In Disk Utility, locate your SD card in the list on the left side of the screen and select it.
- Access Disk Information: To view detailed information about your SD card, click on the “Info” button.
- Verify the Format: In the information panel, locate the “Format” field. Ensure it matches with the format you chose when formatting the SD card (FAT32, exFAT, etc).
On a PC:
- Open File Explorer: You can do this by pressing the Windows key + E, or by clicking on the folder icon in the taskbar.
- Navigate to the SD Card: In File Explorer, locate your SD card under the “This PC” or “Computer” section in the left panel.
- Access Properties: Right-click on the SD card and select “Properties” from the drop-down menu.
- Check the File System: Under the “General” tab in Properties, you will find a field labeled “File system”. Ensure this matches the format you chose when formatting the SD card.
Remember, if your SD card is not recognized or the format doesn’t match your selection, it might be necessary to repeat the formatting process. Always make sure you’re formatting the correct drive to avoid data loss.
How to Eject the SD Card
How to eject the SD card on a Mac:
To eject the SD card on a Mac, open Finder and go to the drive where your SD card is located. Next, click on the eject icon in the upper right corner of your screen.
You can also use the key combination of Command + E to eject the SD card.
Best Practices for Maintaining Formatted SD Cards
Maintaining the health of your SD card is essential to avoid data corruption or loss. Here are some best practices to keep your formatted SD card in good working condition:
A. Regularly Backing Up Important Files
It’s crucial to make regular backups of important files. This practice ensures that, if your SD card fails or becomes corrupted, your valuable data is not lost.
The frequency of backups should depend on how often the data on the SD card is updated. If the content changes frequently, consider daily backups.
For less frequently updated files, a weekly or monthly backup might suffice. Tools like Time Machine on Mac or File History on Windows can automate the backup process.
B. Avoiding Sudden Removal or Ejection During File Transfers
Removing an SD card during file transfer can lead to data loss or corruption.
Always make sure that any file transfers have been completed before removing your SD card.
On a Mac, you can use the eject option in Finder or the Command + E shortcut. On a Windows computer, use the ‘Safely Remove Hardware and Eject Media’ option in the system tray.
By following these best practices, you can prolong the lifespan of your SD cards and safeguard your stored data.
What are the different ways to format an SD card on a Mac?
There are primarily two methods to format an SD card on a Mac – using the Disk Utility application and the Terminal command line. Depending on your comfort level and specific needs, you can choose either of these options.
Using Disk Utility:
The Disk Utility application is user-friendly and offers a visual interface, making it easier to navigate and less prone to errors. Below are the steps to format an SD card using Disk Utility:
- Open Disk Utility: You can find this by searching for it in Spotlight or by navigating to Applications > Utilities > Disk Utility.
- Select the SD Card: Once in Disk Utility, find your SD card in the list on the left side of the screen and select it.
- Choose the Format: Click on the “Erase” button, select the desired format (FAT32, exFAT, etc.), and then click “Erase” again.
Tip: Disk Utility is a safer option as it minimizes the risk of formatting the wrong drive, given its visual nature. However, it may take a bit longer to format an SD card using this method.
Using Terminal:
The Terminal is a more advanced method to format an SD card and is generally faster. However, it requires caution as mistakes can result in data loss. Here are the steps to use Terminal:
- Open Terminal: You can access Terminal by navigating to Applications > Utilities.
- List all Disks: Type `sudo diskutil list` and press Enter. This command will list all disks. Identify the SD card you wish to format.
- Format the SD Card: Type `sudo diskutil eraseDisk ExFAT name_of_disk` and press Enter. Replace `name_of_disk` with the identifier for your SD card.
Tip: Ensure you double-check the disk identifier before executing the format command in Terminal to avoid accidentally formatting the wrong drive.
In conclusion, both methods have their merits. Disk Utility offers ease of use and safety, while Terminal offers speed and efficiency. The decision will depend on your specific needs and comfort level with using these tools.
What are the benefits of formatting an SD card on a Mac?
Formatting an SD card on a Mac comes with a number of advantages that enhance its functionality and the overall user experience. Here are the key benefits:
- Ease of Operation: Mac’s user-friendly interfaces, such as Disk Utility and Terminal, make the process of formatting an SD card straightforward and easy to execute.
- Versatility in File Systems: Mac supports a range of file systems including FAT32 and exFAT. This gives you the flexibility to choose the format that best suits your needs and enhances compatibility with other devices.
- Enhanced Performance: Formatting can help to enhance the performance of your SD card. It clears any bugs or issues that may have been causing the card to run slowly or malfunction, ensuring smoother and faster operations.
- Data Management: Formatting an SD card completely erases all the data stored on it. This is particularly useful when you need a ‘clean slate’ for new data storage or when you want to dispose of the card without leaving any residual information.
- Problem Prevention: Proper formatting of your SD card on a Mac can prevent numerous potential issues. It aids in optimizing the card’s operation, reducing the risk of data corruption and loss.
Remember, it’s always important to back up your data before formatting an SD card to avoid accidental loss of important files.
What To Do If The SD Card Is Corrupt And Can’t Work
Using Disk Utility First Aid:
- Open Disk Utility: Locate Disk Utility by searching for it in Spotlight or navigating to Applications > Utilities > Disk Utility.
- Select the Corrupt SD Card: Find your corrupt SD card in the list on the left side of the screen and select it.
- Run First Aid: Click on the “First Aid” button and follow the prompts. The First Aid process will attempt to find and fix any errors with the card.
Checking Security Level:
- Inspect the SD Card’s Security Settings: If your card is still unresponsive or problematic, check its security settings. If they are set to anything other than “None”, you will need to change this setting.
- Change Security Settings: Set the SD card’s security level to “None” and proceed to format the SD card.
Formatting the SD card with Terminal:
If the SD card still isn’t working after running First Aid and checking security settings, you may need to format it using Terminal.
- Open Terminal: You can find Terminal by navigating to Applications > Utilities > Terminal.
- List all Disks: Type in `diskutil list` and press Enter. This will display all connected disks. Identify the SD card you wish to format by its disk number.
- Format the SD Card: Enter the command `sudo diskutil eraseDisk FAT32 MBRFormat /dev/diskX`. Replace “diskX” with the actual disk number of your SD card. Hit Enter, input your password when prompted, and hit Enter again to initiate the formatting.
Please note that using Terminal requires careful attention to detail. Always double-check the disk number to avoid accidentally formatting the wrong drive.
FAQ
What is the best format for SD card on Mac?
The best format for an SD card on a Mac depends on its intended use. If you plan to use the SD card with Mac only, the best format is Mac OS Extended (Journaled). However, if you need the SD card to work with both Mac and Windows, you should choose exFAT. For older devices that don’t support exFAT, FAT32 is the best option.
How do I fix my micro SD card that won’t format on my Mac?
If your micro SD card won’t format on your Mac, you can try a few troubleshooting steps. Firstly, try using Disk Utility’s First Aid function to repair any errors. If this doesn’t work, check the SD card’s security settings and ensure they’re set to ‘None’. Still unsuccessful? Consider formatting the SD card using Terminal, but make sure to double-check the disk number to avoid formatting the wrong drive.
How do I format an SD card on a MacBook Air?
To format an SD card on a MacBook Air, you can use Disk Utility. Open Disk Utility, select your SD card from the list, click the ‘Erase’ button, choose your preferred format, and then click ‘Erase’ again. Ensure you have a backup of your data before formatting.
How do I format an SD card on MacBook Pro?
Formatting an SD card on a MacBook Pro is similar to the process on a MacBook Air. You’ll use Disk Utility, which you can find by using Spotlight or navigating through Applications > Utilities. Select your SD card from the list, click ‘Erase’, choose the desired format (FAT32, exFAT, etc.), and click ‘Erase’ again.
What is the meaning of SD in official letters?
In official letters, ‘SD’ is an abbreviation for ‘Signed Document’. It refers to a document that has been signed by the party or parties involved, indicating their acceptance or agreement with the content of the document.
Summary
In this guide, we covered the process of formatting an SD card on a Mac, discussing the numerous advantages such as ease of operation, versatility in file systems, enhanced performance, effective data management, and problem prevention. We explored how to tackle a corrupt SD card using Disk Utility’s First Aid, checking security settings, and as a last resort, using Terminal for formatting.
We also highlighted the different formats suitable for various uses and answered several FAQs relating to formatting an SD card on different Mac models and the meaning of ‘SD’ in official letters. Remember, always back up your data before initiating a formatting process to prevent any unintentional data loss.

J.S. is the owner, content creator, and editor at Upgrades-and-Options.com. I’ve worked in the IT and Computer Support field for over 20 years. The server hardware in my computer labs has mostly been IBM, but I’ve supported Dell, HP, and various other hardware. In addition, as part of my lab administrator responsibilities, I’ve learned, supported, and repaired/upgraded network hardware such as Cisco routers and switches. READ FULL BIO >>
- Best Laptops for AI and Machine Learning
 Discover the top 5 laptops for AI and Machine Learning. We review high-performance machines perfect for deep learning, data science, and neural networks. Artificial Intelligence (AI) and Machine Learning (ML) are no longer futuristic concepts—they are the tools shaping our daily lives right now. From developing complex neural networks to training large language models (LLMs) locally, the hardware demands for these tasks have skyrocketed. In… Read more: Best Laptops for AI and Machine Learning
 - Upgrading SSD Storage in the ThinkPad X9-15 Gen 1 Aura Edition
 Upgrading SSD Storage and Analyzing Memory in the ThinkPad X9-15 Gen 1 Aura Edition Upgrade Your ThinkPad X9-15 SSD Like a Pro: A Technical Guide The ThinkPad X9-15 Gen 1 Aura Edition (Machine Types 21Q6 and 21Q7) is designed as a premium device. While memory is permanently fixed, users can easily expand storage capacity, as the M.2 Solid-State Drive (SSD) is designated as an Optional-service… Read more: Upgrading SSD Storage in the ThinkPad X9-15 Gen 1 Aura Edition
 - How Quantum Computing Could Impact Everyday Laptops
 Quantum computing may sound like science fiction, but its potential to revolutionize technology is very real. Unlike classical computing, which processes information using bits as 0s and 1s, quantum computing leverages the strange and exciting principles of quantum mechanics — like superposition and entanglement — to perform calculations at speeds previously thought impossible. This unprecedented power isn’t just about tackling complex simulations or advancing artificial… Read more: How Quantum Computing Could Impact Everyday Laptops
 - What Is The Difference Between Lenovo’s Pens? (with Part Numbers)
 Do you ever find yourself writing with an old-school pen or even worse a pencil? As you pry your fingers off that last-century writing device, ask yourself if there isn’t a better way. Well ask no more, there is a whole world of digital pens out there just waiting for you to discover.I went through this same process and wanted to find out about the… Read more: What Is The Difference Between Lenovo’s Pens? (with Part Numbers)
 - Legion 5 Laptop Upgrade Guide: Game Like a Pro
 This article serves as your ultimate guide to upgrading your Lenovo Legion 5 laptop with RAM and SSD, unlocking its potential to deliver unbeatable gaming performance. With over two decades of expertise in the tech industry and countless successful upgrade projects under my belt, I’ve distilled all my knowledge into this comprehensive guide. You’ll learn, step by step, how to upgrade the RAM and SSD;… Read more: Legion 5 Laptop Upgrade Guide: Game Like a Pro
