Upgrading the SSD in your Lenovo Legion 9i (16”, 9) 16IRX9 Gaming Laptop is a smart move for anyone looking to boost their device’s performance.
By swapping out your existing SSD for a faster one, you can enjoy quicker boot times, smoother gameplay, and enhanced responsiveness for all your applications.
This guide is here to take you through the process, step-by-step, ensuring a seamless upgrade.
- Compatibility Check: Ensuring a Perfect Fit
- Pre-Upgrade Preparation: Safety First
- Step-by-Step SSD Upgrade Process
- Post-Upgrade Testing: Ensure Flawless Functionality
- Essential Tips for a Successful Upgrade
- Additional Resources
- Recommended SSD Options for Your Legion 9i Laptop
- My Top SSD Pick
- Choosing the Right Lenovo Legion 9i SSD
- Understanding PCIe 4.0 vs. PCIe 5.0 for SSDs
- Lenovo Legion 9i 16IRX9 Specifications
- Frequently Asked Questions (FAQs)
- 1. What should I consider regarding SSD compatibility with the Lenovo Legion 9i?
- 2. How do I back up my data before upgrading?
- 3. What should I do if the new SSD isn’t recognized?
- 4. Are there any warranty implications when upgrading the SSD?
- 5. What are the common troubleshooting steps if the laptop doesn’t boot after the upgrade?
- 6. Can I install an SSD larger than 2TB?
- Summary
THIS POST MAY CONTAIN AFFILIATE LINKS. As an Amazon Associate, I earn from qualifying purchases. PLEASE READ MY DISCLOSURE FOR MORE INFO.
Compatibility Check: Ensuring a Perfect Fit
Before proceeding, ensure the new SSD aligns with your Lenovo Legion 9i’s specifications:
- Form Factor: M.2 2280
- Interface: Two PCIe NVMe Gen4.0 x4 slots
- Capacity: M.2 2280 SSD up to 2TB.
Note: Lenovo officially states that the maximum supported SSD size is 2TB. However, several users have successfully upgraded to 4TB SSD drives.
Looking to upgrade your SSD right away? Jump right to our list of top SSD drives to find the perfect match for your Legion 9i laptop.
Pre-Upgrade Preparation: Safety First
Tools Required:
- Precision screwdriver set. Here’s one at Amazon.
- Question: What tools do I need?
- Answer: You’ll need a precision screwdriver set. Any standard set should work, but ensure the screwdriver fits the screws on your laptop.
Preparation Steps:
- Back-Up Your Data: Safeguard all important files to prevent data loss.
- Disable Fast Startup: Go to Control Panel > Power Options and disable Fast Startup.
- Enter BIOS: During boot, press F2 to enter BIOS and disable the built-in battery under `Config` > `Power`.
Step-by-Step SSD Upgrade Process
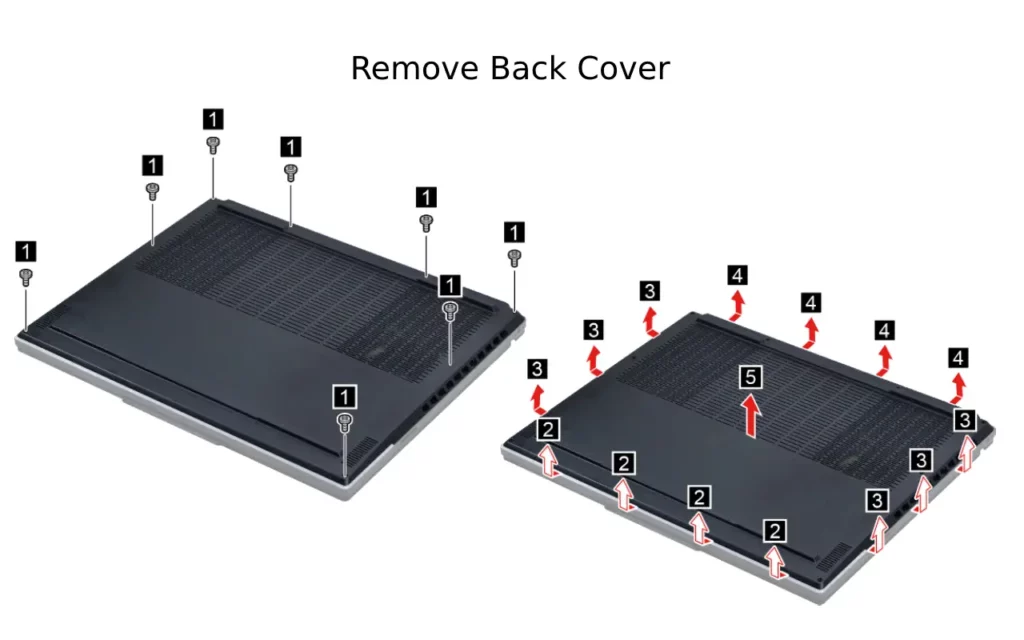
I. Remove the Lower Case
- Power Down: Ensure your laptop is completely shut down and unplugged.
- Position the Laptop: Place it upside down on a flat, stable surface.
- Remove Screws: Unscrew the eight screws securing the lower case.
- Detach the Case: Gently pry up the latches and remove the lower case.
- Question: What if the case doesn’t come off easily?
- Answer: Double-check that all screws are removed. Gently pry from different edges, but avoid using excessive force.
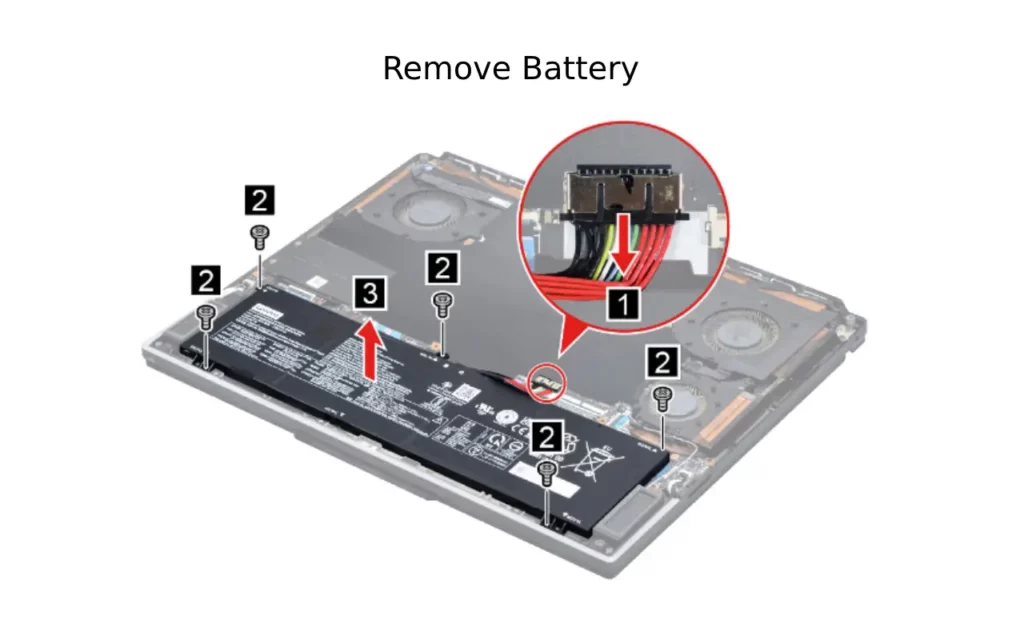
II. Remove the Battery Pack
- Disconnect Battery Cable: Carefully unplug the cable from the system board.
- Unscrew the Battery: Remove the five screws and take out the battery pack.
- Question: How do I safely disconnect the battery?
- Answer: Use your fingernails or a plastic tool to gently unplug the connector, avoiding pulling on the wires.
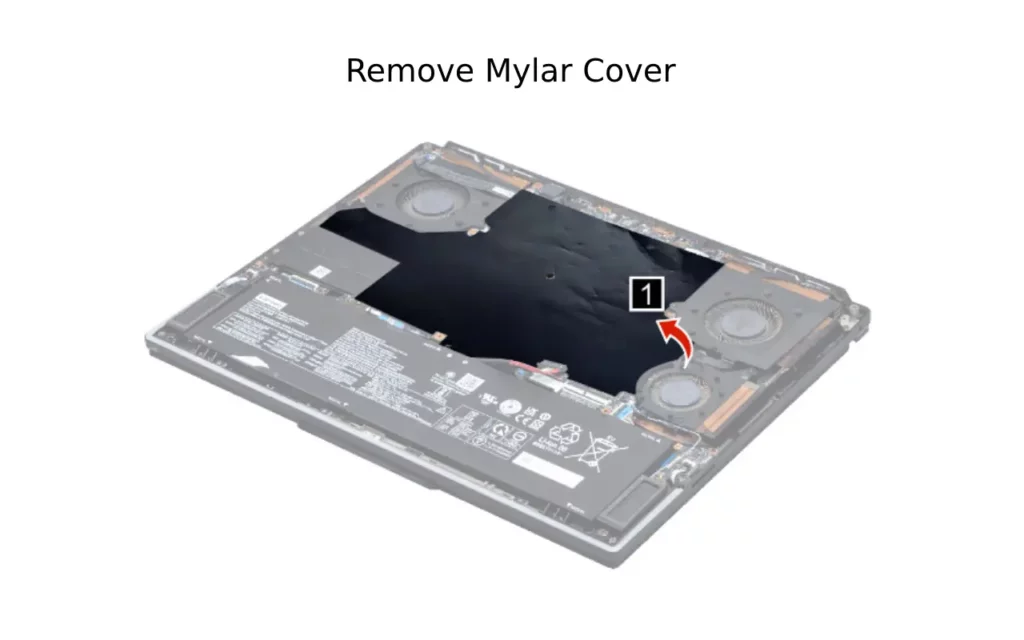
III. Remove the System Board Mylar
- Unplug the Battery Cable: Use fingernails to carefully disconnect the cable without pulling on it.
- Remove Mylar: Detach the system board mylar, ensuring it’s undamaged for reuse.
Note: Retain the system board mylar and reuse it when reassembling the computer.
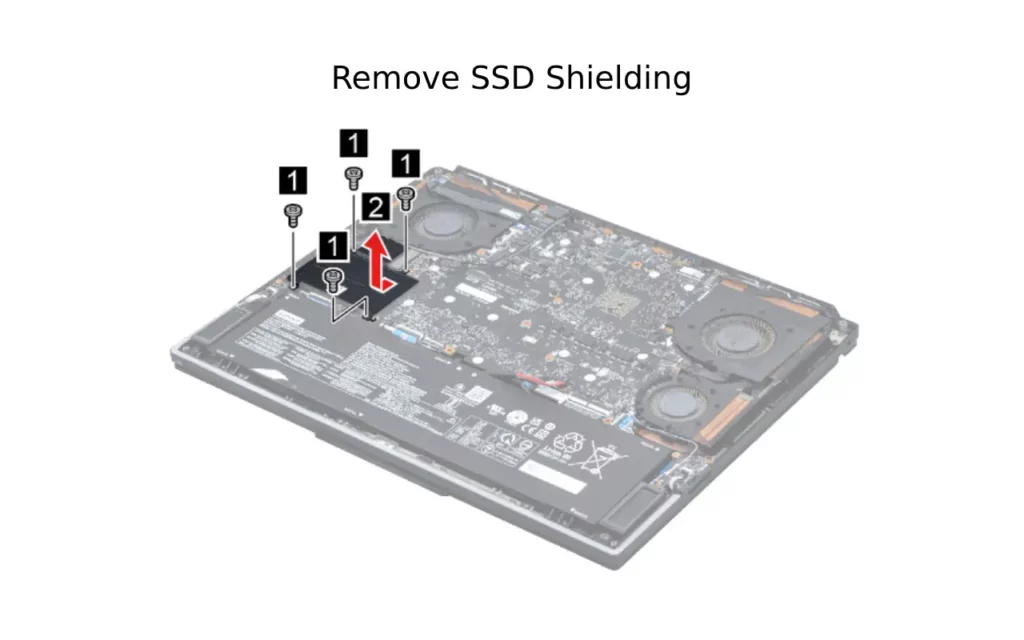
IV. Remove the SSD Shielding
- Unscrew the Shielding: Remove four screws to take off the SSD shielding.
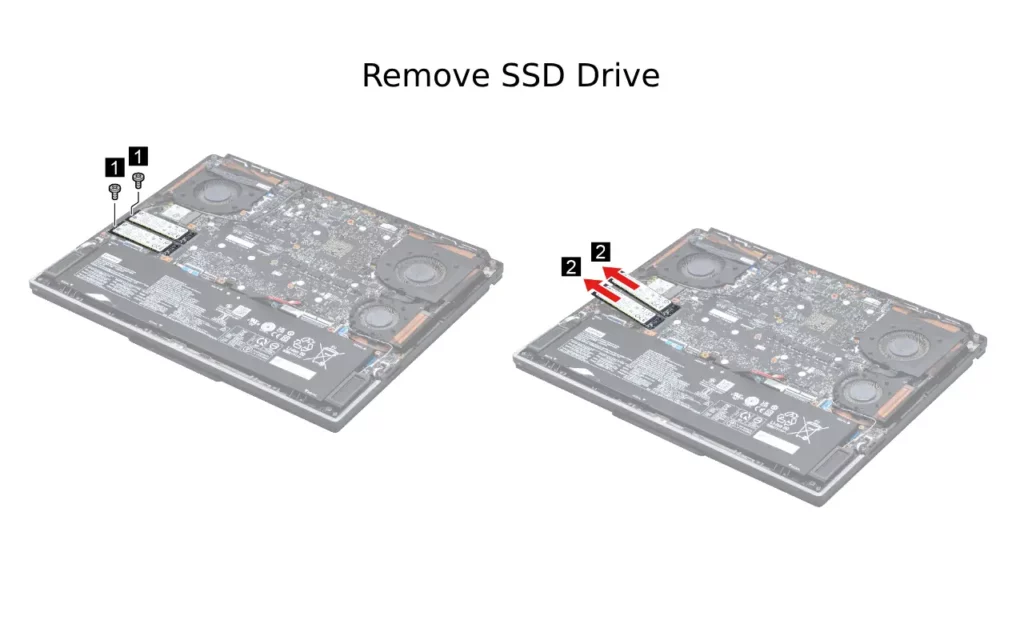
V. Remove and Install the SSD
- Remove Existing SSD: Remove two screws. Gently pull the SSD from the slot.
- Install New SSD: Align the new SSD in the slot, ensuring the connector is properly engaged, and secure it with screws.
- Question: How do I ensure everything is reassembled correctly?
- Answer: Follow the disassembly steps in reverse order, ensuring all connections are secure and screws are tightened without overtightening.
Notes from Lenovo: For LCD panels with the factory color calibration feature, do the following to install new color profiles:
1. Go to https://pcsupport.lenovo.com/us/en/downloads/DS543953 to download the installation software.
Double-click the EXE file and follow the on-screen instructions to finish the installation.
2. X-RiteColorAssistant.exe will auto-run. Click Restore Profile button from the prompted window to restore the profile from the Lenovo cloud.
Post-Upgrade Testing: Ensure Flawless Functionality
- Reassemble the Laptop: Replace all components and screws, ensuring a secure fit.
- Boot Up: Power on your laptop and enter BIOS to verify SSD recognition.
- System Check: Confirm the system boots correctly and performs optimally with the new SSD.
- Question: What if the new SSD isn’t recognized?
- Answer: Ensure it’s properly seated. If issues persist, enter BIOS by pressing F2 during boot and check if the SSD is listed.
Essential Tips for a Successful Upgrade
- Static Precautions: Always wear an anti-static wrist strap and handle components by their edges.
- Avoid Excessive Pressure: Do not force components into place.
- Backup Data: Always ensure data is backed up to prevent loss during the upgrade.
Additional Resources
- Visit Lenovo Support for manuals and additional guidance.
- Read my other – Laptop Upgrade Articles. SSD Not Showing Up In Bios Or Windows | Easy Fix
By following these instructions, you’ll enhance your Lenovo Legion 9i’s performance with a new SSD, ensuring a smooth and efficient user experience.
Recommended SSD Options for Your Legion 9i Laptop
Choosing the right SSD for your Legion 9i laptop can make a significant difference in speed and performance. Here are options that are PCIe 4×4 compatible, ensuring you get the best out of your device.
As an Amazon Associate, I earn from qualifying purchases at no extra cost to you.
Samsung 990 Pro 2TB PCIe NVMe M.2 SSD (MZ-V9P2T0B/AM)
Don’t miss out—purchase the Samsung 990 Pro on Amazon today and elevate your computing experience!
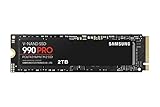
- Interface: PCIe 4.0
- Capacities: Available in 2TB and 4TB
- Performance: Offers blazing speeds up to 7,450 MB/s read and 6,900 MB/s write, perfect for handling large files with ease.
- DRAM: Includes robust DRAM support (2GB for 2TB, 4GB for 4TB) to enhance performance.
- Target Audience: Tailored for power users needing superior speed and efficiency, especially for demanding tasks like video editing and large-scale data processing.
WD Black SN850X 2TB PCIe Gen4 NVMe M.2 SSD (WDS200T2X0E)
Purchase the WD Black SN850X on Amazon now and experience a new level of speed and efficiency.

- Interface: PCIe Gen4 x4
- Form Factor: M.2 2280, making it a perfect fit for your laptop.
- Performance: Achieves impressive read speeds of up to 7,300 MB/s and write speeds up to 6,600 MB/s.
- Endurance: With a 1,200 TBW rating, it offers longevity for intense usage.
- Target Audience: Ideal for gamers and professionals seeking high-speed data access and reliability.
Crucial T500 2TB PCIe Gen4 NVMe M.2 SSD (CT2000T500SSD8)
Buy the Crucial T500 2TB on Amazon now.
- Interface: PCIe Gen4 NVMe
- Performance: Provides a balanced performance with read speeds up to 7,400 MB/s and write speeds up to 7,000 MB/s.
- Endurance: 1,200 TBW ensures durability for everyday use.
- Target Audience: Suitable for users who require a mix of speed and efficiency, ideal for gaming and content creation.
Crucial T500 4TB PCIe Gen4 NVMe M.2 SSD (CT4000T500SSD3)
Buy the Crucial T500 4TB SSD on Amazon now.
- Interface: PCIe Gen4 NVMe
- Performance: Delivers exceptional read speeds up to 7,400 MB/s and write speeds up to 6,900 MB/s, perfect for data-intensive tasks.
- Endurance: A higher endurance of 2,400 TBW makes it great for extensive data handling.
- Target Audience: Perfect for users who need ample storage without sacrificing speed, suitable for creative professionals and gamers alike.
| Feature | Samsung 990 Pro 2TB | WD Black SN850X 2TB | Crucial T500 2TB | Crucial T500 4TB |
|---|---|---|---|---|
| Interface | PCIe 4.0 | PCIe Gen4 x4 | PCIe Gen4 NVMe | PCIe Gen4 NVMe |
| Form Factor | M.2 2280 | M.2 2280 | M.2 2280 | M.2 2280 |
| Sequential Read Speed | Up to 7,450 MB/s | Up to 7,300 MB/s | Up to 7,400 MB/s | Up to 7,400 MB/s |
| Sequential Write Speed | Up to 6,900 MB/s | Up to 6,600 MB/s | Up to 7,000 MB/s | Up to 6,900 MB/s |
| Random Read Speed (IOPS) | N/A | 1,200,000 | Up to 1,180K | N/A |
| Random Write Speed (IOPS) | N/A | 1,100,000 | Up to 1,440K | N/A |
| Endurance (TBW) | N/A | 1,200 | 1,200 | 2,400 |
| DRAM | Yes (2GB/4GB) | N/A | N/A | N/A |
| Target Audience | Power users | Gamers/Professionals | Gamers/Creators | Creators/Gamers |
| Warranty | N/A | 5-Year Limited | N/A |
My Top SSD Pick
Here’s why the WD Black SN850X 2TB SSD is my top pick for the Legion 9i laptop:
- PCIe Gen4 x4 Interface: Offers cutting-edge technology for superior performance and fast data access.
- High Read/Write Speeds:
- Sequential read speeds up to 7,300 MB/s.
- Write speeds up to 6,600 MB/s.
- Ensures smooth operation even during heavy workloads.
- Impressive Endurance: Withstands up to 1,200 TBW, making it reliable for intensive use.
- Ideal for Gamers and Professionals:
- Tailored to meet the high-performance needs of gaming and professional applications.
- Provides a competitive edge with robust features and efficiency.
- Overall Performance: Combines speed, durability, and efficiency, making it the ultimate upgrade for enhancing the Legion 9i laptop experience.
This SSD stands out as the best choice, offering a blend of reliability and top-notch performance.
Choosing the Right Lenovo Legion 9i SSD
Upgrading the SSD in your Lenovo Legion 9i can significantly enhance gaming performance and multitasking capabilities. Here’s how to choose the right SSD for your device:
Key Considerations
- Form Factor:
- Ensure the SSD is an M.2 2280, the most compatible form factor for the Legion 9i. This size fits perfectly within the laptop’s design, allowing for easy installation.
- Interface:
- Look for SSDs with a PCIe NVMe interface. The Legion 9i supports both Gen3 x4 and Gen4 x4, but opting for a Gen4 x4 will provide faster data transfer speeds, leveraging the latest technology for improved performance.
- Capacity:
- Assess your storage needs. While an SSD with a capacity of 1TB is often sufficient for most users, those in need of extensive storage might consider 2TB options. Ensure the chosen capacity aligns with your usage patterns and future needs.
Understanding PCIe 4.0 vs. PCIe 5.0 for SSDs
When deciding between PCIe 4.0 and PCIe 5.0 SSDs, it’s important to understand their key differences and how they might impact your computing experience, especially for gaming and high-performance tasks.
Bandwidth and Performance
PCIe 4.0: This version offers a significant upgrade from its predecessor, PCIe 3.0, by doubling the data transfer rate to 16 gigatransfers per second (GT/s). It’s well-suited for high-speed SSDs and can efficiently support modern graphics cards and peripherals, ensuring faster data access and reduced latency.
PCIe 5.0: Doubling the bandwidth of PCIe 4.0, PCIe 5.0 reaches 32 GT/s, offering even greater potential for high-speed data transfer.
This additional bandwidth is particularly beneficial for future-proofing your system, as it can handle more demanding tasks and newer technologies as they become available.
Compatibility and Future-Proofing
Both PCIe 4.0 and 5.0 are backward-compatible, meaning you can use them with devices designed for older PCIe generations. This compatibility ensures that you won’t need to replace all your existing components when upgrading your SSD.
Opting for PCIe 5.0 provides an edge in future-proofing, as it can accommodate next-generation advancements without bottlenecking.
Practical Implications for SSD Choices
For most current applications, PCIe 4.0 SSDs provide ample performance improvements, particularly when upgrading from PCIe 3.0.
They support faster load times and improved responsiveness in gaming and data-intensive tasks. However, if you plan to keep your system for several years and anticipate future upgrades, investing in PCIe 5.0 might be beneficial.
It can handle the increased demands of future software and hardware innovations, offering a longer-lasting solution.
Choosing the Right SSD
Ultimately, your choice between PCIe 4.0 and PCIe 5.0 should consider your current needs and future plans. If you’re focused on immediate performance gains at a lower cost, PCIe 4.0 is a strong choice.
For users prioritizing long-term value and readiness for the latest technology, PCIe 5.0 is worth the investment. Consider your usage scenarios and how soon you plan to upgrade other components when making your decision.
Lenovo Legion 9i 16IRX9 Specifications
Processor and Chipset
- Processor: Intel® Core™ i9-14900HX, 14th Generation Intel® Core i9
- Chipset: Intel® HM770
Operating System
- Options: Windows 11 Pro, Windows 11 Home
Graphics
- Options:
- NVIDIA® GeForce RTX™ 4090 Laptop GPU with 16GB GDDR6
- NVIDIA® GeForce RTX™ 4080 Laptop GPU with 12GB GDDR6
Memory
- Max Memory: Up to 64GB DDR5-5600 (overclock)
- Memory Slots: Two DDR5 SO-DIMM slots, dual-channel capable
- Memory Type: DDR5-5600, DDR5-5600 (overclock)
Storage
- Capacity: Up to two drives, 2x M.2 SSD
- Type: M.2 2280 SSD up to 2TB. Lenovo officially states that the maximum supported SSD size is 2TB. However, several users have successfully upgraded to 4TB SSD drives.
- Storage Slot: Two M.2 2280 PCIe® 4.0 x4 slots
Battery and Power
- Battery: 99.99Whr with Super Rapid Charge
- 30min Charge 0~70% Capacity
- 80min Charge 0~100% Capacity
- Power Adapter: 330W Slim Adapter, 140W (Type-C™ Power Delivery)
Display
- Size and Resolution: 16″ 3.2k (3200 x 2000) Mini LED
- Features:
- 16:10 aspect ratio
- 165 Hz refresh rate / 3 ms response time
- 100% Adobe RGB, 100% DCI-P3, 100% sRGB
- 1200 nits brightness
- VESA DisplayHDR™ 1000Certified
- Dolby Vision®, Advanced Optimus, NVIDIA® G-SYNC® Support
- TÜV Rheinland® certified
Dimensions and Weight
- Dimensions (W x D x H): 357.7 x 277.7 x 18.9-22.7 mm
- Weight: Approximately 2.6 kg
Keyboard
- Features:
- 1.5mm key travel
- Per-key RGB lighting
- 0.3mm ditch, 100% anti-ghosting
- Switchable set (8 keys caps) with Legion Spectrum RGB Software
Color
- Finish: Carbon Black
Webcam
- Resolution: Built-in FHD Webcam (1080p) with E-Shutter
Connectivity
- Bluetooth: Starting from Bluetooth® 5.3
- WLAN: 2×2 Wi-Fi 7, 2×2 Intel® Wi-Fi 6E (802.11 ax)
Audio
- Speakers: 2 X 2W Harman® Super Linear Speaker System and Smart Amp with Nahimic Audio
I/O Ports
- Left Side:
- 1 X Audio Combo Jack
- 1 X SD Card Reader 3.0
- Right Side:
- 1 X USB Type C (USB 3.2 Gen 1)
- 1 X USB Type A (3.2 Gen 1)
- 1 X eShutter Button
- Rear:
- 1 X DC in
- 1 X USB Type A (USB 3.2 Gen 1, Always On USB 5V2A)
- 2 X Thunderbolt 4 (40Gbps, DisplayPort 1.4, Power Delivery 3.0 140W)
- 1 X HDMI 2.1
- 1 X RJ45
This comprehensive list highlights the cutting-edge features and high-performance capabilities of the Lenovo Legion 9i 16IRX9, making it an ideal choice for gaming and other intensive tasks.
Frequently Asked Questions (FAQs)
1. What should I consider regarding SSD compatibility with the Lenovo Legion 9i?
When selecting an SSD for your Lenovo Legion 9i, ensure it is an M.2 2280 form factor and supports PCIe NVMe Gen4.0 x4. While Lenovo officially supports up to 2TB, users have successfully installed 4TB drives. Always double-check the SSD specifications for compatibility.
2. How do I back up my data before upgrading?
Before starting the upgrade, back up all important files to an external hard drive or cloud storage. This ensures your data is safe in case anything goes wrong during the installation process.
3. What should I do if the new SSD isn’t recognized?
If your SSD isn’t recognized, first ensure it is properly seated in the slot. Enter BIOS by pressing F2 during boot to check if the SSD appears. If not, recheck connections and ensure the SSD is compatible with your system.
4. Are there any warranty implications when upgrading the SSD?
Upgrading the SSD usually doesn’t void the warranty, but it’s essential to check your warranty terms. Keep original parts and perform the upgrade carefully to avoid damage, which could affect warranty claims.
5. What are the common troubleshooting steps if the laptop doesn’t boot after the upgrade?
First, ensure all components are securely connected and the SSD is properly installed. Revisit BIOS settings to confirm the SSD is recognized. If issues persist, try reinstalling the original SSD to see if the problem is with the new drive.
6. Can I install an SSD larger than 2TB?
While Lenovo supports up to 2TB officially, some users have installed 4TB SSDs successfully. Ensure that the SSD is compatible in terms of interface and dimensions before making such upgrades.
Summary
Upgrading the SSD in your Lenovo Legion 9i Gaming Laptop will enhance your computing experience. This upgrade offers significant benefits, including faster boot times, improved performance, and smoother application responsiveness.
By following our step-by-step guide, you can seamlessly transition to a more powerful SSD, unlocking your laptop’s full potential.
Ready to take your Legion 9i to the next level?
Check out our recommended Legion 9i SSD drive on Amazon right now:
WD Black SN850X 2TB PCIe Gen4 NVMe M.2 SSD (WDS200T2X0E)
#LenovoLegion9i #SSDUpgrade #TechTips #GamingLaptop #PerformanceBoost

J.S. is the owner, content creator, and editor at Upgrades-and-Options.com. I’ve worked in the IT and Computer Support field for over 20 years. The server hardware in my computer labs has mostly been IBM, but I’ve supported Dell, HP, and various other hardware. In addition, as part of my lab administrator responsibilities, I’ve learned, supported, and repaired/upgraded network hardware such as Cisco routers and switches. READ FULL BIO >>