Upgrading RAM and SSD in Lenovo K14 Gen3
This blog post will guide you on how to upgrade the RAM and SSD in your Lenovo K14 Gen3, enhancing its performance and providing ample storage space for your needs.
By upgrading these crucial components, you can experience significant improvements in your laptop’s responsiveness and overall capability.
Upgrading the RAM allows for smoother multitasking and faster processing speeds while upgrading the SSD results in quicker boot times, faster application loading, and increased storage capacity for your files and data.
THIS POST MAY CONTAIN AFFILIATE LINKS. As an Amazon Associate, I earn from qualifying purchases. PLEASE READ MY DISCLOSURE FOR MORE INFO.
I. Things to Consider Before You Begin
Before you jump into upgrading the RAM and SSD in your Lenovo K14 Gen3, it’s crucial to consider a few important factors to ensure a smooth and successful upgrade process. Taking the time to address these considerations beforehand can save you potential headaches and ensure you get the most out of your upgraded laptop.
Compatibility:
One of the most critical aspects of upgrading any laptop component is ensuring compatibility. You need to select RAM modules and an SSD that are compatible with your specific Lenovo K14 Gen3 model.
- RAM Type: The Lenovo K14 Gen3 utilizes DDR5-5600 RAM. Dual-channel capable.
- maximum RAM: Capacity of 64GB.
- SSD Specs: M.2 SSDs with a PCIe NVMe interface.
- Interface: Two PCIe NVMe Gen4.0 x4 slots
- Capacity: M.2 2280 SSD up to 2TB.
Warranty: Opening your Lenovo K14 Gen3 laptop and upgrading components may affect your warranty coverage. Lenovo’s warranty terms might vary depending on your region and the specific warranty purchased. It’s crucial to review your warranty documentation or contact Lenovo support for clarification before proceeding with any upgrades.
Data Backup: Upgrading your SSD, especially if you plan to replace the existing drive, involves a risk of data loss. It’s absolutely essential to back up all your important data before starting the upgrade.
This can be done using an external hard drive, cloud storage, or any other reliable backup method. Having a backup ensures you can restore your data in case of any unforeseen issues during the upgrade.
Safety Precautions: Working with electronic components requires taking precautions to prevent electrostatic discharge (ESD) damage.
Following these safety measures is crucial to protect your components and ensure a successful upgrade.
Static-Free Environment: Set up your workspace in a static-free environment, preferably on a non-carpeted surface.
Ground Yourself: Use an anti-static wrist strap connected to a ground point, such as a metal part of your computer case, to discharge any static buildup from your body.
Handle Components Carefully: Avoid touching the gold contacts on RAM modules and SSDs. Hold the components by their edges to minimize the risk of damage.
II. Gathering Your Tools and Materials
Before you begin the upgrade process, gather all the necessary tools and materials to ensure a smooth and efficient workflow. Having everything prepared beforehand will make the upgrade much easier.
Tools Required:
- Precision screwdriver set. Here’s one at Amazon.
- Question: What tools do I need?
- Answer: You’ll need a precision screwdriver set. Any standard set should work, but ensure the screwdriver fits the screws on your laptop.
By gathering all the necessary tools and materials before starting the upgrade, you’ll streamline the process and minimize the risk of delays or complications.
Need to buy some RAM? Consider these from Amazon.com. THIS POST MAY CONTAIN AFFILIATE LINKS. As an Amazon Associate, I earn from qualifying purchases. PLEASE READ MY DISCLOSURE FOR MORE INFO.
III. Step-by-Step Upgrade Guide
Detailed step-by-step guide for replacing the RAM and SSD in the Lenovo K14 Gen3.
A. Lenovo K14 Gen3 RAM Upgrade
- Prepare your workspace: Set up in a clean, well-lit area with a static-free surface. It is generally recommended to ground yourself using an anti-static wrist strap.
- Shut down the computer and disconnect the power adapter: This is crucial to prevent electrical shock and damage to components.
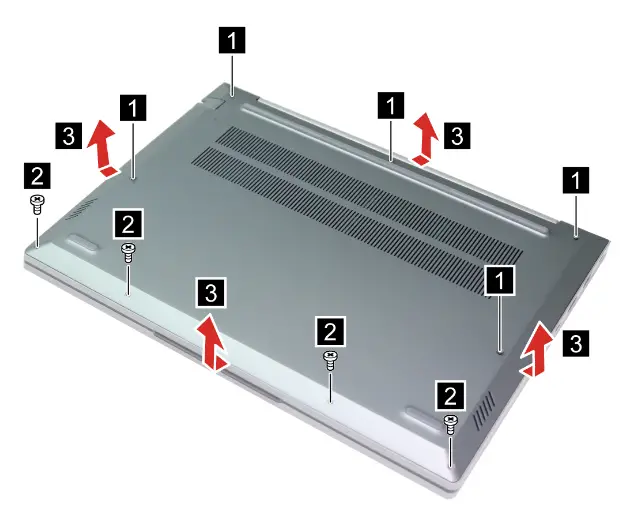
- Remove the lower case:
- Place the laptop upside down on a flat surface.
- Loosen five screws and remove four screws.
- Gently pry up the latches to detach and remove the lower case.
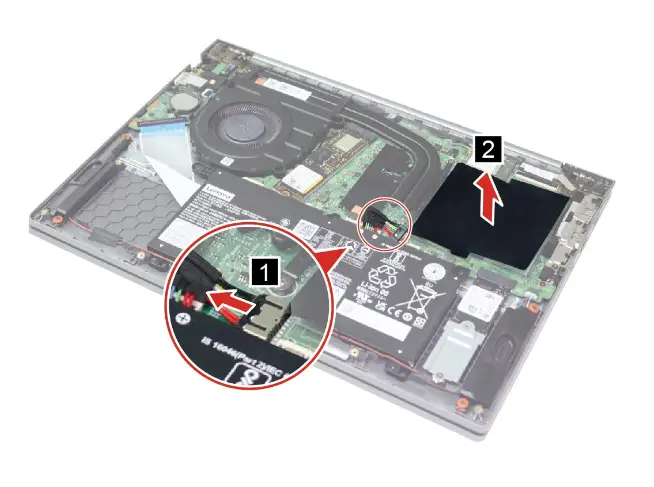
- Disconnect the battery pack cable from the system board.
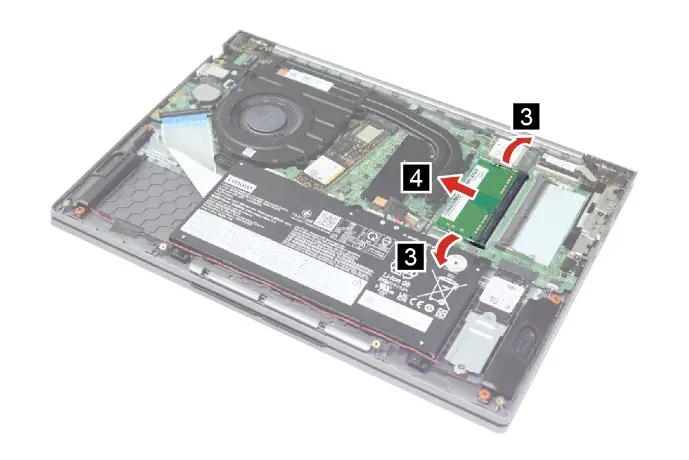
- Locate the RAM slots: The RAM slots will be visible on the motherboard, usually near the fan or heat sink.
- Open the retaining clips: The RAM modules are held in place by clips on either side of the slots. Gently push these clips outward to release the modules.
- Remove the existing RAM modules: The modules should pop up slightly once the clips are released. Carefully pull them out of the slots.
- Install the new RAM modules: Align the notch on the RAM module with the key in the slot. Push down on both ends of the module until it clicks into place. Ensure the retaining clips snap back securely to hold the modules.
- Reassemble the laptop: Replace the lower case, securing it with the screws and ensuring the latches are properly fastened.
- Power on and test: Turn on your laptop and verify that the new RAM is recognized in the system settings (usually under System Information or BIOS settings).
Question: What if the case doesn’t come off easily?
Answer: Double-check that all screws are removed. Gently pry from different edges, but avoid using excessive force.


B. Lenovo K14 Gen3 SSD Upgrade
- Prepare your workspace and tools: Follow the same preparation steps as for the RAM upgrade. You’ll also need the appropriate M.2 screwdriver, usually a Phillips head (size varies).
- Shut down the computer and disconnect the power adapter: As with any component replacement, this is essential for safety and to prevent damage.
- Remove the lower case: Follow the same steps as outlined in the RAM upgrade section.
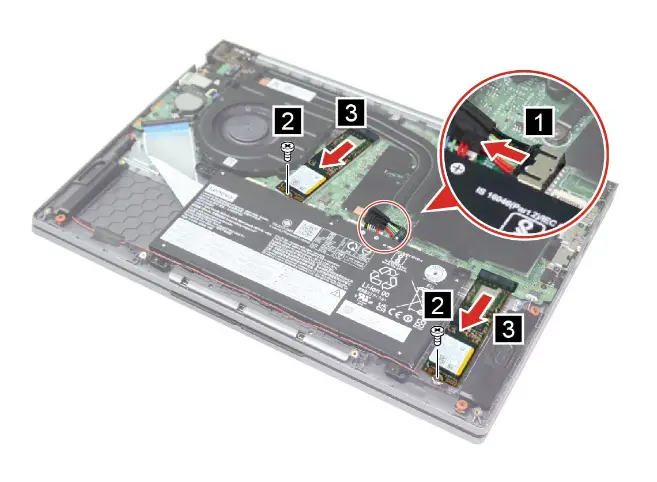
- Locate the SSD slot: The M.2 SSD slot is typically a small, rectangular slot on the motherboard, often labeled. The Lenovo K14 Gen3 can have M.2 SSD slots in sizes 2280 and possibly 2242, but you need to confirm 2242 compatibility.
- Remove the existing SSD (if applicable): If replacing the SSD, remove the screw securing the existing drive and gently pull it out of the slot.
- Install the new SSD: Align the notch on the SSD with the key in the slot and insert it at a slight angle. Push the SSD down and secure it with the screw.
- Reassemble the laptop: Replace the lower case, ensuring all screws and latches are properly secured.
- Install the operating system (if necessary): If you replaced the SSD, you’ll need to install a fresh copy of your operating system. This usually involves booting from a USB drive containing the OS installation files. You may need to consult your operating system’s documentation or support for detailed instructions.
- Restore your data (if applicable): Once the OS is installed, you can restore your backed-up data.
Key Points to Remember:
- Backup Your Data: Before replacing the SSD, back up all your data to an external drive or cloud storage to prevent data loss.

Following these step-by-step instructions and taking the necessary precautions can help you upgrade the RAM and SSD in your Lenovo K14 Gen3 successfully and enjoy improved performance and storage capacity.
Need to buy an SSD? Consider these from Amazon.com. THIS POST MAY CONTAIN AFFILIATE LINKS. As an Amazon Associate, I earn from qualifying purchases. PLEASE READ MY DISCLOSURE FOR MORE INFO.
IV. Lenovo K14 Gen 3 Specifications
Here is a table listing the specifications of the Lenovo K14 Gen 3 laptop:
| Feature | Specifications |
|---|---|
| Processor | Intel® U Series Core Ultra 5 / 7 Processor (Series 1) Specific models: Core Ultra 5 125U, Core Ultra 5 135U, Core Ultra 7 155U, Core Ultra 7 165U |
| Graphics | Intel® Graphics (Integrated, Shared Memory) |
| Operating System | Options include: – Windows® 11 Pro – Windows® 11 Home – Windows® 11 Home Single Language – No preload operating system |
| Memory | – Maximum Memory: Up to 64GB DDR5-5600 – Memory Slots: Two DDR5 SO-DIMM slots (dual-channel capable) |
| Storage | – Support: Up to two drives, 2x M.2 SSD – Storage Slot: Two M.2 slots (one M.2 2280 PCIe® 4.0 x4 slot for factory SSD and one M.2 2280 or 2242 PCIe® NVMe®, PCIe® 4.0 x4 slot for user self-extension) |
| Display | – Size: 14″ – Resolution Options: WUXGA (1920×1200) – Touch Options: None, Multi-touch – Panel Type: IPS – Brightness: 300nits – Aspect Ratio: 16:10 |
| Keyboard | 6-row, spill-resistant, multimedia Fn keys, Copilot key, Backlight options: LED backlight or Non-backlight |
| Touchpad | Buttonless Mylar® surface multi-touch touchpad, supports Precision TouchPad (PTP), 75 x 120 mm (2.95 x 4.72 inches) |
| Camera | Options include: – FHD 1080p + IR hybrid, with privacy shutter, fixed focus – FHD 1080p, with privacy shutter, fixed focus – HD 720p, with privacy shutter, fixed focus |
| Audio | – Audio Chip: High Definition (HD) Audio, Realtek® ALC3287 codec – Speakers: Stereo speakers, 2W x2, Dolby Audio™ – Microphone: Dual-microphone array with smart noise-cancelling |
| Battery | – Options: Integrated Li-Polymer 45Wh battery with Rapid Charge Pro, or Integrated Li-Polymer 60Wh battery with Rapid Charge |
| Power Adapter | Options include: – 65W USB-C® (3-pin) AC adapter, supports PD 3.0, 100-240V, 50-60Hz – 65W USB-C® slim (2-pin, wall-mount) AC adapter, supports PD 3.0, 100-240V, 50-60Hz |
| Ports | – 1x USB-A (USB 5Gbps / USB 3.2 Gen 1) – 1x USB-A (USB 5Gbps / USB 3.2 Gen 1), Always On – 1x USB-C® (USB 10Gbps / USB 3.2 Gen 2), with USB PD 3.1 and DisplayPort™ 1.4 – 1x USB-C® (USB 10Gbps / USB 3.2 Gen 2), with USB PD 3.1 and DisplayPort™ 2.1 – 1x HDMI® 2.1, up to 4K/60Hz – 1x Headphone / microphone combo jack (3.5mm) – 1x Ethernet (RJ-45) – 1x SD card reader |
| Connectivity | – Ethernet: Gigabit Ethernet, 1x RJ-45, supports Wake-on-LAN – WLAN + Bluetooth®: Various options, including Realtek® and Intel® Wi-Fi® 6 and 6E cards with Bluetooth® 5.2 or 5.3 |
| Security & Privacy | – Security Chip: Discrete TPM 2.0, TCG certified – Physical Locks: Kensington® Nano Security Slot™, 2.5 x 6 mm – Fingerprint Reader: Optional, touch style integrated in power button, match-on-chip |
| Dimensions | 313.5 x 224 x 18.9 mm (12.34 x 8.82 x 0.74 inches) |
| Weight | Starting at 1.38 kg (3.04 lbs) |
This table provides a summary of the key specifications.
V. Lenovo K14 Gen3 Post-Upgrade Steps and Tips
After successfully upgrading your Lenovo K14 Gen 3’s RAM and/or SSD, there are a few essential post-upgrade steps and tips to ensure everything is functioning correctly and optimize your system’s performance:
1. Initial Boot and BIOS/UEFI Check
- First Boot Observation: Pay close attention to the initial boot process after the upgrade. Look for any error messages or unusual behavior that might indicate an issue with the newly installed components.
- BIOS/UEFI Confirmation: Access the BIOS/UEFI settings by pressing F1 repeatedly during boot to confirm that the new RAM and SSD are properly recognized. Check the system information section for RAM capacity and the boot order to ensure the new SSD is the primary boot drive if you replaced the original drive.
2. Operating System and Driver Updates
- Windows Update: If you’re running Windows, ensure that you have all the latest operating system updates installed. This includes critical security patches and bug fixes that can enhance system stability and compatibility with your new hardware.
- Driver Updates: Check for the latest drivers for your new RAM and SSD on the manufacturer’s website (e.g., Crucial, Kingston for RAM, Samsung, Western Digital for SSD). Updated drivers can often improve performance and address any compatibility issues. It’s also a good practice to check Lenovo’s support website for any specific drivers related to the RAM or SSD upgrade for your Lenovo K14 Gen3 model.
3. Performance Benchmarking (Optional)
- Performance Tests: Consider running benchmark tests to assess the performance improvement after the upgrade. Various benchmarking software options are available online, and the results can give you insights into the speed and efficiency gains from the new RAM and SSD. This step is optional but can be helpful to quantify the impact of your upgrade.
4. Data Transfer and Backup (SSD Replacement)
- Data Migration: If you replaced the SSD, transfer your backed-up data from the external drive or cloud storage to the new SSD. Ensure that all your essential files, applications, and settings are restored correctly.
- Regular Backups: Going forward, establish a regular backup routine to safeguard your data. Consider using cloud backup services or external drives to keep copies of your important files in case of any unexpected issues.
Additional Tips
- Consult Official Resources: If you encounter any issues or have specific questions, always refer to Lenovo’s official support website, documentation, or contact their customer support for assistance. They can provide the most accurate and up-to-date information tailored to your Lenovo K14 Gen3 model.
- Securely Dispose of Old Components: If you removed and replaced any components, dispose of them responsibly. Check with your local electronics recycling center for proper disposal methods.
Additional Resources
- Visit Lenovo Support for manuals and additional guidance.
- Read my other – Laptop Upgrade Articles. SSD Not Showing Up In Bios Or Windows | Easy Fix
By following these post-upgrade steps and tips, you can ensure that your Lenovo K14 Gen3 is running smoothly and efficiently with its new hardware.
VI. Conclusion
Throughout this guide, we have covered the essential steps and precautions to successfully upgrade the RAM and SSD in your Lenovo K14 Gen3 laptop. From preparing your workspace and tools to post-upgrade tasks, each step is crucial for a smooth and successful upgrade process. Remember to back up your data before starting any hardware replacements and consult official resources if you encounter any issues.
With upgraded RAM and SSD, you can enjoy improved performance and storage capacity on your Lenovo K14 Gen3. No matter what model or brand of laptop you have, it’s always beneficial to upgrade components when possible to extend its lifespan and enhance its capabilities.

J.S. is the owner, content creator, and editor at Upgrades-and-Options.com. I’ve worked in the IT and Computer Support field for over 20 years. The server hardware in my computer labs has mostly been IBM, but I’ve supported Dell, HP, and various other hardware. In addition, as part of my lab administrator responsibilities, I’ve learned, supported, and repaired/upgraded network hardware such as Cisco routers and switches. READ FULL BIO >>


