Upgrade the RAM and SSD drive in your Lenovo Thinkpad X1 Extreme Gen 4 laptop plus check out the specifications of the laptop in this guide.
Is ThinkPad X1 Extreme upgradable?
Yes, upgrading the X1 Extreme Gen 4 laptop including part numbers and instructions is in this article, plus specs.
And if you need a new gaming chair and keyboard for your laptop or are looking for other technical information guides, I’ve got you covered with my other articles.
How To Upgrade The RAM And SSD On
Thinkpad X1 Extreme Gen 4
THIS POST MAY CONTAIN AFFILIATE LINKS. As an Amazon Associate, I earn from qualifying purchases. PLEASE READ MY DISCLOSURE FOR MORE INFO.
How To Upgrade RAM In The X1 Extreme Gen 4
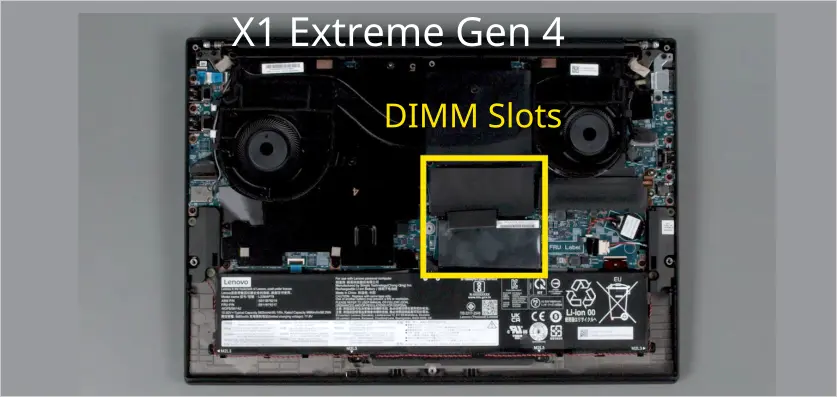
You upgrade the RAM in an X1 Extreme Gen 4 laptop by removing the back cover, locating the two DIMM slots, and adding new memory. You will only need a Philips head screwdriver and a plastic pry tool. See the steps below.
Before performing any work inside the laptop you need to disable the internal battery. This is done by restarting your laptop. When you see the logo screen, immediately press F1 to enter the BIOS/UEFI Setup. From there, select Config ➙ Power. Then select Disable built-in battery and press Enter. Finally, select Yes and the laptop will turn off.
The maximum RAM in the Thinkpad X1 Extreme Gen 4 is 64GB across its two DIMM slots.
The X1 Extreme Gen 4 laptops have two DDR4-3200 SO-DIMM slots and are dual-channel capable. Buy two of the same memory DIMM to take advantage of the dual-channel capability.
Note that Lenovo states the maximum amount of RAM is 64GB, but the 11th gen. Intel processors can handle up to 128GB of memory. The chipset is the Intel WM590 chipset.
What RAM Does The X1 Extreme Gen 4 Use?
Buy DDR4-3200 RAM for the X1 Extreme Gen 4 models. And buy two of them to use the dual-channel capability.
I recommend you buy dual rank(2Rx8) memory. The X1 Extreme does not support XMP, so do not buy XMP RAM.
I’ve listed some compatible RAM below:
RAM Upgrade Steps:
Go into the BIOS/UEFI and disable the battery before upgrading the laptop. Do this by pressing F1 at boot and selecting the ‘power’ section, then selecting Disable built-in battery.
- Make sure the Thinkpad X1 Extreme Gen 4 laptop is turned off and disconnect the A/C adapter.
- Close the laptop display and turn the laptop over.
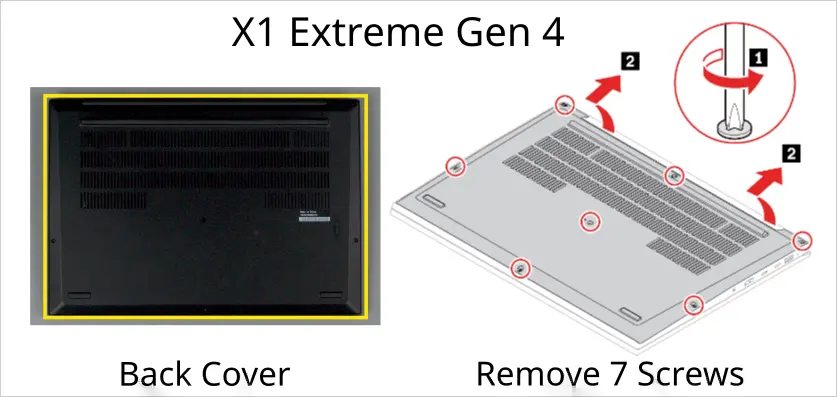
- Remove the 7 screws that secure the back panel in place.
- Carefully pry up the latches holding the back cover in place and remove the back panel. (See diagram)
- The memory modules are in the center of the board and are covered with heat shielding.
- Remove the heat shielding and the current RAM module(s).
- Insert your new RAM module(s) and replace the cover.
Note: Insert the notched end of the memory DIMM into the socket. Press the DIMM in firmly and pivot it down until it snaps into place. Make sure the DIMM is installed firmly in place.
After the RAM upgrade, reenter the BIOS by pressing F1 at boot and verifying the system recognizes the new memory.
How To Upgrade SSD In The X1 Extreme Gen 4 Laptop
Upgrading the X1 Extreme’s SSD drive is a simple process. You will need to purchase an M.2 NVMe PCIe SSD drive and remove the back panel as shown in the steps below.
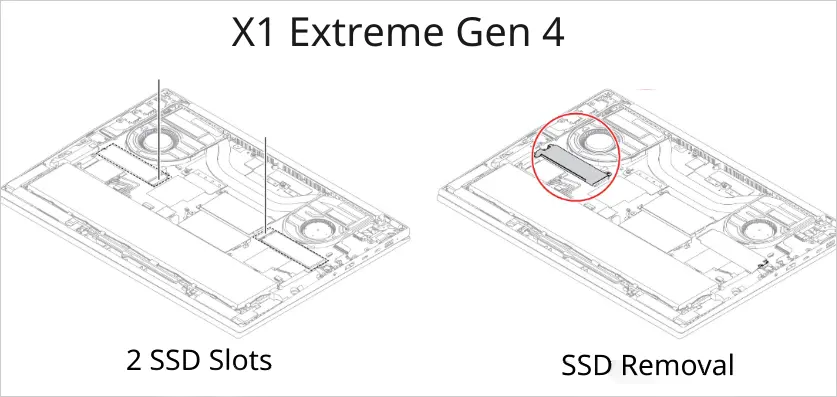
Depending on your model, it will support one or two SSD drives. See the table below for the details.
| X1 Extreme with RTX 3060/3070/3080 graphics | X1 Extreme with Intel UHD Graphics or RTX 3050 Ti graphics |
|---|---|
| one drive, up to 2TB M.2 2280 | up to two drives, 2x 2TB M.2 SSD |
| The right M.2 2280 PCIe is a Gen 4×4 slot | The right M.2 2280 PCIe is a Gen 3×4 slot |
| The left M.2 2280 PCIe is a Gen 4×4 slot |
SSD Upgrade Steps:
The following steps show how to upgrade the SSD drive in your X1 Extreme Gen 4 laptop. Ensure you disable the internal battery prior to removing or replacing any component.
- Make sure the X1 Extreme Gen 4 is turned off and disconnect the A/C adapter.
- Close the display and turn over the laptop.
- Remove the 10 screws that secure the back panel in place.
- Carefully pry up the latches holding the cover in place and remove the back panel. (See diagram above)
- The drive locations are on the lower left and right side of the board, above the main battery. (See diagram below)
- Unscrew 2 screws holding the SSD cover in place and remove it.
- Unscrew the existing drive and add your replacement. You can add an M.2 2280 in either slot.
Keep something in mind: if you do replace your drive, either clone your current drive or re-install the operating system and all your data and programs. Many drives come with software to help you clone your computer.
And if you are having issues with your SSD drive, I have an article I think will help you solve the issues. It goes through a few steps to get it recognized by the laptop.
I listed some compatible SSD drives below.
ADATA 2TB SSD Legend 850 LITE, NVMe PCIe Gen4 x 4 M.2 2280 Internal Solid State Drive, Speed up to 5,000MB/s, Storage for Gaming and PC Upgrades, High Endurance with 3D NAND
Thinkpad X1 Extreme Gen 4 Laptop Specifications
I created a table below listing some of the popular X1 Extreme Gen 4 model types and their specifications for your reference. These are some of the top-selling in the US.
| Model | Processor | Graphics | RAM | SSD |
|---|---|---|---|---|
| 20Y5000WUS | Intel Core i9-11950H | NVIDIA GeForce RTX 3080 16GB GDDR6 | 2x 16GB SO-DIMM DDR4-3200 | 512GB SSD M.2 2280 PCIe 4.0×4 |
| 20Y5000XUS | Intel Core i7-11800H | NVIDIA GeForce RTX 3050 Ti 4GB GDDR6 | 1x 16GB SO-DIMM DDR4-3200 | 512GB SSD M.2 2280 PCIe 4.0×4 |
| 20Y5000VUS | Intel Core i7-11800H | NVIDIA GeForce RTX 3050 Ti 4GB | 16 GB DDR4 3200MHz | 512 GB PCIe SSD Gen 4 |
| 20Y50010US | Intel Core i9-11950H | NVIDIA GeForce RTX 3080 16GB GDDR6 | 2x 16GB SO-DIMM DDR4-3200 | 1TB SSD M.2 2280 PCIe 4.0×4 |
| 20Y50011US | Intel Core i7-11850H | NVIDIA GeForce RTX 3070 8GB GDDR6 | 1x 16GB SO-DIMM DDR4-3200 | 512GB SSD M.2 2280 PCIe 4.0×4 |
| 20Y50012US | Intel Core i7-11800H | NVIDIA GeForce RTX 3050 Ti 4GB GDDR6 | 1x 16GB SO-DIMM DDR4-3200 | 512GB SSD M.2 2280 PCIe 4.0×4 |
| 20Y50013US | Intel Core i7-11850H | NVIDIA GeForce RTX 3070 8GB GDDR6 | 2x 16GB SO-DIMM DDR4-3200 | 512GB SSD M.2 2280 PCIe 4.0×4 |
| 20Y50014US | Intel Core i7-11850H | NVIDIA GeForce RTX 3070 8GB GDDR6 | 1x 16GB SO-DIMM DDR4-3200 | 512GB SSD M.2 2280 PCIe 4.0×4 |
Get a new Thinkpad X1 Extreme Gen 4 laptop directly from Lenovo using my affiliate link:
And if you have questions about this model, I have a whole article covering it.
X1 Extreme Gen 4 Laptop RAM And SSD Upgrade – Summary
This article was all about upgrading the RAM and SSD in your Thinkpad X1 Extreme Gen 4 laptop from Lenovo. Doing these upgrades can boost the performance and storage capacity of your laptop and are well worth considering.
Here are some of my favorite tools
Thank you for checking out my article, I hope you have found it helpful. Below are some tools I recommend that I think you will find useful as well. They are affiliate links where I earn a commission if you do use them. This helps to support this website.