If you’re having Lenovo Touchpad not working issues there are a number of ways you can try to fix the problem.
To fix the Lenovo Touchpad not working issue, we’ll look at the Touchpad properties and settings, the BIOS settings, the driver status, and finally reinstalling the touchpad driver.
Lenovo Touchpad problems can be frustrating but you should be able to get your Lenovo Touchpad working again in no time.
And if you want to know about Lenovo laptops or shop accessories, or other buying guides, I’ve got you covered in my other articles as well.
THIS POST MAY CONTAIN AFFILIATE LINKS. As an Amazon Associate, I earn from qualifying purchases. PLEASE READ MY DISCLOSURE FOR MORE INFO.
How to Fix Touchpad on Lenovo Laptop
If you are having issues, here’s how to fix Lenovo Touchpad or Trackpad problems.
Lenovo Touchpad Not Working? Here’s the Fix.
If you’re having Lenovo Touchpad not working issues there are a number of ways you can try to fix the problem.
- Reboot – The first thing to do is reboot the Lenovo laptop. This often resolves temporary issues.
- Check Settings – Try adjusting the Touchpad settings in the Lenovo tab of the Mouse Properties window in the Control Panel.
- Check the BIOS – Make sure the touchpad is enabled in the BIOS settings.
- Reinstall Driver – The next thing to do is to uninstall the Synaptics driver and then reinstall it. This can be done in the Device Manager.
- Update Driver – Lenovo users can try to update the BIOS and device drivers. This can be done by visiting the Lenovo support website.
1. Reboot Your Lenovo Laptop:
Rebooting your Lenovo laptop is the simplest and often the most effective way to resolve touchpad issues. Follow these detailed steps to ensure a proper reboot:
Save Your Work:
-
- Before restarting, save any open documents, projects, or files to avoid losing any data.
Close Open Applications:
-
- Close all running applications by clicking the ‘X’ button at the top right corner of each window, or by right-clicking on the application icon in the taskbar and selecting ‘Close window’.
Initiate Restart:
-
- Click on the Start Menu (Windows icon) at the bottom left corner of the screen.
- Select the Power button, which is usually found at the bottom of the Start Menu.
- Choose Restart from the list of options.
Wait for Reboot:
-
- Allow the laptop to completely shut down and restart. This process will take a few minutes.
Check Touchpad Functionality:
-
- Once the laptop has restarted, test the touchpad to see if it is functioning correctly. Move your finger across the touchpad surface to confirm that the cursor responds appropriately.
If you have now rebooted your Lenovo laptop but are still experiencing Touchpad issues, continue with the steps below.
2. Check Touchpad Settings:
First, open the Mouse Properties window from the Control Panel. In the Mouse Properties window, click on the Lenovo tab (or similar, depending on your laptop model). From here, you should be able to enable or disable the touchpad, as well as change other touchpad settings.
Next, look at the actual Touchpad settings themselves.
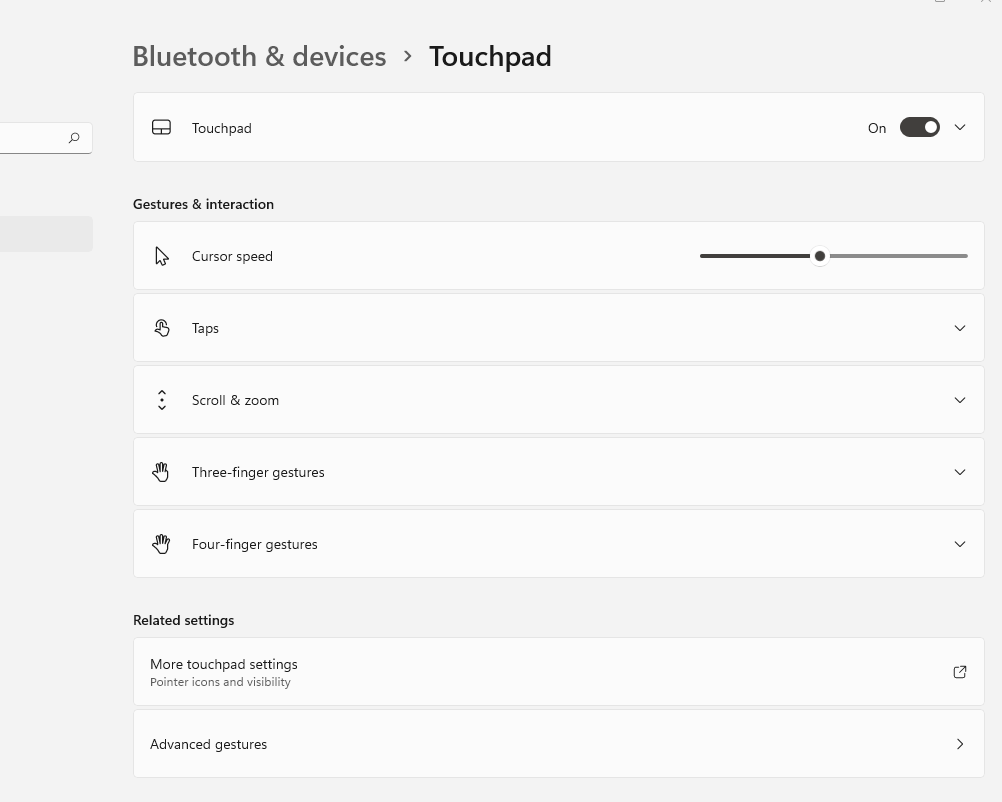
Touchpad Setting in Windows 11:
- Press the Windows key + S and type “Touchpad” to open the Settings window.
- Click on Touchpad and make sure that the “Touchpad” slider is turned On.
- Also, check the “Leave touchpad on when a mouse is connected” is enabled.
Touchpad Settings in Windows 10:
- Press the Windows key + I to open the Settings window.
- Then click on Devices and select Mouse & touchpad from the left-hand menu.
- From here, select the Turn the touchpad on or off option and make sure the Touchpad is set to On. You can change a number of settings, including the touchpad sensitivity as well.
3. Check Touchpad Status in BIOS:
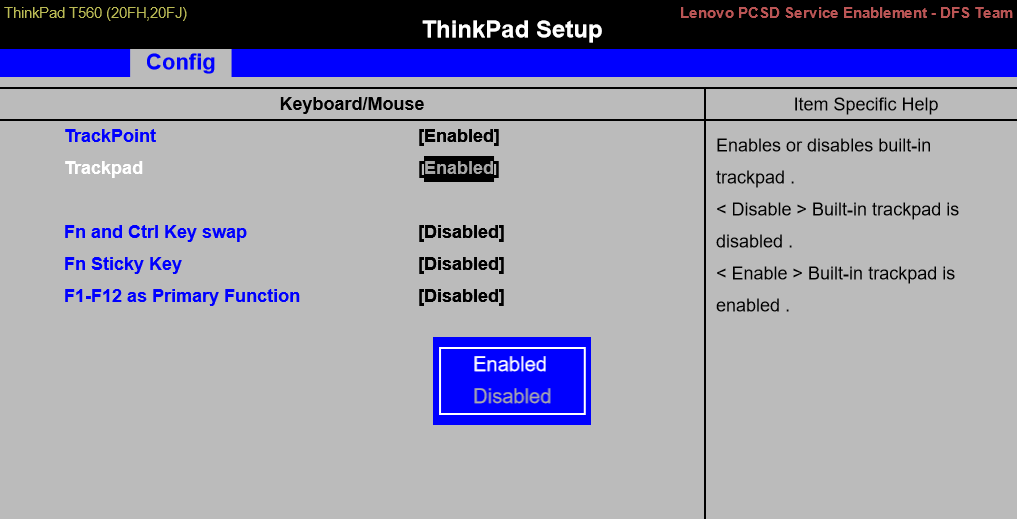
Ensure the Touchpad is enabled in the Lenovo BIOS. To do this:
- Restart the Lenovo laptop and press F1 immediately to enter the BIOS.
- Use the arrow keys on the keyboard to navigate to the Config menu and then Keyboard/Mouse.
- Select TrackPad/TouchPad and ensure the status is set to Enabled.
- Save your changes and exit the BIOS.
4. Reinstall Touchpad Driver:
If the Touchpad settings aren’t the issue, it’s possible that there is a problem with the driver. To fix this, you can try uninstalling and then reinstalling the driver.
- To do this, open the Device Manager (press the Windows key + X and select Device Manager from the menu).
- In the Device Manager, expand the Mice and other pointing devices section. It may be listed under Human Interface Devices as HID-compliant touch pad.
- Right-click on your Lenovo touchpad and select Uninstall from the menu.
Once the driver has been uninstalled, restart your Lenovo laptop. The touchpad driver should now be automatically reinstalled.
5. Update Touchpad Driver:
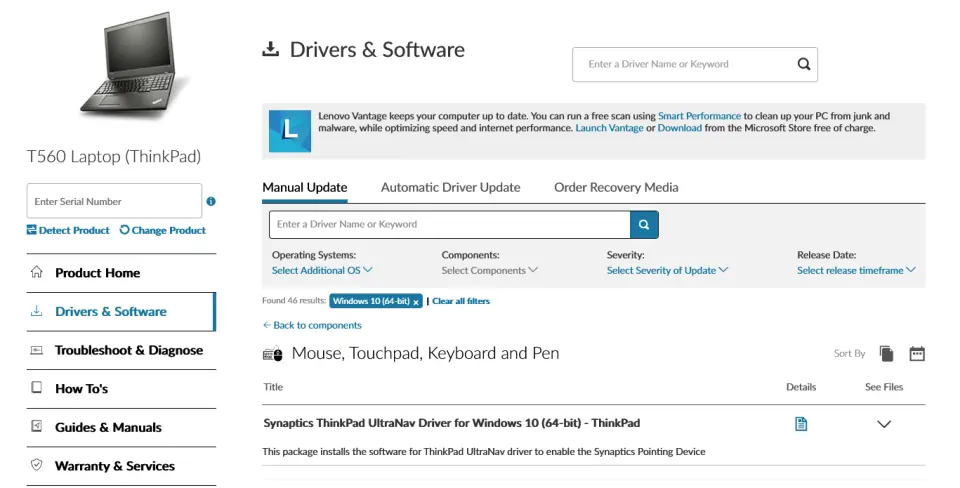
If you are still having issues with the Lenovo touchpad, it’s possible that there is a problem with the driver. Visit the Lenovo support website to download the latest Touchpad device driver(Synaptics ThinkPad UltraNav Driver) and BIOS. These updates can resolve Touchpad issues.
If you have followed all 5 of these steps but the Lenovo Touchpad still does not work, it’s possible that there is a hardware issue. In this case, you may need to contact Lenovo support for further assistance.
Check the status of your Lenovo Warranty to see if your Lenovo laptop is still covered.
ALSO READ: How to Shut Down a Lenovo Laptop
Reseat the Touchpad Hardware Cable
If your laptop is out of warranty and none of the fixes above have resolved your Touchpad problem, you may want to try looking at the hardware which will require you to remove the back panel of the laptop. Opening your laptop is a somewhat advanced procedure and may void your Lenovo warranty if you are still covered.
If you are comfortable opening up your Lenovo laptop, you can try reseating or replacing the Touchpad yourself.
Lenovo Touchpads are usually located just under the palm rest and are easy to remove and replace. Find your Lenovo Hardware Maintenance Manual on Lenovo’s support site and it will show you how to disassemble your Lenovo laptop and replace the Touchpad.
First, try reseating the cable that connects the Touchpad to the motherboard. You can do this by carefully unplugging the cable and then plugging it back in.
If this doesn’t work, you may need to replace the Touchpad itself. Lenovo laptops use either ALPS or Synaptics touchpads. You can try contacting Lenovo support to see if they can sell you a replacement Touchpad.
How to Adjust Touchpad Sensitivity
If you find your Lenovo touchpad is too sensitive or not sensitive enough, you can adjust the sensitivity settings in the Mouse Properties window.
- Open the Mouse Properties window from the Control Panel.
- In the Mouse Properties window, you can adjust the sensitivity and pointer speed of the touchpad as well as enable or disable other touchpad features.
ALSO READ: Should You Leave Your Laptop Plugged In All The Time?
What is a TrackPad vs Touchpad?
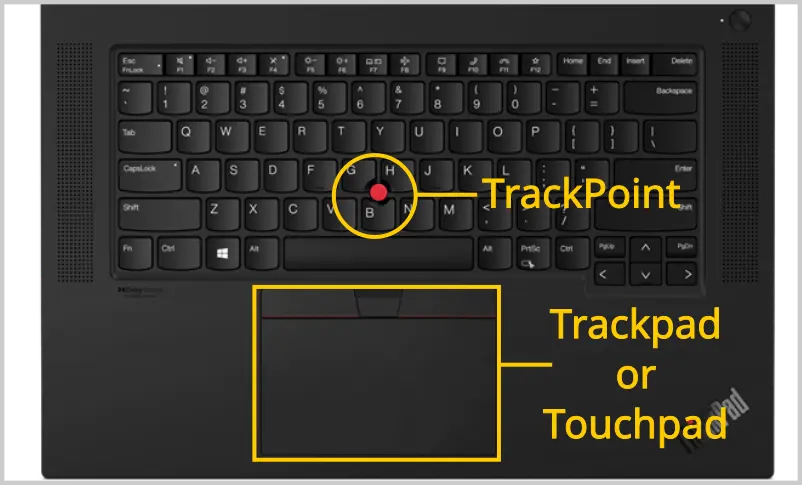
The terms TrackPad and Touchpad are used interchangeably to refer to the built-in pointing device on a laptop. A Touchpad is a pointing device that uses pressure and movement sensors to detect finger gestures. The Touchpad is generally a rectangle with two buttons located below it.
The TrackPad/Touchpad works similarly to a mouse in that you use it to move the cursor around the screen. However, the TrackPad does not have a separate mouse button; instead, you use the buttons below the Touchpad or built-in buttons on the Touchpad itself.
What is a TrackPoint?
A TrackPoint is a pointing device consisting of a small eraser-head-like button on the keyboard. Lenovo laptops often have a TrackPoint in addition to a touchpad. IBM originally developed the TrackPoint and Lenovo has continued to use the TrackPoint on its ThinkPad laptops.
The TrackPoint is used to move the mouse cursor without having to take your hand off of the keyboard. To use the TrackPoint, simply press down on the button and move the mouse in the direction you want to go.
ALSO READ: Lenovo Laptop Keyboard Not Working? (Steps To Fix)
FAQs – Lenovo Touchpad Not Working
This is the TrackPoint button and is used to control the mouse cursor around the screen.
The vast majority of people are right-handed, so it’s considered more ergonomic to have the touchpad off to the left side. And, some people tend to use the touchpad with their right thumb, so it’s more comfortable to have the touchpad on the left side of the keyboard.
There are a few ways to disable the Touchpad on a Lenovo laptop. The most common way is to disable the Touchpad in the Mouse Properties window in the Device Manager. Some Lenovo laptops can disable or enable the touchpad with the Fn + F6 key. If you want to completely disable the Touchpad, you can also do so from the BIOS Setup Utility.
On Windows 11 go to Settings > Bluetooth&Devices > Mouse.
Click on TrackPoint Settings.
Enable or disable the TrackPoint as well as assign the middle button to scrolling.
Uninstalling the mouse from the Device Manager along with the ELAN TrackPoint device and rebooting to allow Windows to reinstall the drivers should fix the issue.

J.S. is the owner, content creator, and editor at Upgrades-and-Options.com. I’ve worked in the IT and Computer Support field for over 20 years. The server hardware in my computer labs has mostly been IBM, but I’ve supported Dell, HP, and various other hardware. In addition, as part of my lab administrator responsibilities, I’ve learned, supported, and repaired/upgraded network hardware such as Cisco routers and switches. READ FULL BIO >>
Cool new displays, accessories, and other gear from Lenovo:
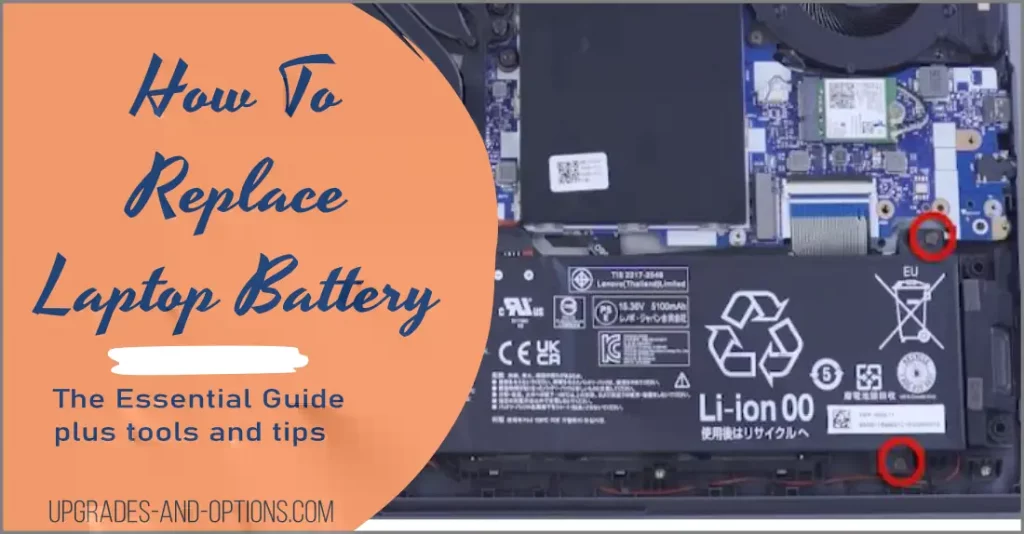
- How to Replace Your Laptop Battery: A Step-by-Step GuideLaptop battery not lasting as long? Replacement may be needed. Before we jump into the process, it is essential to mention that you will require some tools. You’ll need a screwdriver (or two), a new laptop battery (make sure you get the right one), and a clean workspace. THIS POST MAY CONTAIN AFFILIATE LINKS. As an Amazon Associate, I earn from qualifying purchases. PLEASE READ… Read more: How to Replace Your Laptop Battery: A Step-by-Step Guide
- Shut Down a Lenovo Laptop: Quick and EasyThis article explains all the ways you can shut down your Lenovo laptop. I know a lot of people are having difficulty powering off their Lenovo machines for different reasons. After doing some research, I found several ways to shut it down correctly. Hopefully, this article can help others who are also experiencing similar issues with their laptops. In this blog post, we will walk… Read more: Shut Down a Lenovo Laptop: Quick and Easy
- Why Is My Computer So Slow? Ways to Fix It Now!A slow computer is a common frustration, but thankfully, there are several steps you can take to identify and fix the problem. A computer’s speed is largely determined by three key components: Here are some follow-up questions you might have: Quick Fixes for an Instant Speed Boost Restart Your PC Restarting your computer clears the RAM and closes all programs, providing a clean slate for… Read more: Why Is My Computer So Slow? Ways to Fix It Now!
- Connecting Your AirPods to Your Windows LaptopThis blog post is your comprehensive guide to pairing your AirPods with a Windows laptop. While the process is usually straightforward, we’ll focus on Windows 11, which presents unique challenges, particularly with AirPods Pro. We’ll provide clear, step-by-step instructions, complete with screenshots, to help you successfully connect your AirPods and troubleshoot any problems you might encounter. Standard Pairing Process for Windows 11 Step 1: Enable… Read more: Connecting Your AirPods to Your Windows Laptop
- How to Easily Update Realtek 802.11 N WLAN Adapter Drivers for Seamless ConnectivityKeeping your Realtek 802.11 N WLAN adapter drivers up-to-date is crucial for maintaining optimal wireless connectivity and performance. This guide provides detailed steps for updating these drivers, with specific tips for Lenovo laptop users. Why Update Your Drivers? Updating your Realtek Wireless LAN driver can resolve several issues, such as: Two Methods for Updating Drivers 1. Manually Downloading and Installing This method is best suited… Read more: How to Easily Update Realtek 802.11 N WLAN Adapter Drivers for Seamless Connectivity

